

FAQ
A focused answer library for system, connectivity, music & streaming, and other guides. Search by model or keyword, then narrow by topic.
All frequently asked questions
General Guide
SFP Usage and Connection Guide for Eversolo Devices
SFP Usage and Connection Guide for Eversolo Devices
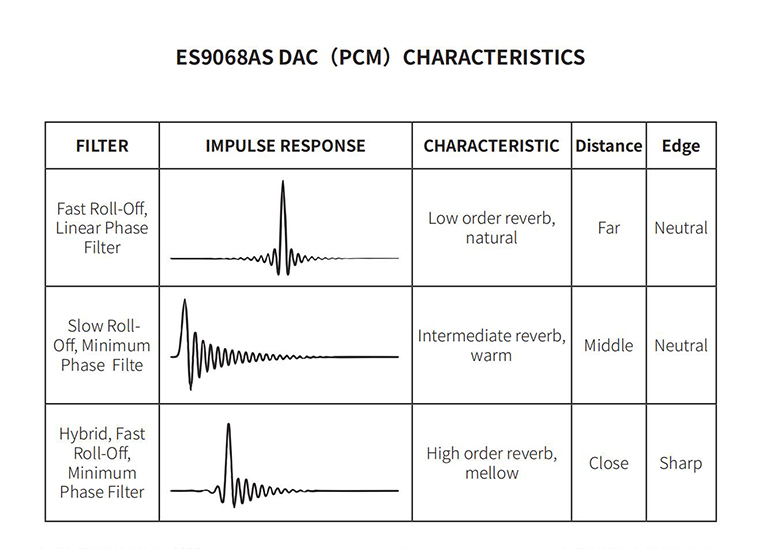
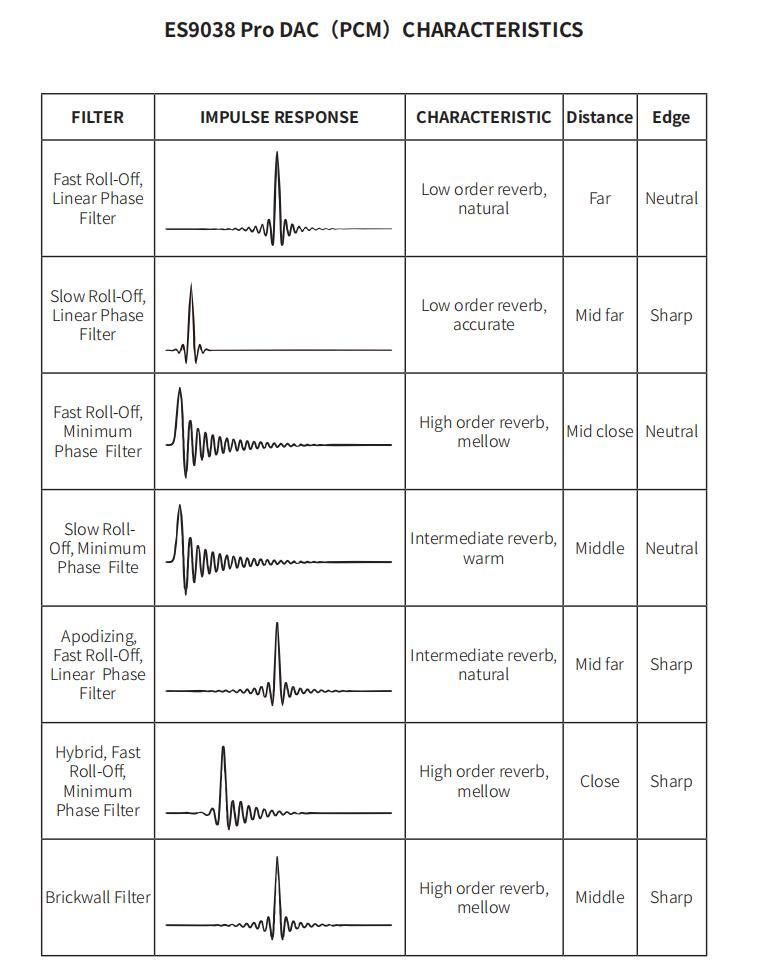
Eversolo DAC(PCM) Filters
Eversolo DAC(PCM) Filters
Eversolo Streamers File Management User Guide
Eversolo Streamers File Management User Guide
Music & Streaming
Spotify Lossless Playback Guide for Eversolo Devices
Spotify Lossless Playback Guide for Eversolo Devices
Eversolo Streamers CD Playback and Ripping
Eversolo Streamers CD Playback and Ripping
How to install and configure Roon with Eversolo Streamer
How to install and configure Roon with Eversolo Streamer
Eversolo Streamers Song Transfer Tutorial
Eversolo Streamers Song Transfer Tutorial
Eversolo DMP-A6 Music Apps Online Upgrade Tutorial
Eversolo DMP-A6 Music Apps Online Upgrade Tutorial
Note: DMP-A6 needs to be connected to the network via WiFi or Ethernet and must have normal access to the wide area network (WAN)!!!
1. Go to the Streaming menu on the DMP-A6 main interface, and scroll down to the Music Apps option.
2. Eversolo will periodically release new versions of the music apps. When a new version is pushed for the installed app, a red update icon will appear in the upper right corner. You can simply click on the red icon, and the app will update automatically. Please wait a moment for the update to complete.
Eversolo Streamers Music Library User Guide
Eversolo Streamers Music Library User Guide
Eversolo Tidal Connect Guide
Eversolo Tidal Connect Guide
Connectivity
How to Connect Eversolo DACs with Mobile Phone via Bluetooth?
How to Connect Eversolo DACs with Mobile Phone via Bluetooth?
1. Download Eversolo Mobile Controller App
Android: https://dl.eversolo.com/dac/app/eversolo_control.apk
Note: It is compatible with Android 4.1 and above, we can also copy and open the link on browser of mobile phone.
IOS: https://apps.apple.com/cn/app/eversolo-control/id1630016931
Note: The APP can also be downloaded by searching "eversolo" in Apple Store.
2. How to pair Eversolo Mobile Controller App with DACs?
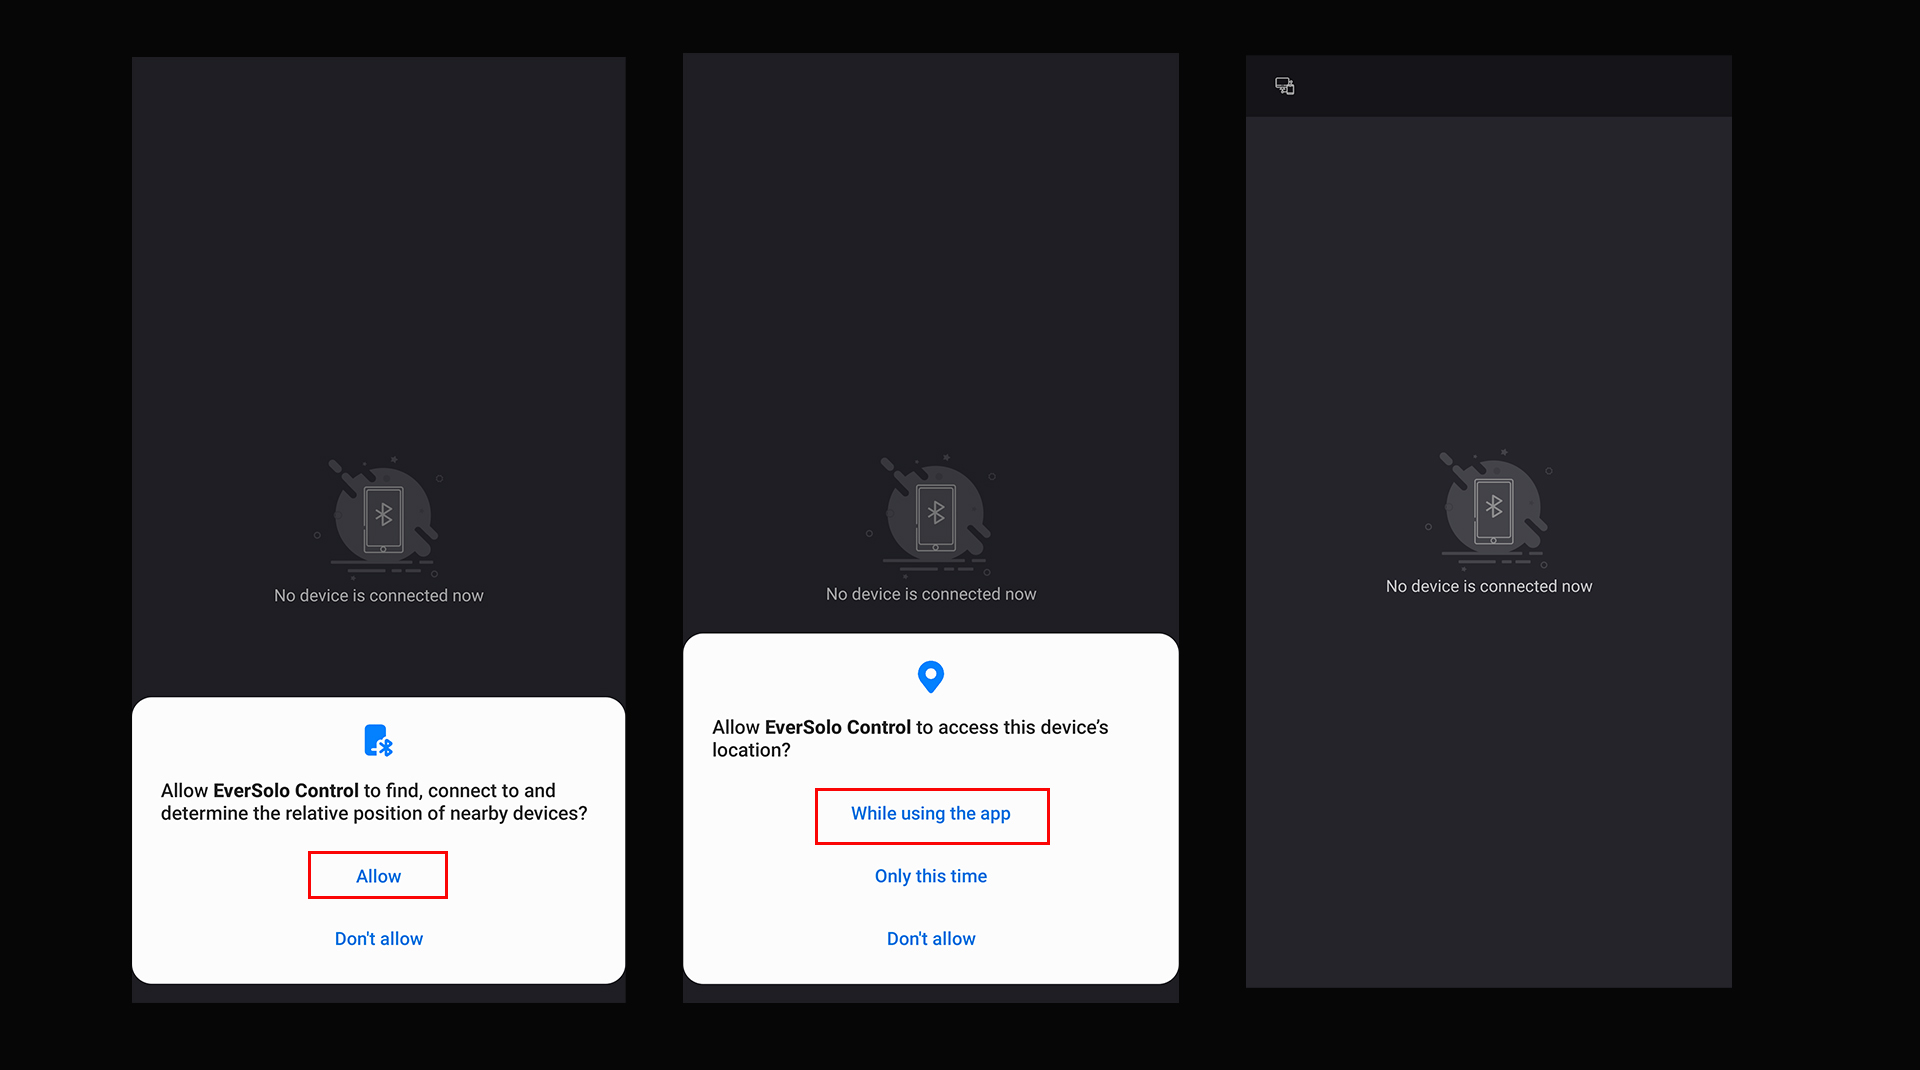
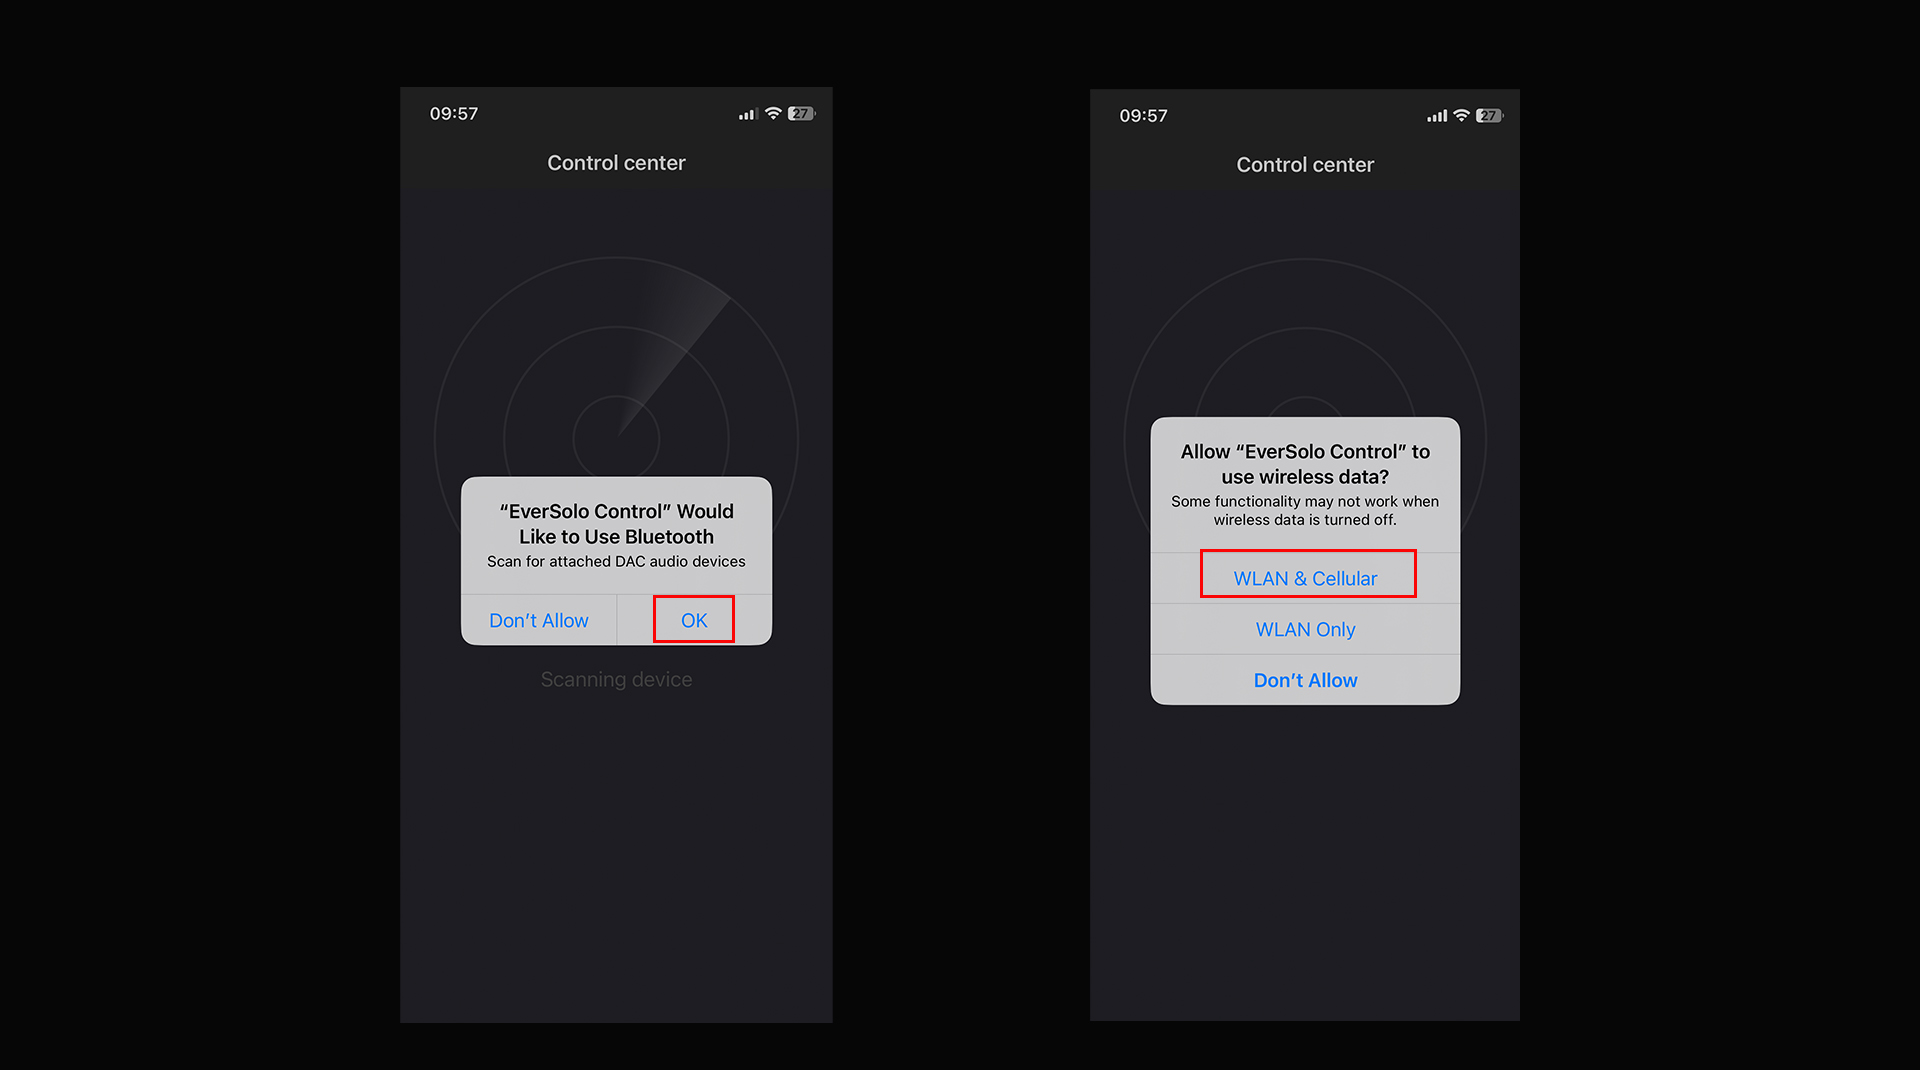
2.1 Allow corresponding permissions to Eversolo Controller App.
Android: Allow Bluetooth and location permissions.
IOS: Allow Bluetooth and WLAN&Cellular permissions.
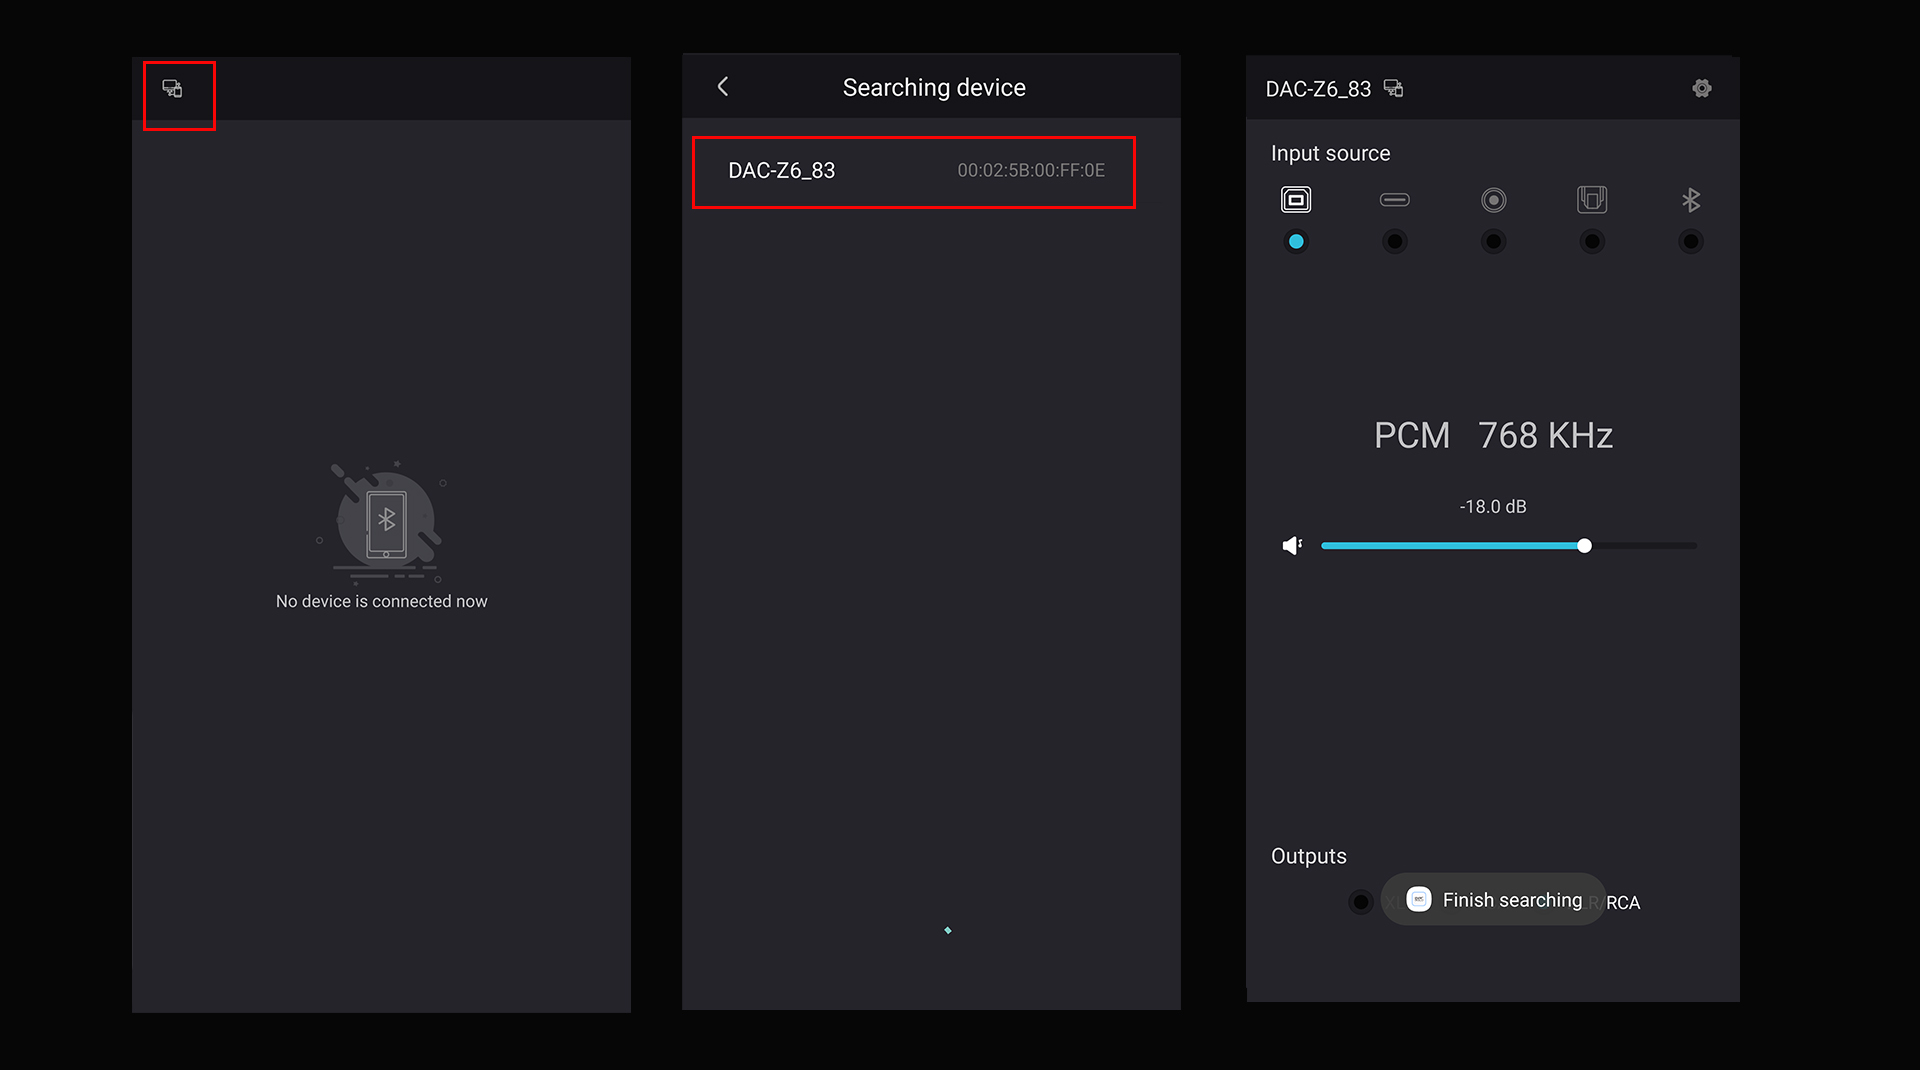
2.2 Search and find Eversolo DACs on Android phones.
Note: Make sure the antenna on the rear panel of Eversolo DACs are installed.
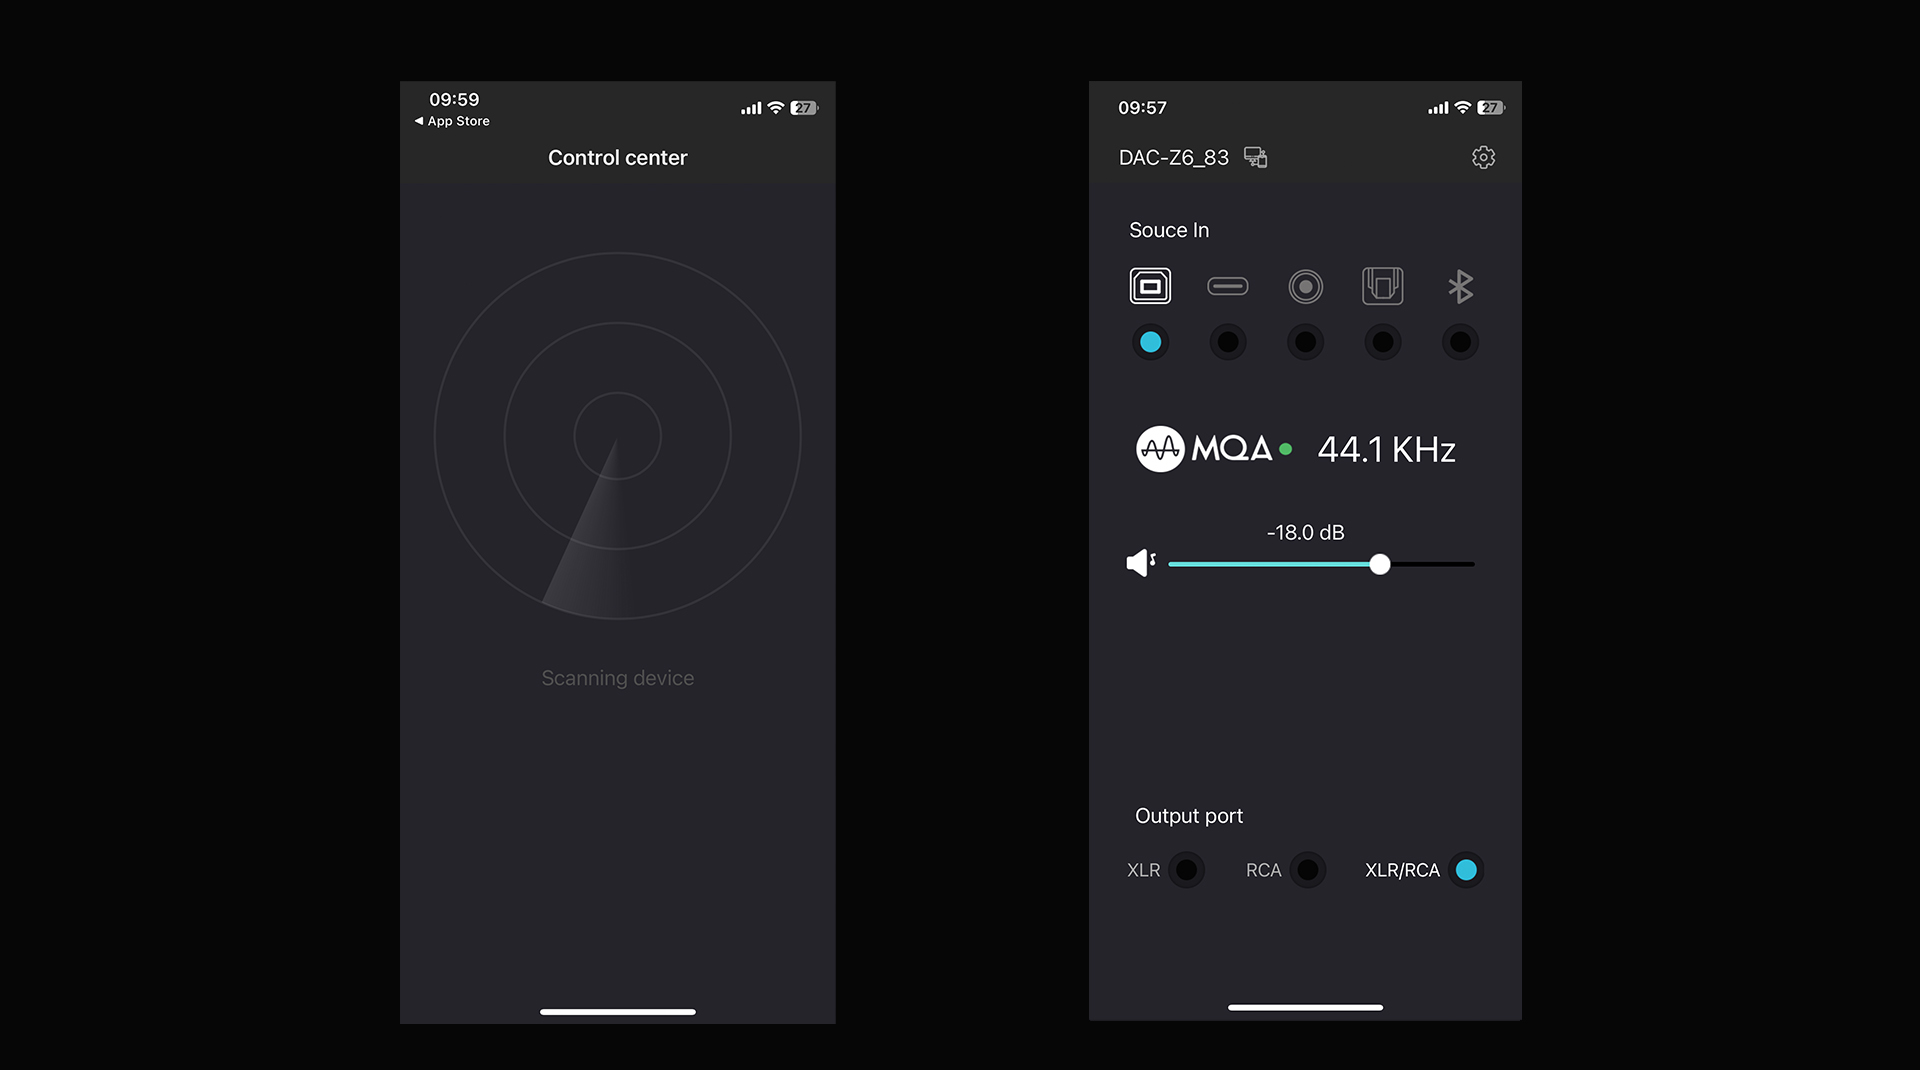
2.3 iPhone will search and connect DAC automatically.
3. Functions introduction of Eversolo Controller APP
The home page of Eversolo controller will display the audio format and sampling rate.
Meanwhile, we can adjust and switch the input source, volume and output port on the home page.
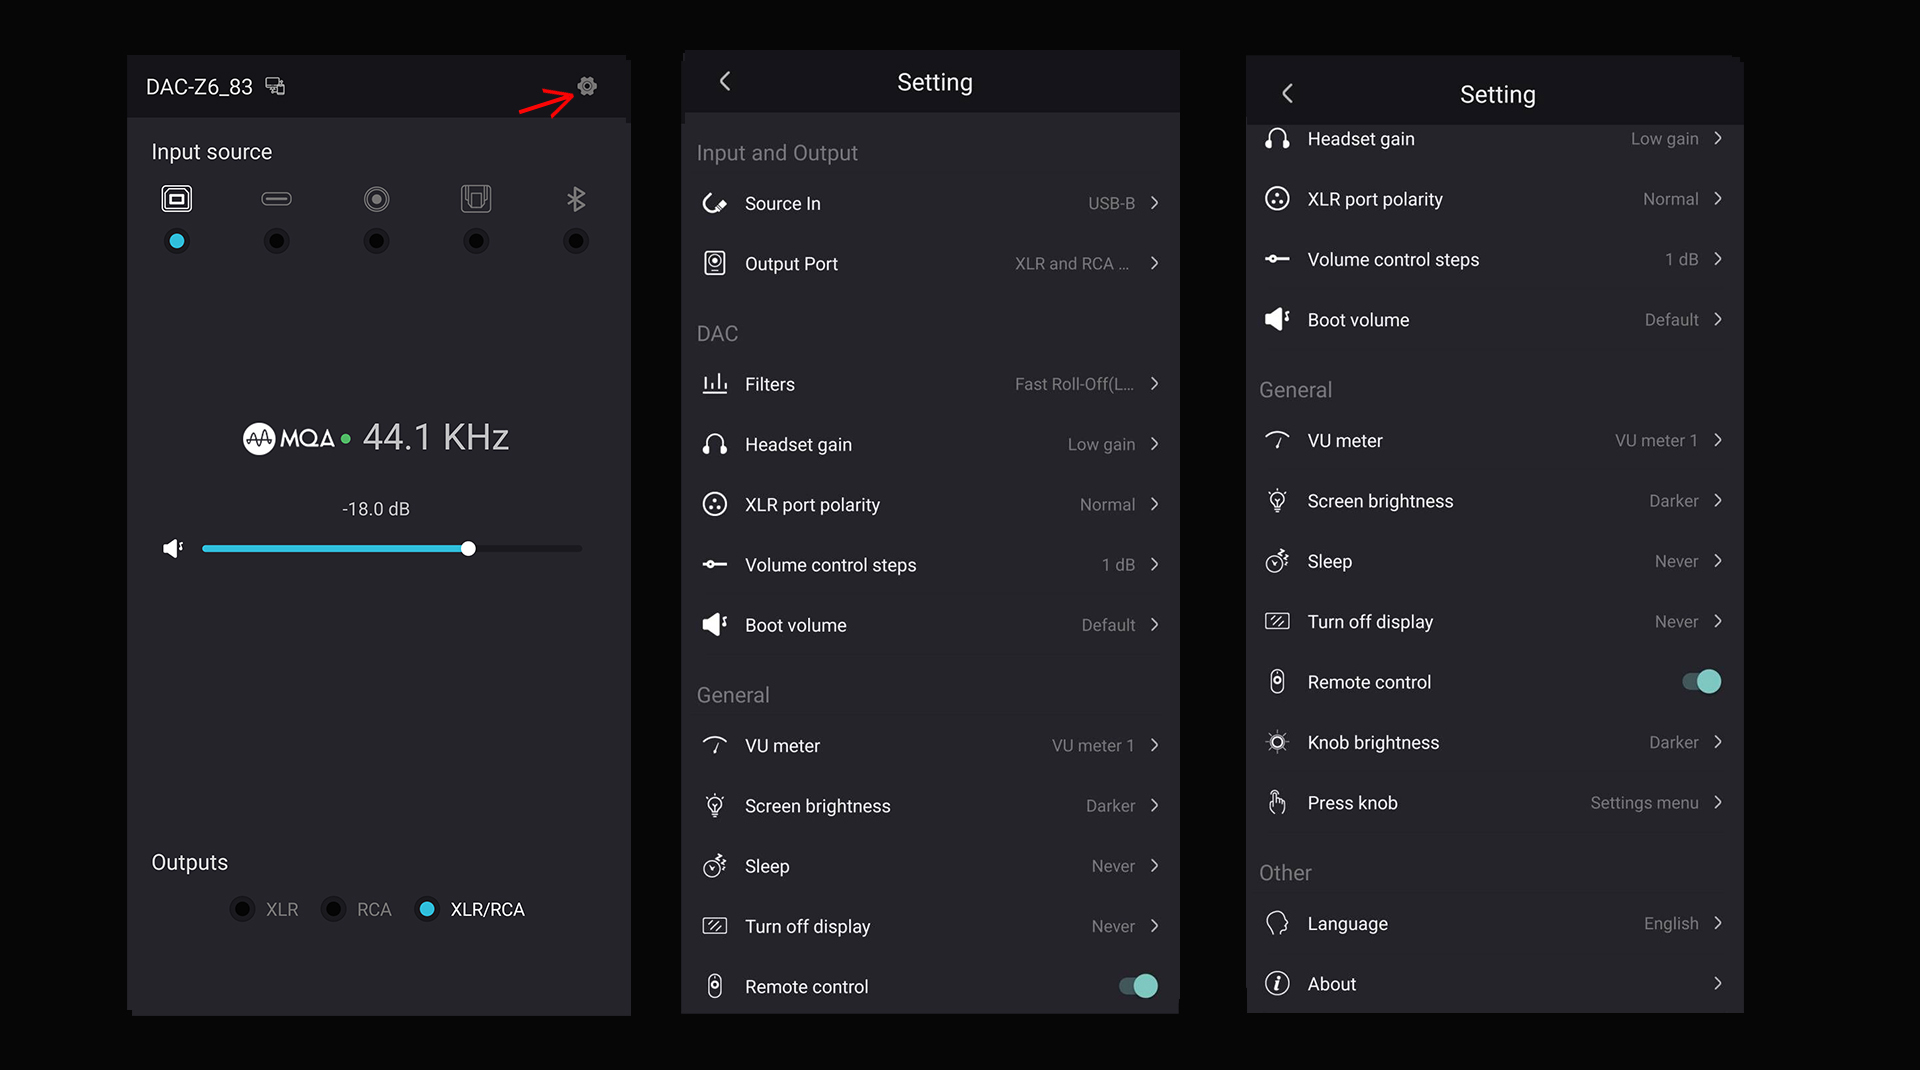
More settings can be found by clicking the gear icon on the upper right corner.
Eversolo DACs and Zidoo Media Players Connection Tutorial
Eversolo DACs and Zidoo Media Players Connection Tutorial
User Guide for Connection Between Eversolo Decoder and Zidoo Media Player
This tutorial is applicable for DAC-Z6 and DAC-Z8
Preparation
1,An Eversolo decoder
2,A Zidoo Media Player( RTD1619DR products)
3,A USB A-B audio cable(included in standard accessory)
Eversolo decoder connection and settings
1, Decoder and Zidoo connection
1.1 Use the standard USB A to B type square audio cable to connect any USB port of the Zidoo with the USB-B audio input port at the end of the decoder.

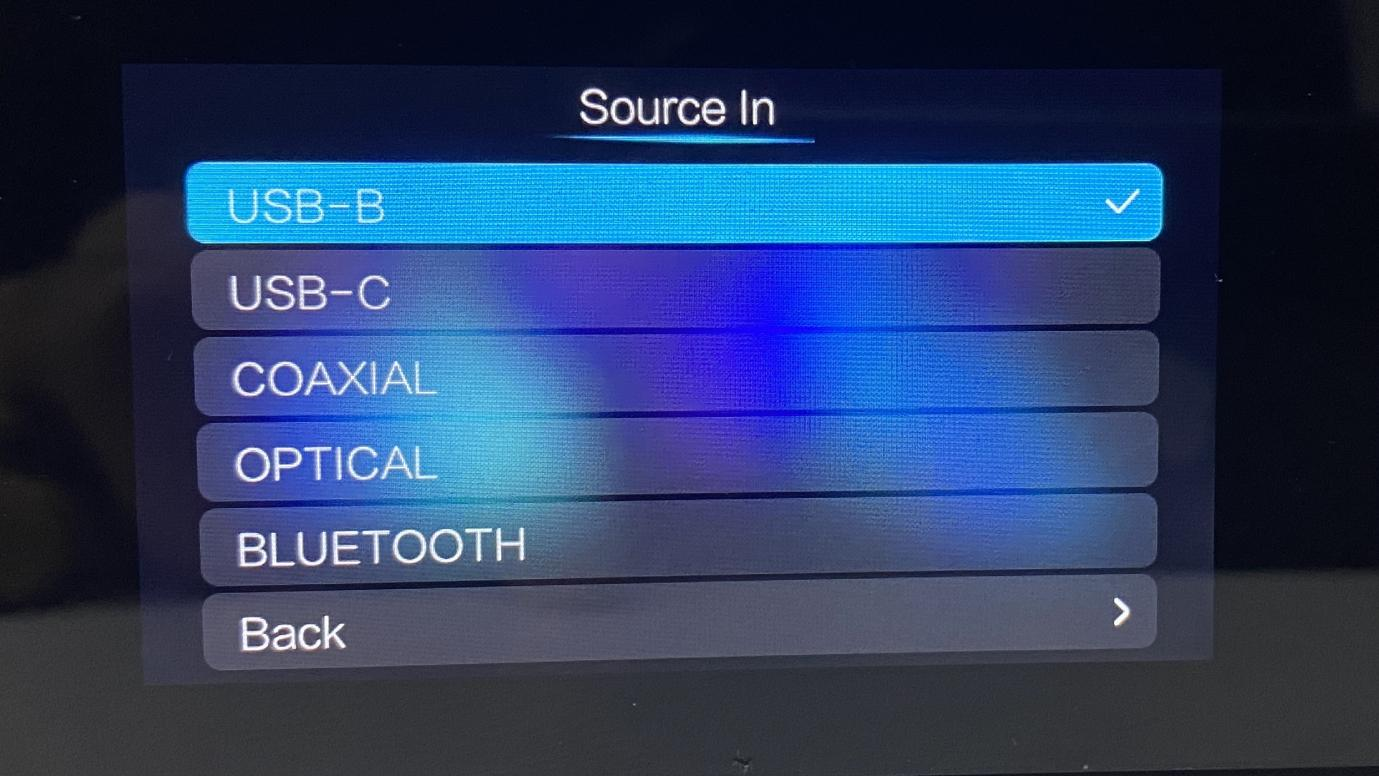
2, Eversolo decoder audio source setting
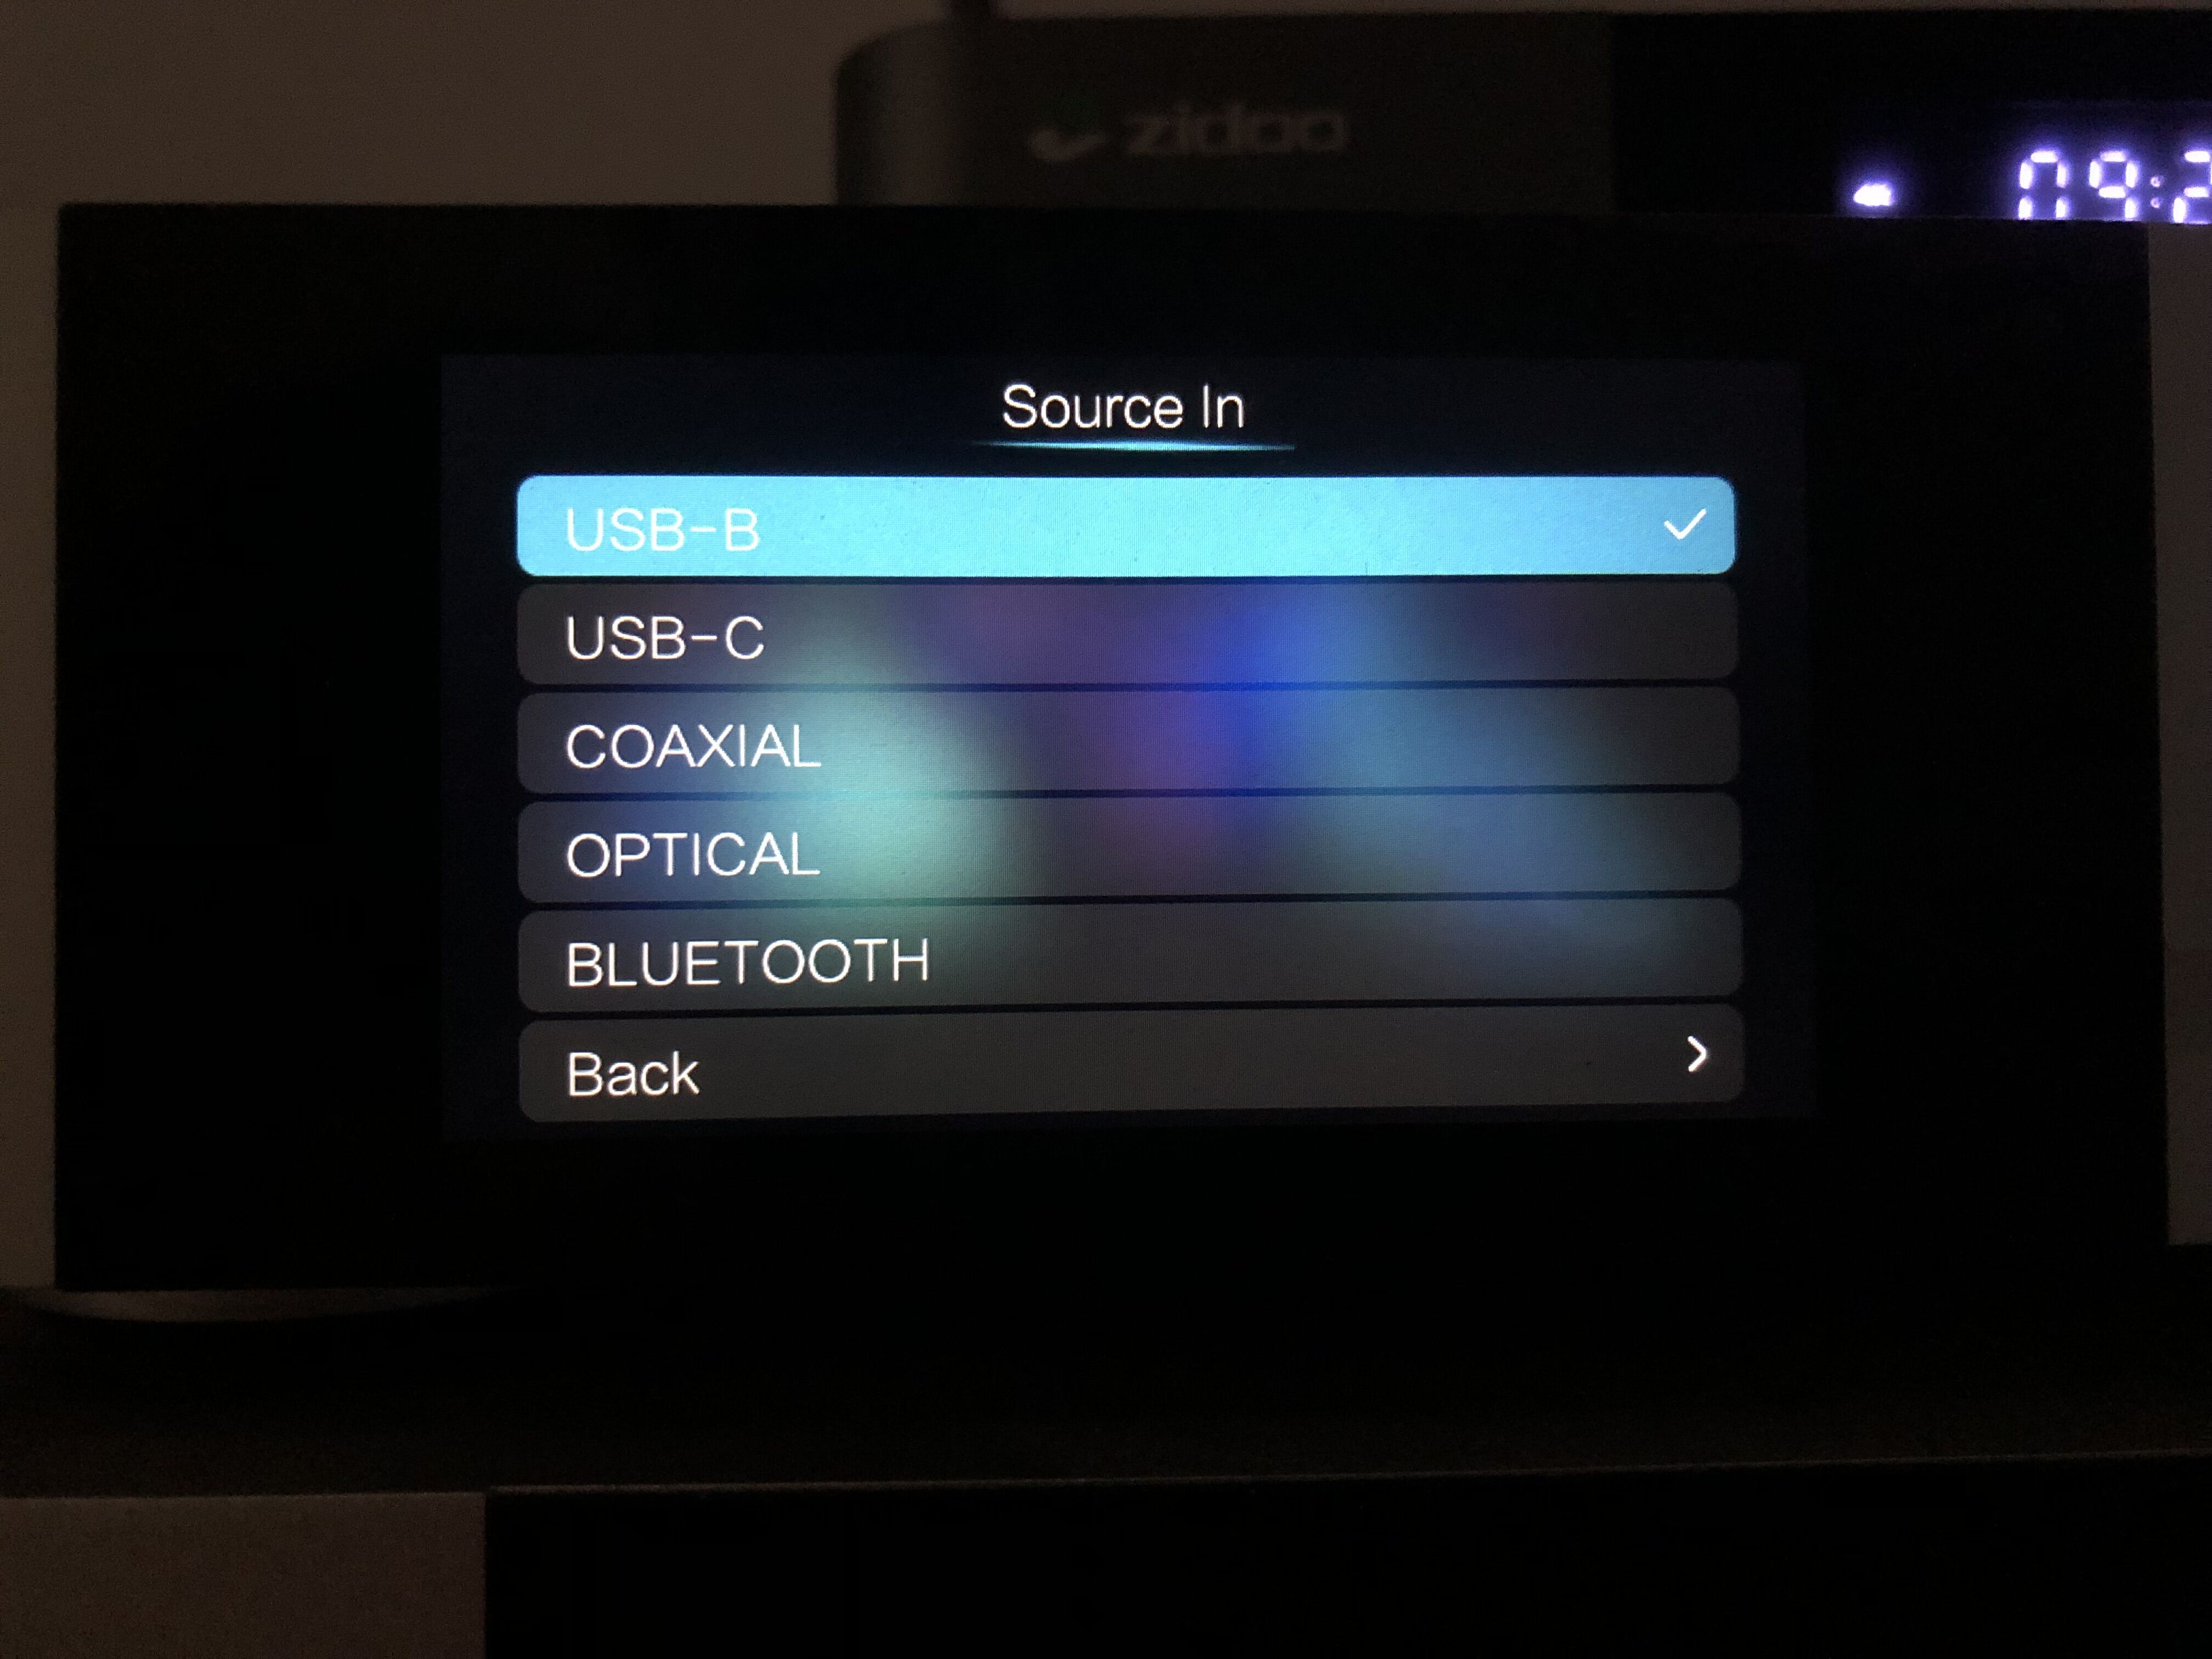
2.1 Tap the knob of decoder to enter the Setting > Source In , set it to USB-B.
2.2 After the Zidoo player is turned on, it will automatically recognize the connected decoder and pop up the following prompt, please click “Open Now”.
Warm Tip: Zidoo automatic identification function requires firmware v6.4.42|v6.7.42 or above!!!
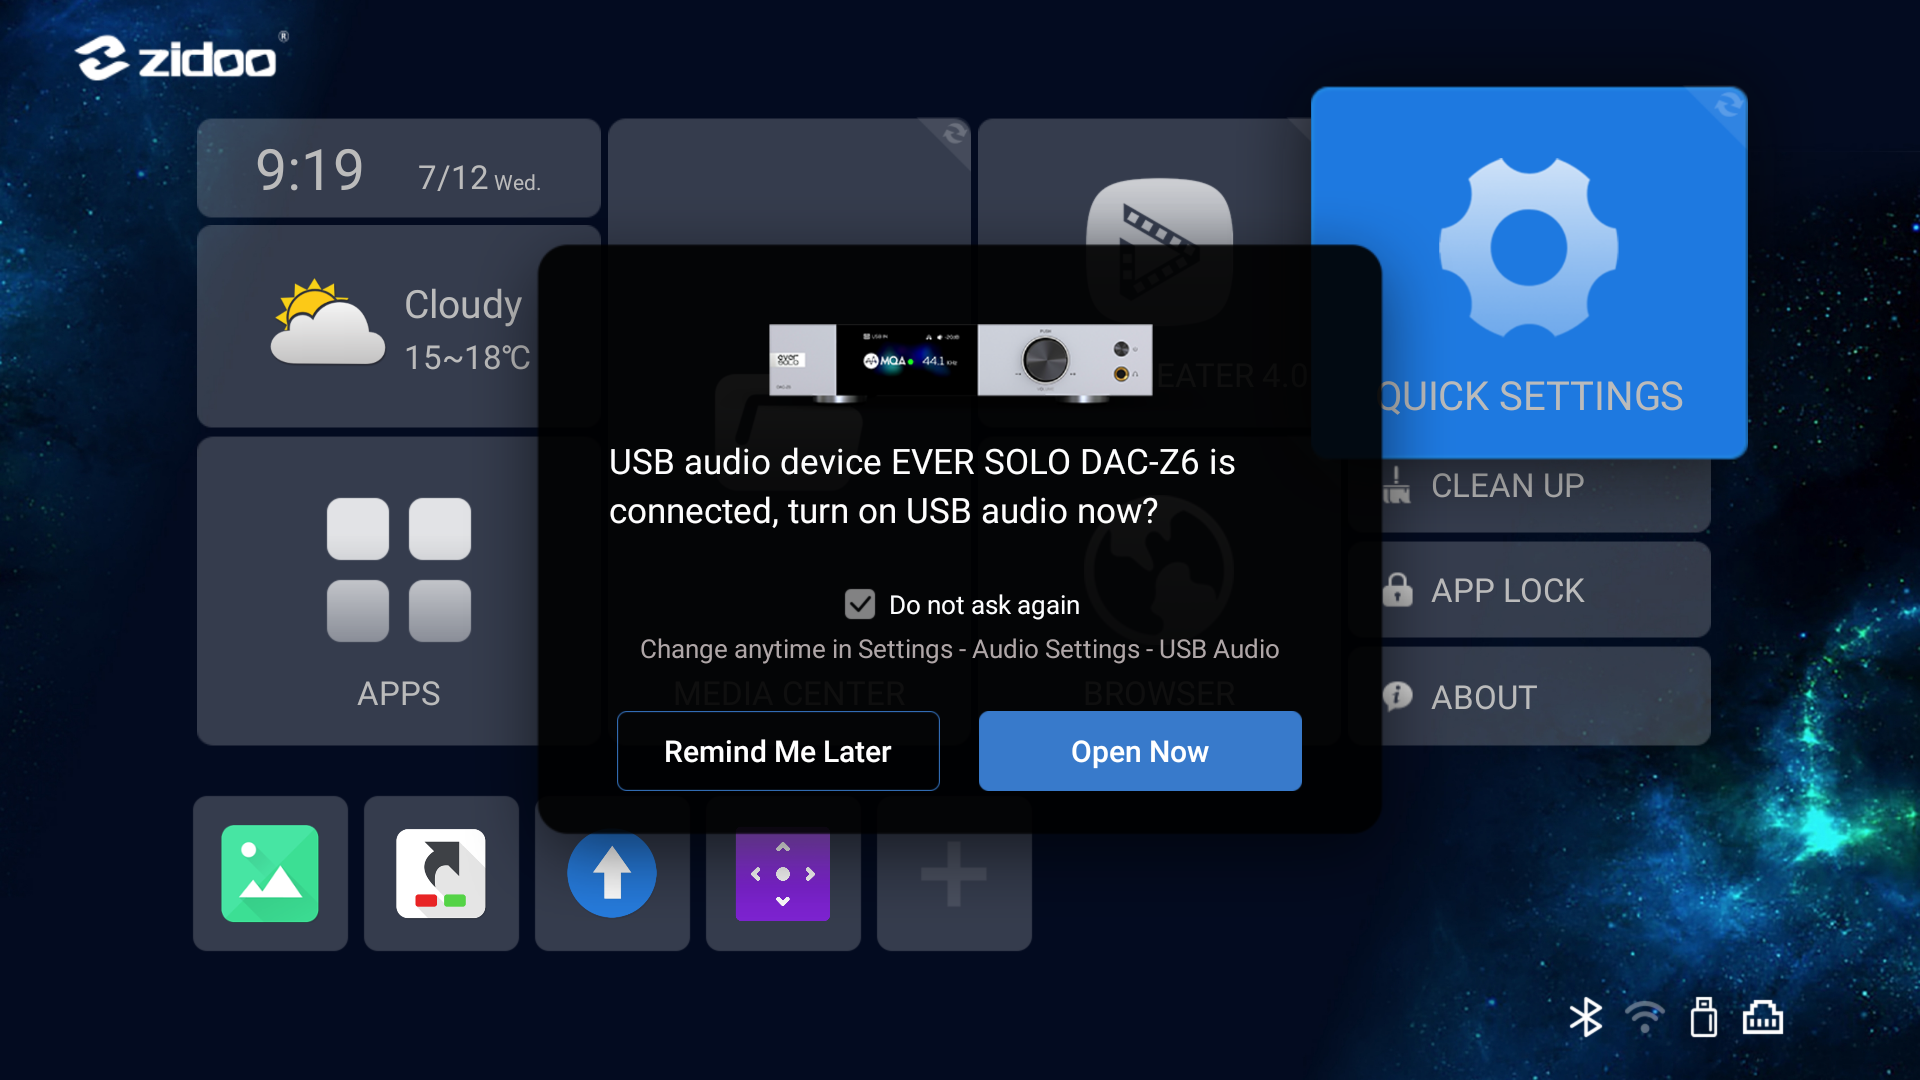
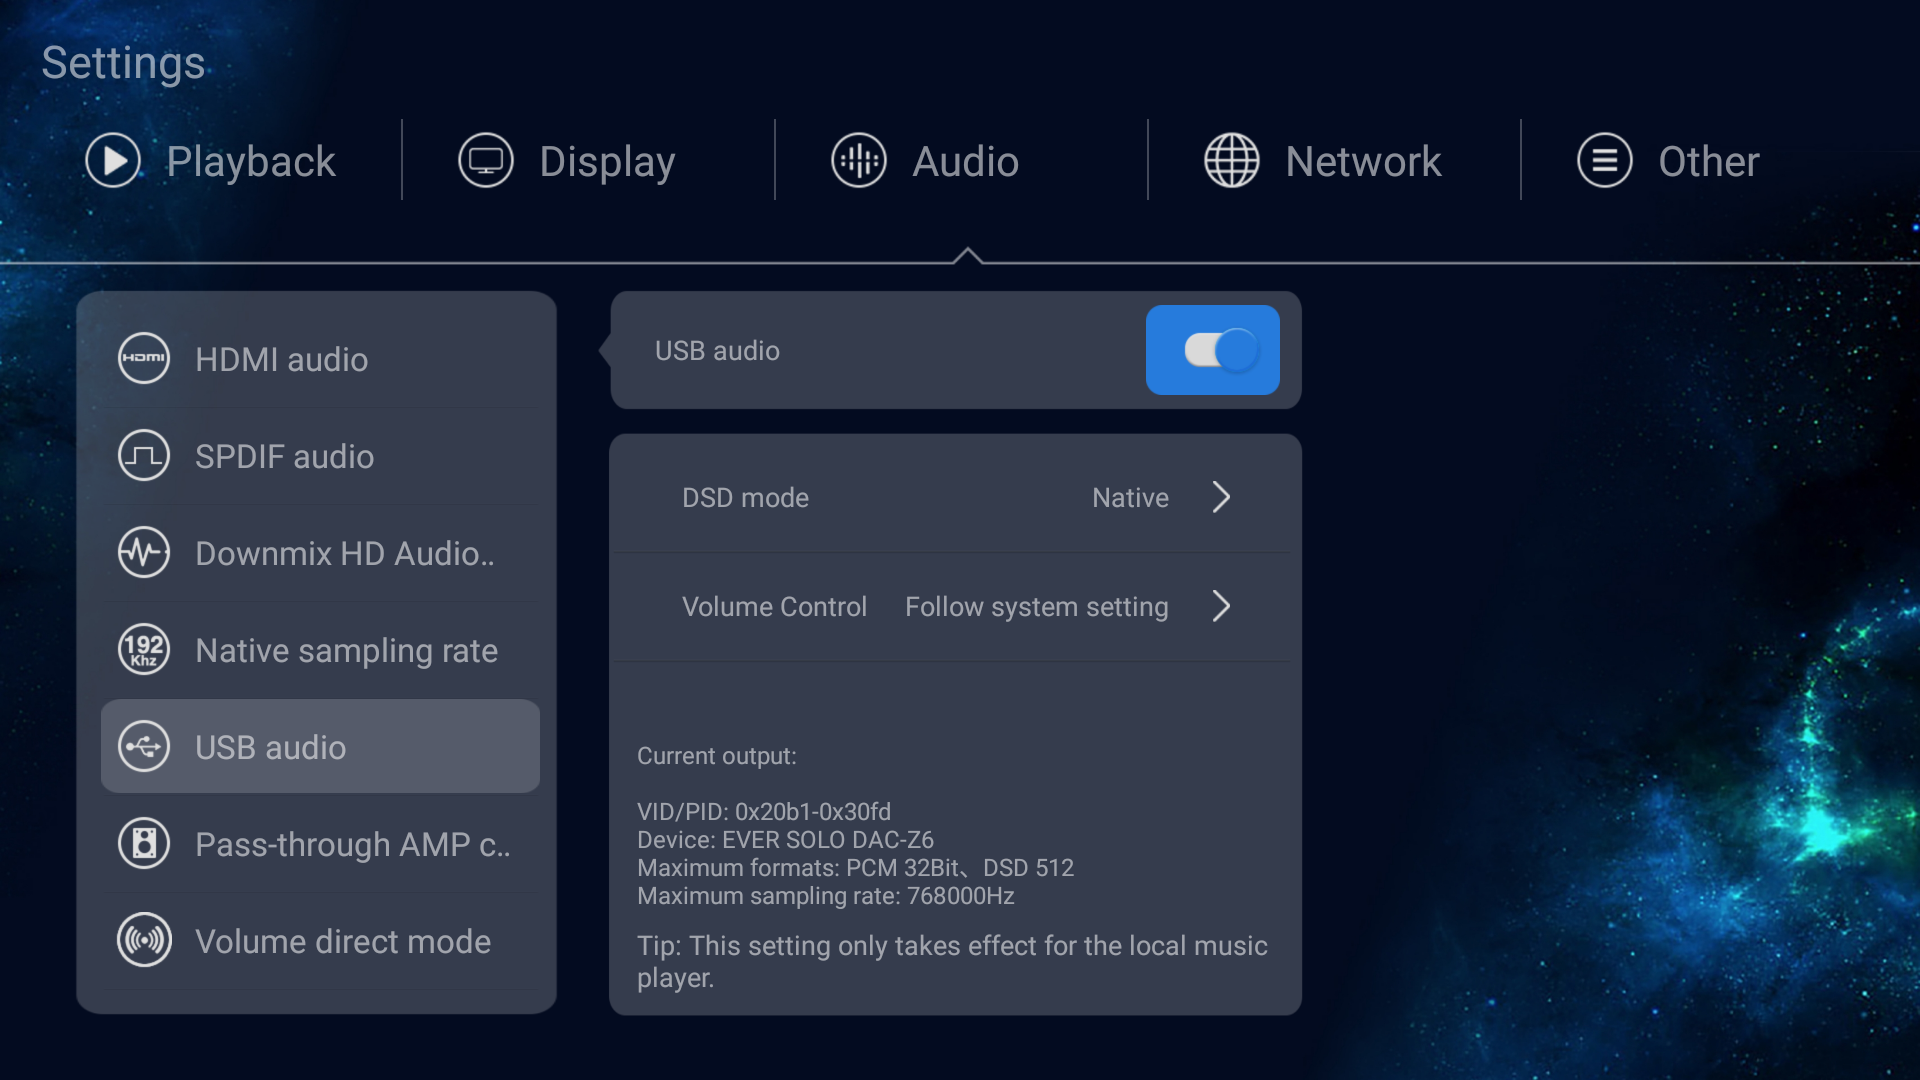
2.3 If there is no pop-up prompt, you can enter Zidoo Settings >Audio, turn on the USB audio, and you can view the decoder parameters at the bottom of this menu. The connection and settings are completed here.
Warm tip: RCA or XLR port at the end of the decoder, need to be connected with the combination of amplifier and speaker or HiFi active speakers!!!
3, Zidoo media player playback
Use music player in Zidoo player to play music, can pass the music to the decoder for decoding output through USB directly.
Warm tip: You can use Zidoo remote control with a red line learning function to learn the volume and on/off keys of the Eversolo decoder remote control, bringing a more convenient broadcast control experience.
How to Connect Eversolo Streamers with an external USB DAC
How to Connect Eversolo Streamers with an external USB DAC
Connect and Use Eversolo Streamers with a PC
Connect and Use Eversolo Streamers with a PC
This guide applies to all Streamers, here we use A6 as an example.
I. Preparations
1. An Eversolo DMP-A6
2. A computer (Windows 10, 11/Apple Mac OS system)
3. USB IN audio device driver for Computer
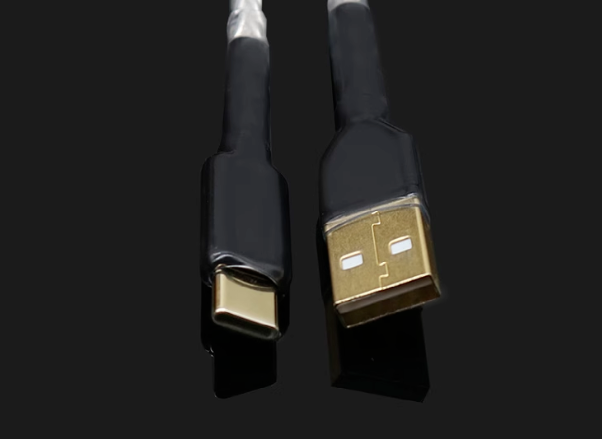
4. A USB A-C audio cable
Windows USB IN driver download link:
https://dl.eversolo.com/dac/usb/EversoloUsbAudio_v5.58.0_setup.zip
Note: This driver supports ASIO and WASAPI device, DSD up to native DSD512, PCM up to 768KHz@32bit, MQA format
II. Installation of Computer Driver
1. Windows system
Note: If the XMOS-Stereo-USB-Audio driver was previously installed on the PC, please make sure to uninstall it first!!!
1.1. Extract the downloaded driver compressed file, and then double-click to start.
EversoloUsbAudio_v5.58.0_setup.exe
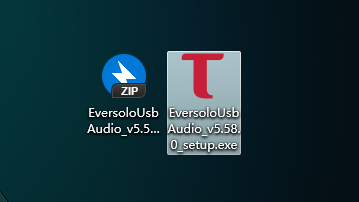
1.2. Click on “Install” to Continue.
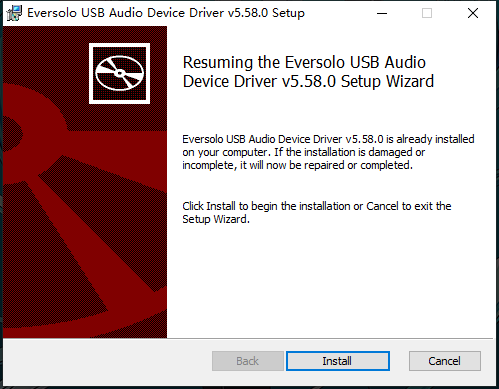
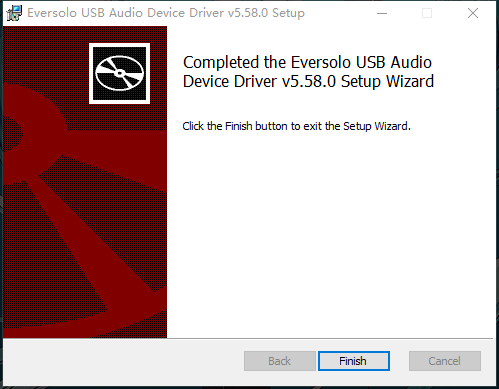
1.3. Wait for the installation progress bar to complete.

1.4. Click “Finish” to complete the installation.

Friendly reminder: If the Eversolo DMP-A6 was already connected to the computer with a USB audio cable before installing the driver, the driver may encounter recognition issues after the installation is complete.
Please restart the PC and the Eversolo DMP-A6.
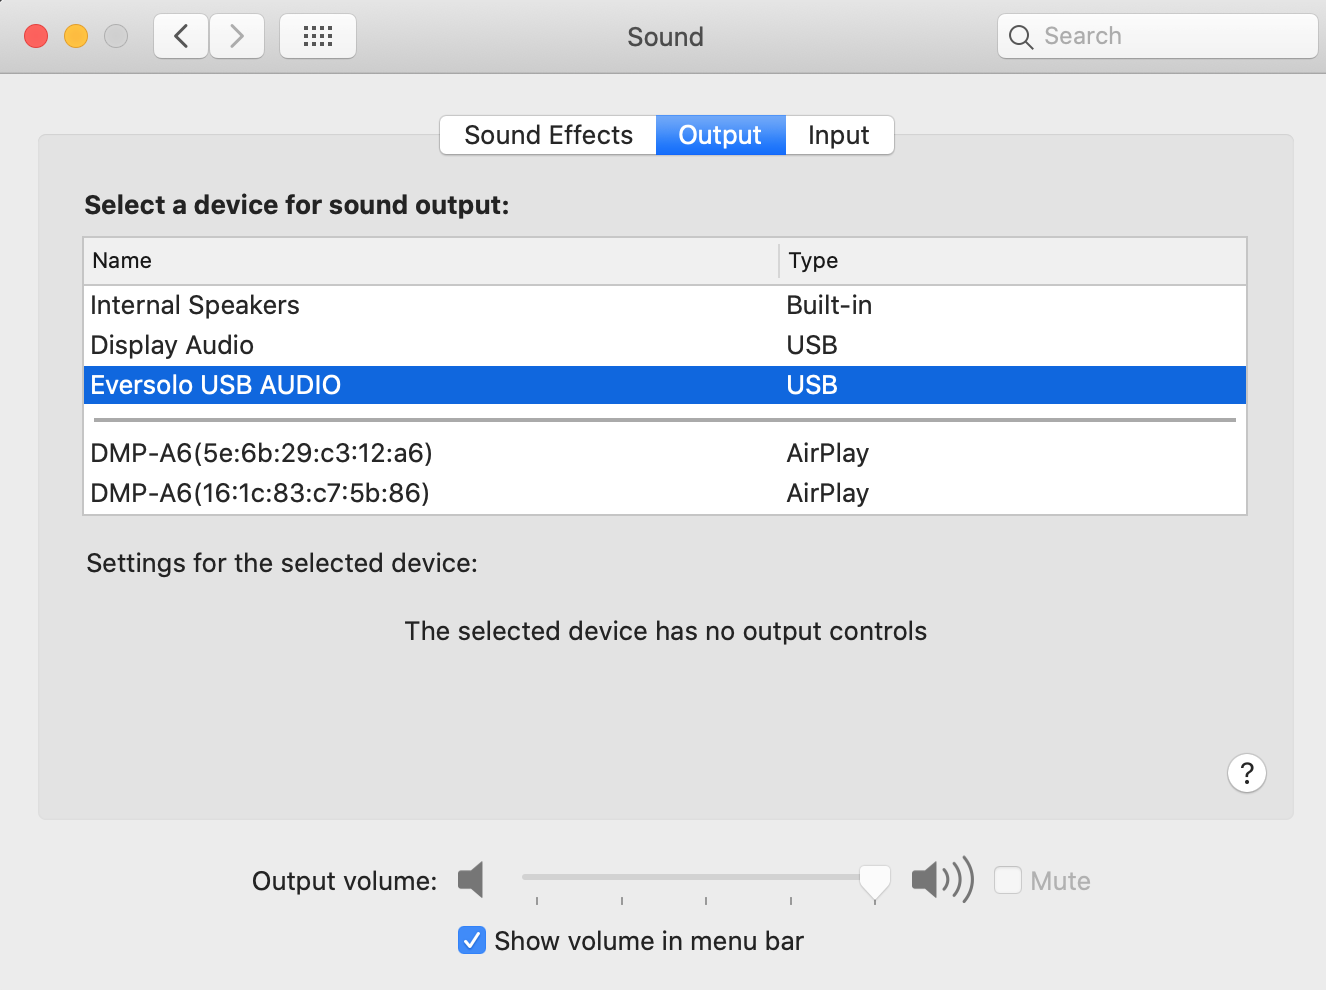
2. Apple MAC system
There is no need to install a computer driver on Apple MAC system.
After the Eversolo DMP-A6 is connected via a USB audio cable, proceed to enter the system preference settings - Sound - Output - Select [Everolo USB AUDIO].
Supports up to DSD256, PCM768.

III. Connection and Configuration of Eversolo DMP-A6
1. Connect Eversolo DMP-A6 to the Computer
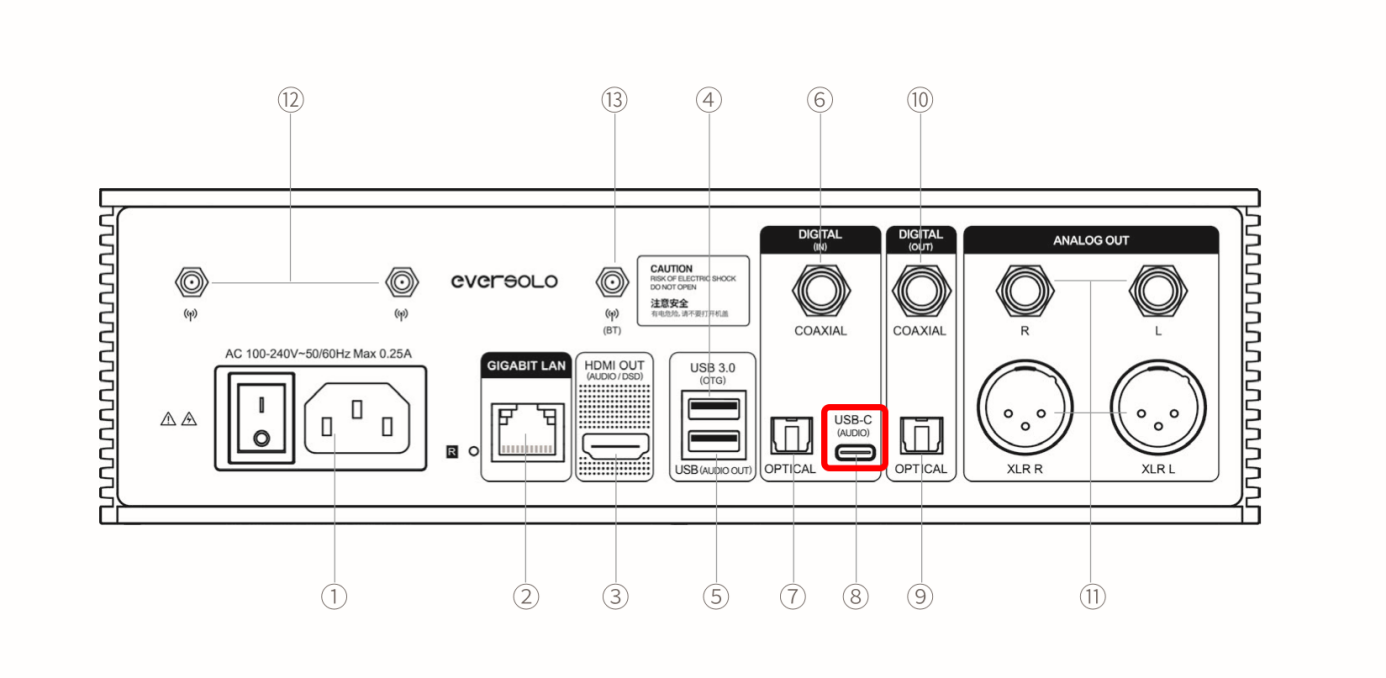
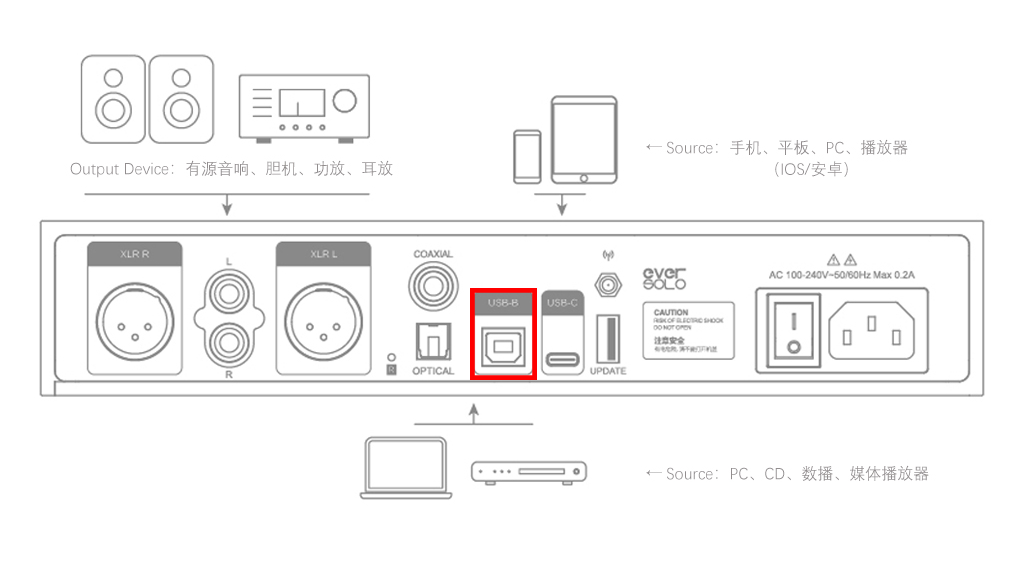
1.1. Use a USB-A to Type-C audio data cable to connect any USB port on the computer to the USB-C audio input port at the rear of the DMP-A6.
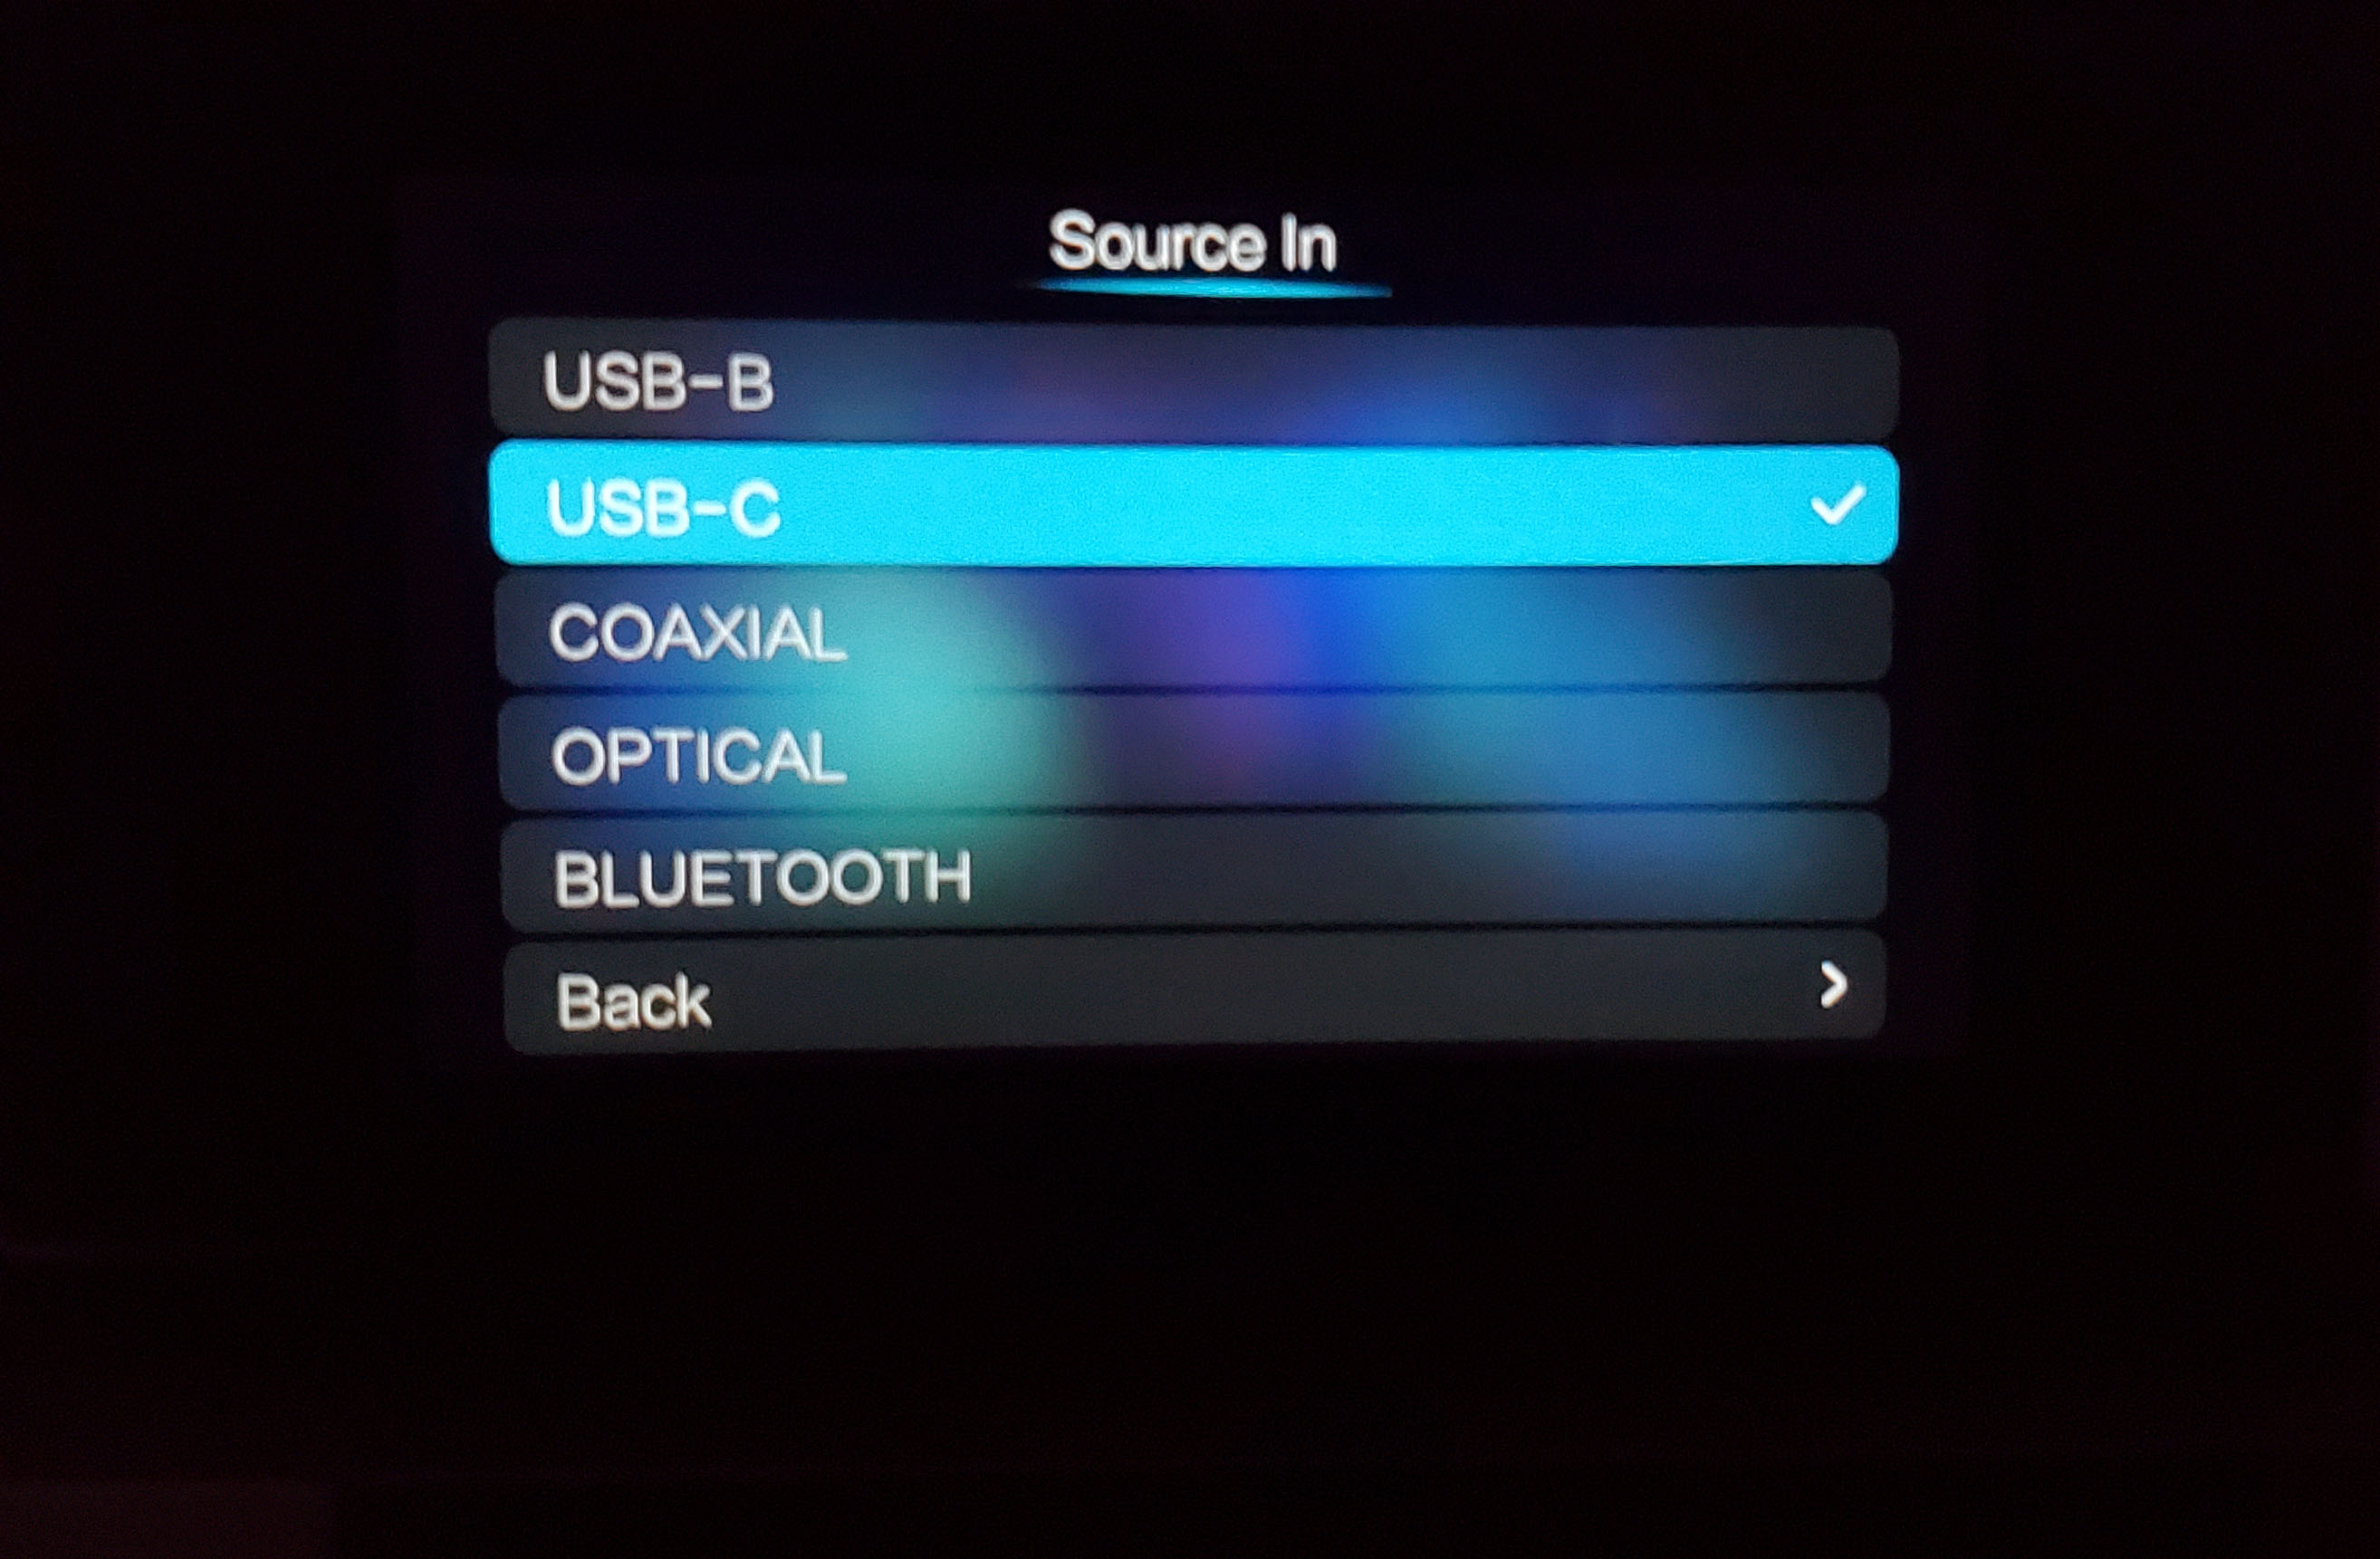
2. Audio Source Configuration for Eversolo DMP-A6
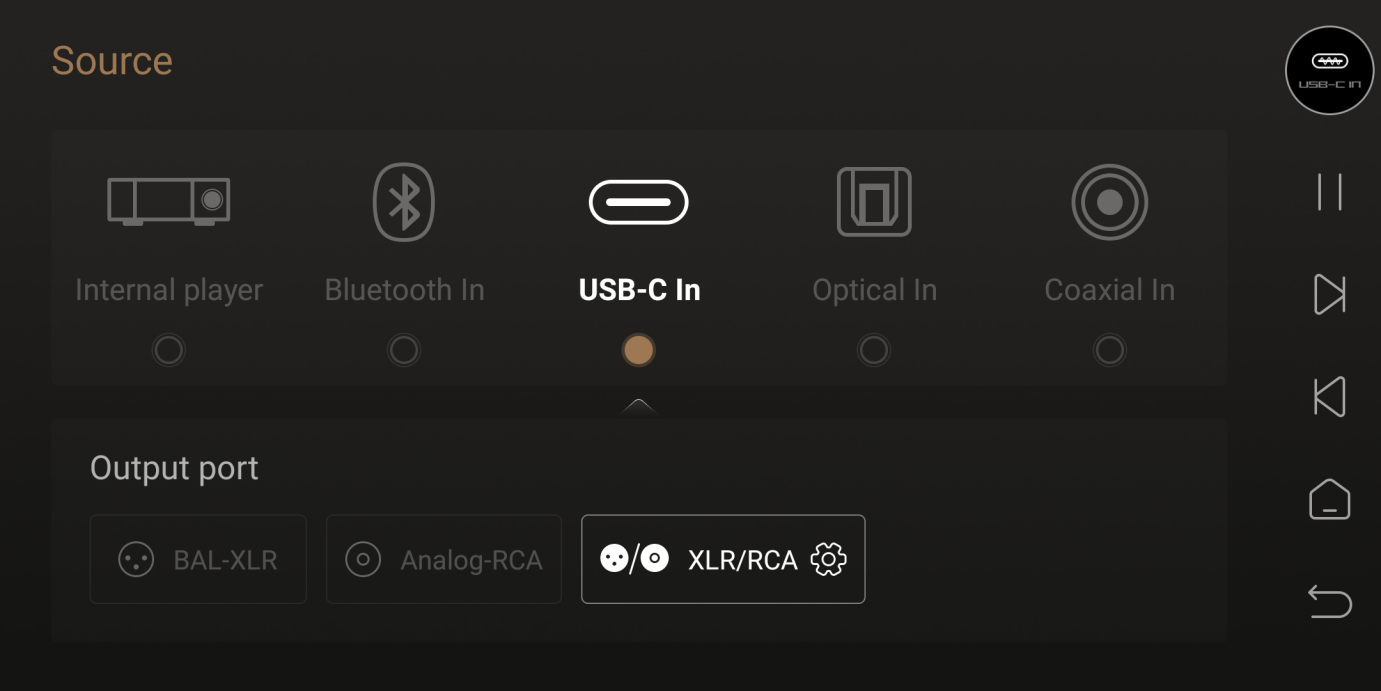
2.1. On the main interface of the DMP-A6, navigate to the source menu and select USB-C as the input. Switch the output port to the port you are currently connected to.
Friendly reminder: For the rear RCA or XLR ports of the DMP-A6, please connect them to a power amplifier + speakers or HiFi active speakers!!!
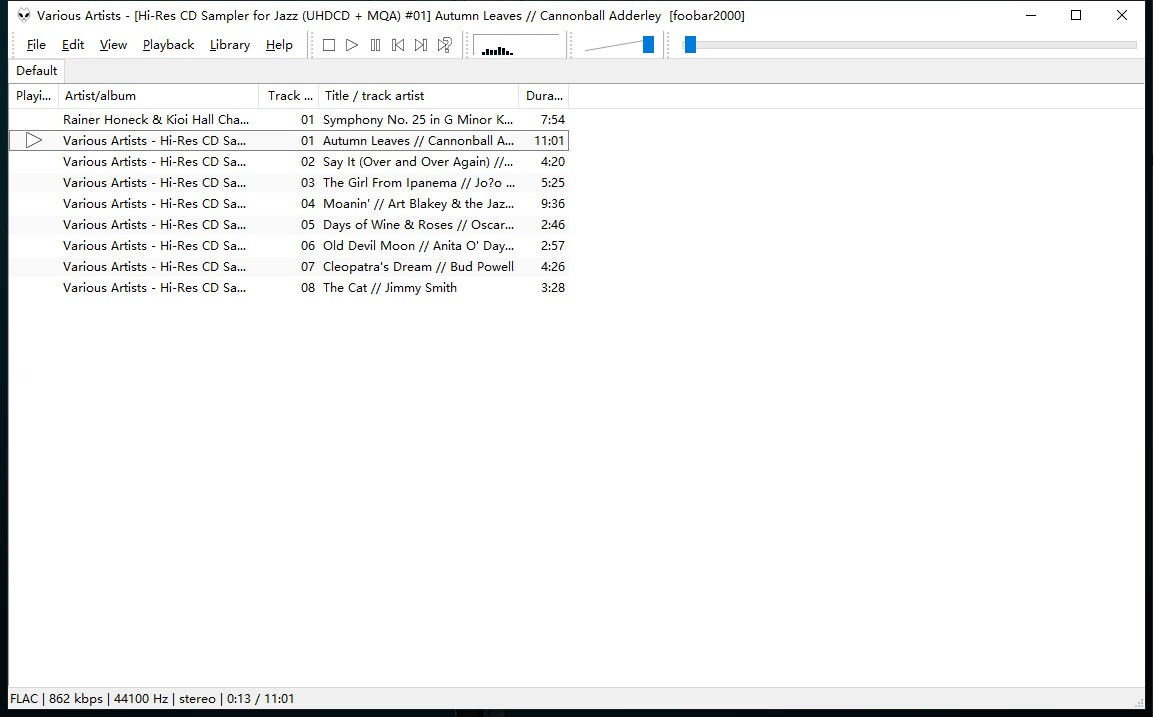
IV. Playback on Computer
Friendly reminder: The Eversolo DMP-A6 function is only intended for use as a DAC (sound card). The computer serves as the playback device, and the supported audio formats and output sampling specifications depend on the player. If you wish to play DSD or higher sampling music formats, please install professional playback software on your computer, such as foobar2000, Roon, jriver, etc. You will also need to configure the output device and format in the corresponding menu of the playback software. The following instructions will use foobar2000 as an example.
1. Downloading Foobar2000
Link: https://drive.google.com/file/d/15TIqqiTNmPlSgSnSKGHF2VMmet9KZ3qe/view?usp=sharing
2. Foobar2000 Installation and Setup
Note: If you already have Foobar2000 installed, please make sure to uninstall it (including the configuration files) completely before installing again. Do not perform a "overwrite" installation, as the previous components will still remain.
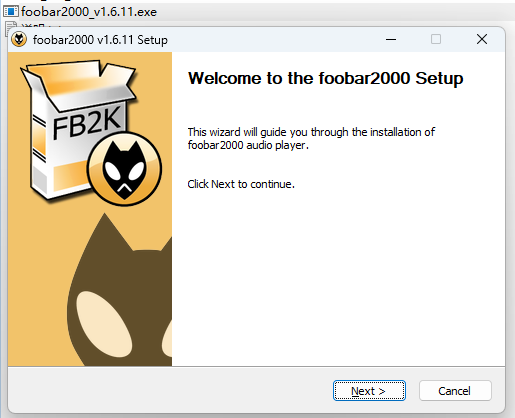
2.1. First, run foobar2000_v1.6.11.exe to install Foobar2000 on your system. Simply follow the default installation settings throughout the process.
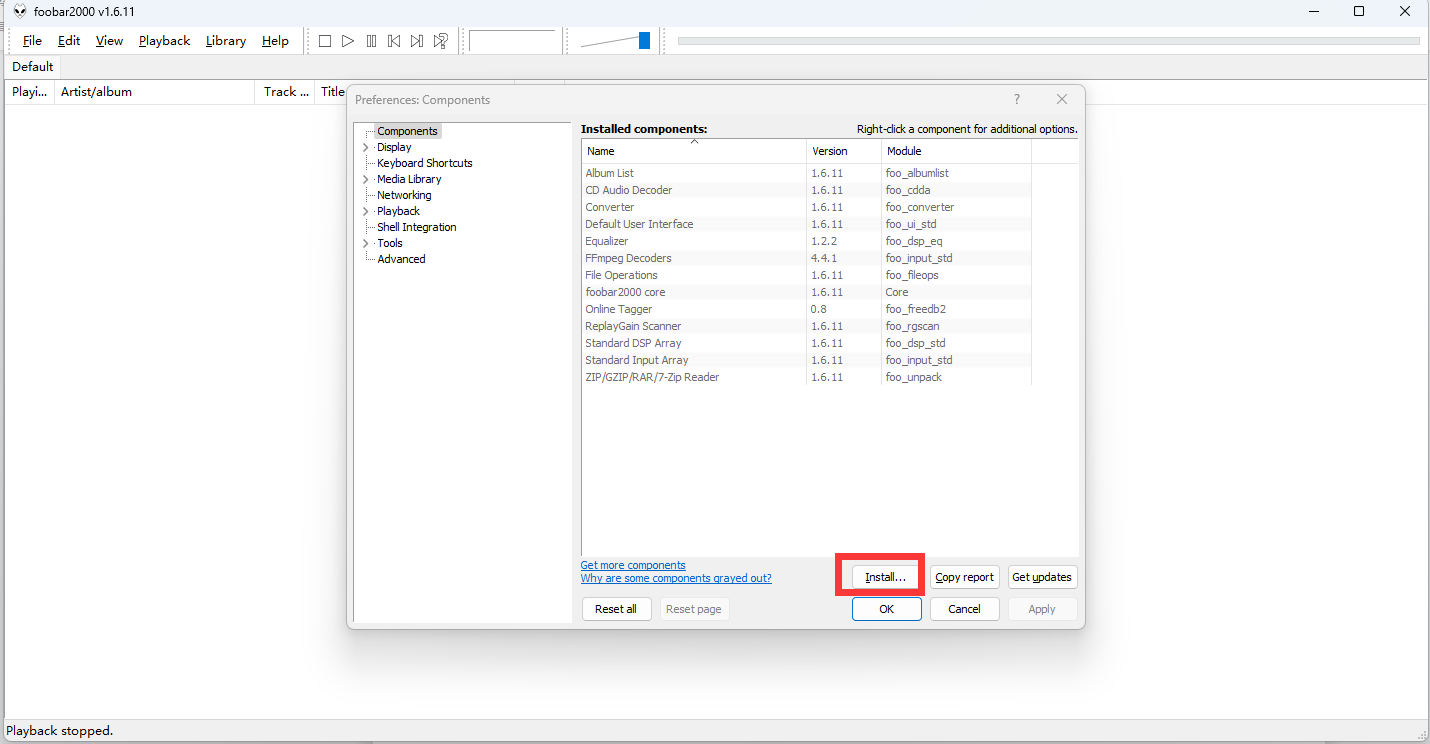
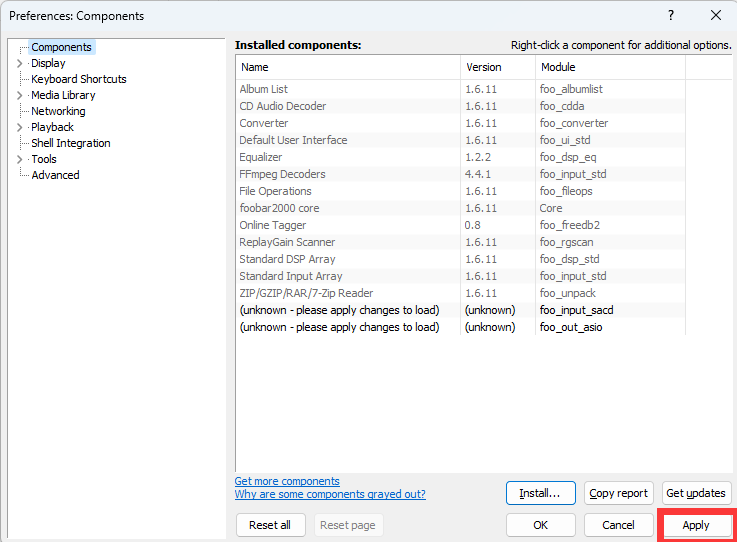
2.2. Run foobar2000, then go to settings (Ctrl+P). Click on "Components" in the left sidebar, and then click the "Install" button in the bottom right corner. Choose the "foo_input_sacd.fb2k-component" from the "foo_input_sacd-0.9.6" folder, and then click "Open". Next, install the "foo_out_asio.fb2k-component" from the "foo_out_asio-2.1.2" folder. After installing both components, click on the "Apply" button in the bottom right corner. Then foobar2000 will prompt you to restart itself, click "Yes" to proceed.
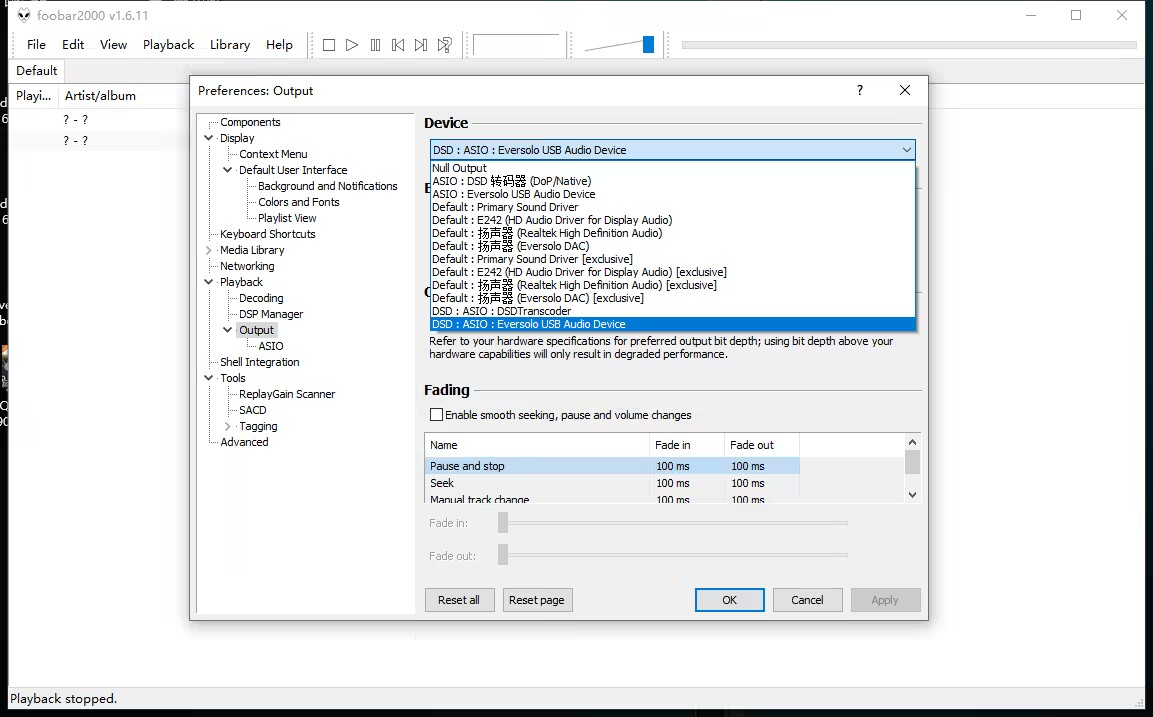
After restarting the foobar2000 program, go to the foobar2000 settings (Ctrl+P) - Playback - Output. In the "Device" dropdown menu, select the installed driver: ASIO+DSD : Eversolo USB Audio Device
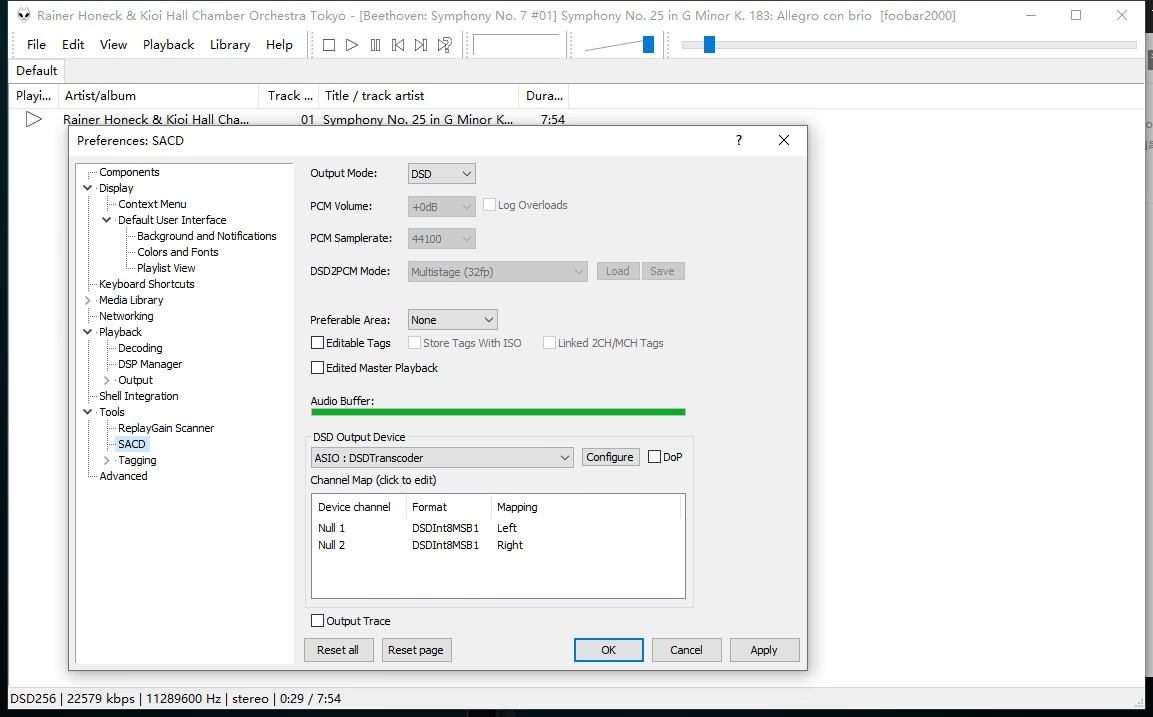
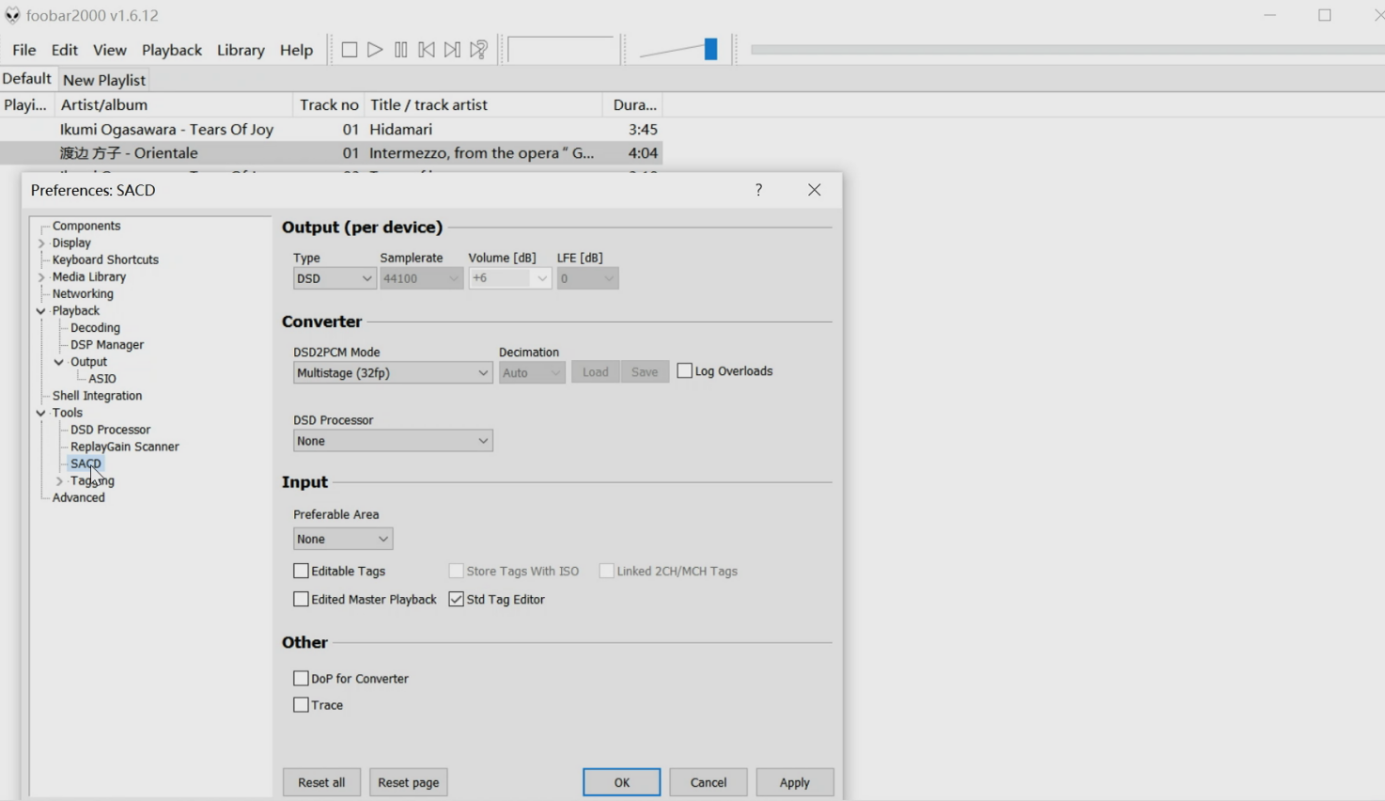
2.3.After restarting the foobar2000, go to foobar2000 settings (Ctrl+P) - tools - SACD, and select "DSD" from the "Output Mode" menu.
2.4. Add music and play them in foobar2000, you can simply output the source code.
How to Connect Eversolo Decoders with PC
How to Connect Eversolo Decoders with PC
This tutorial is applicable for DAC-Z6 and DAC-Z8
Preparations
1. An Eversolo decoder
2. A computer (Windows7,10,11/Apple MAC os system)
3. Computer USB IN audio device driver
4. A USB A-B audio cable (included in standard accessory)
Download address for Windows USB IN Driver:https://dl.eversolo.com/dac/usb/EversoloUsbAudio_v5.58.0_setup.zip
Note: This driver supports ASIO and WASAPI device, DSD up to native DSD512, PCM up to 768KHz@32bit, MQA format
Computer driver installation and settings
1. Driver installation in Windows system
Note: If the XMOS-Stereo-USB-Audio driver was previously installed on the PC, please make sure to uninstall it first!!!
1.1. Unzip the downloaded driver package, then double click to start
EversoloUsbAudio_v5.58.0_setup.exe

1.2. Follow the wizard and click “install”

1.3. Wait for the installation progress bar to complete.

1.4. Click “Finish”
Warm tip: The Eversolo decoder has been connected to the computer by using the USB audio cable before driver installation, the driver may not be recognized after the installation is completed, please restart the PC and Eversolo decoder.
2. Apple MAC System
Apple MAC needn't to install driver, when the Eversolo decoder is connected via USB audio cable, go to System Preferences - Sound - Output - select [EVERSOLO USB AUDIO], Supports up to DSD256, PCM768.
Eversolo decoder connection and setup
1、 Decoder and computer connection
Use the standard USB A to B type square audio cable to connect any USB port of the computer with the USB-B audio input port at the end of the decoder.
2、Eversolo decoder audio source settings
Tap the knob of decoder to enter the Setting > Source In , set it to USB-B
Warm tip: RCA or XLR port at the end of the decoder, need to be connected with the combination of amplifier and speaker or HiFi active speakers!!!
Computer playback software related
Note: The Eversolo decoder is only used as a DAC (sound card), the computer is used as a playback device, the audio format played and the output sampling specifications are also related to the player. If you need to play DSD or higher sampling music formats, please install more professional player software in your computer, such as: foobar 2000, Roon, jriver, etc., and you need to configure the output device and output format in the corresponding menu of the playback software, it is usually recommended to open the exclusive device interface to get better sound quality. The following is take the use of foobar 2000 player as an example.
Downloading Foobar2000
Link: https://drive.google.com/file/d/15TIqqiTNmPlSgSnSKGHF2VMmet9KZ3qe/view?usp=sharing
Foobar2000 Settings
Please download and install the Foobar2000 software on your own network. After installation, start the software and set it up according to the following example.
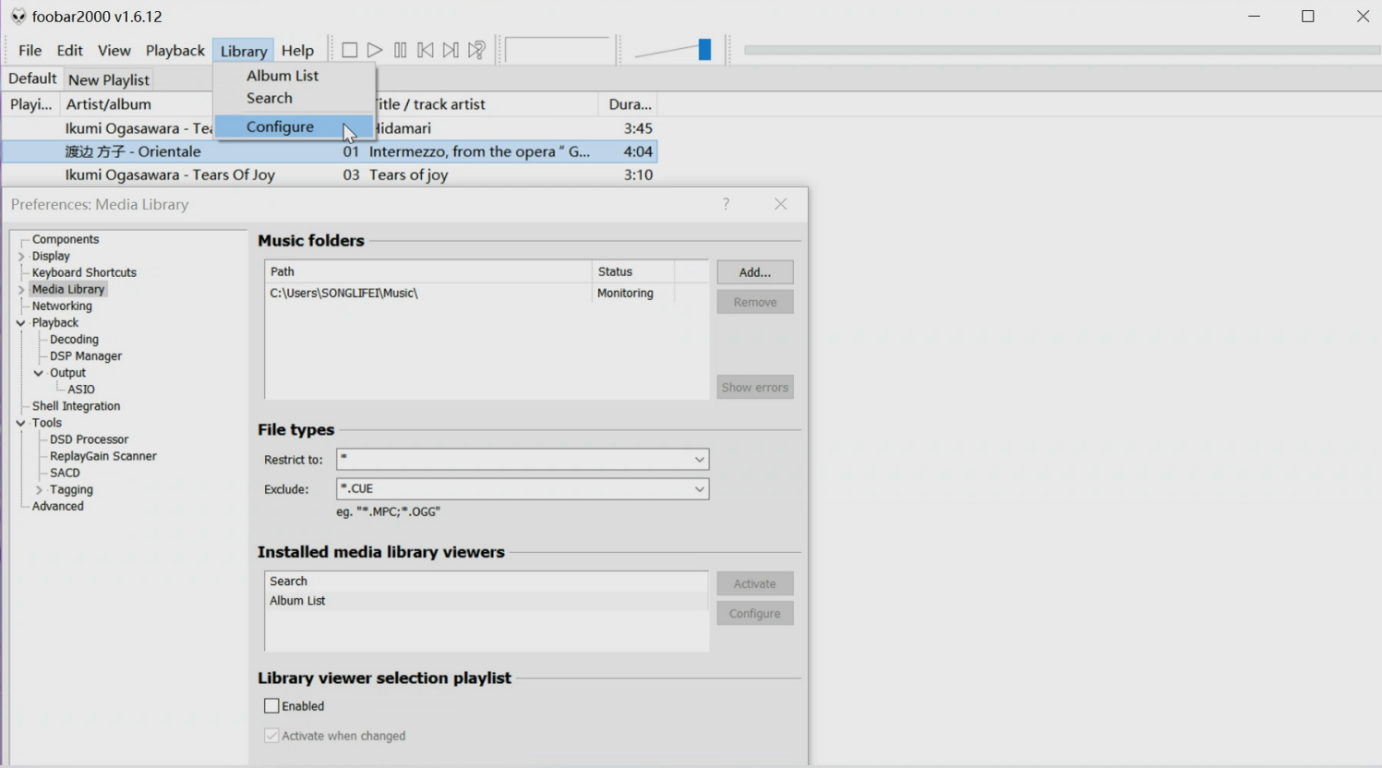
Open foobar2000 configuration menu: Library- configure
Select output device:Click Playback-Output-Device to select as:
ASIO+DSD : Eversolo USB Audio Device

After selected device, please select SACD output type as DSD output, open foobar2000 setting option -Tools - SACD - Output (Per Device) - select as: DSD, then click Apply, OK respectively, and you can play music after configuration is finished.
Eversolo Mobile & Tablet Control APP Pairing Guide
Eversolo Mobile & Tablet Control APP Pairing Guide
Eversolo Streamers Plex&Emby Mapping Local Path Tutorial
Eversolo Streamers Plex&Emby Mapping Local Path Tutorial
How to Connect Eversolo DACs with Mobile Phone by USB
How to Connect Eversolo DACs with Mobile Phone by USB
1. Eversolo DACs USB setting
1.1 Push the volume knob on the front panel and enter into "Settings> Input Source> USB-C".
1.2 Connect the mobile phone to DACs USB-C port by a data cable.
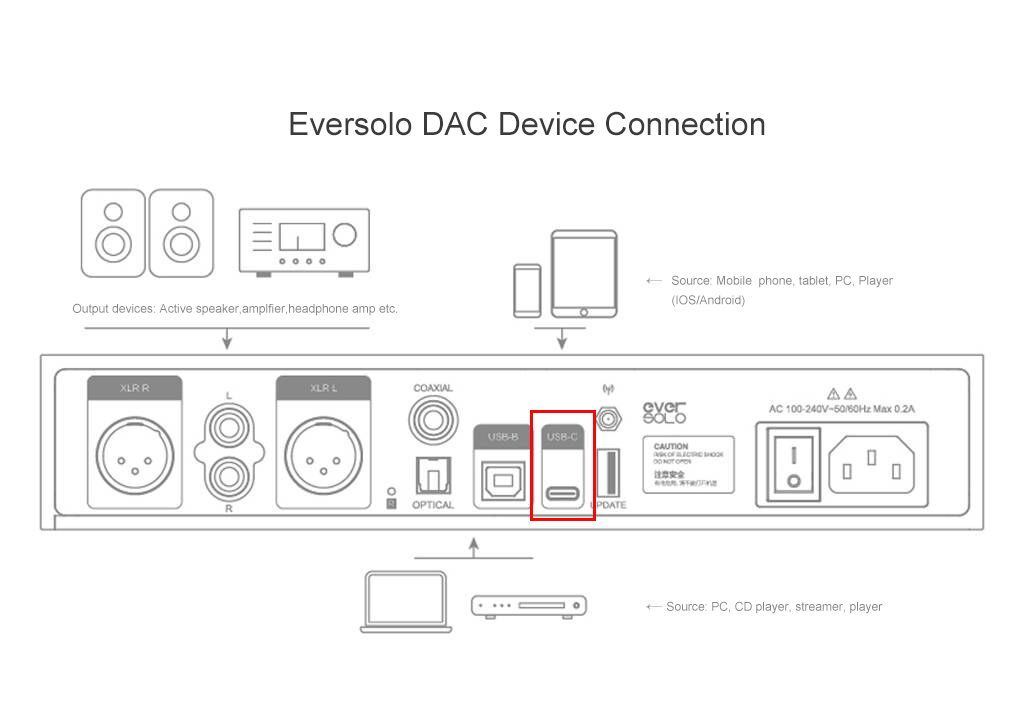
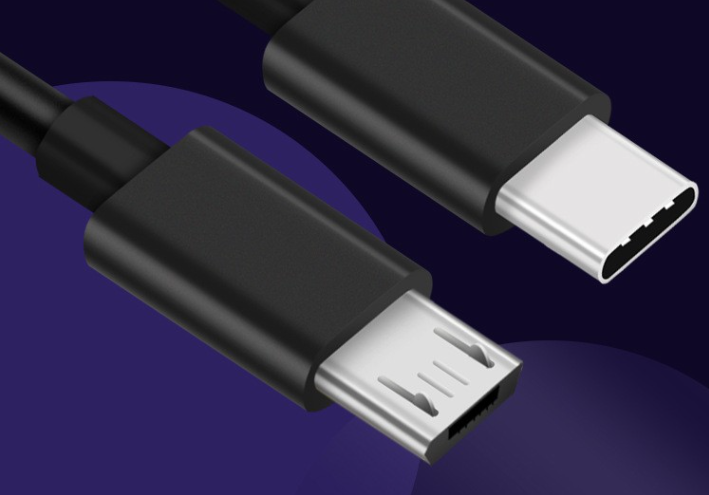
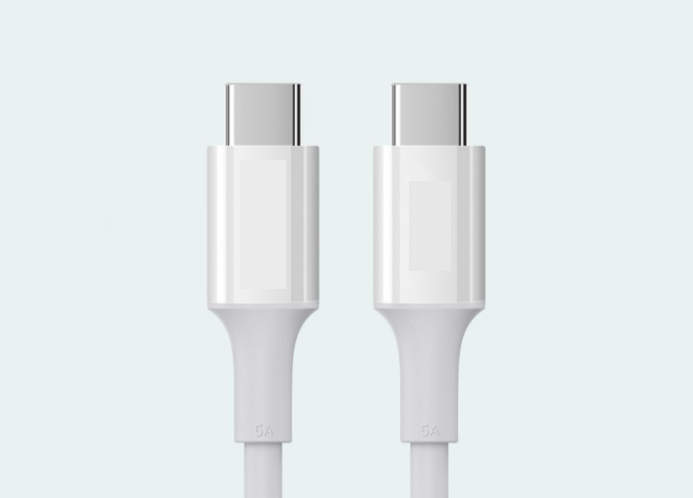
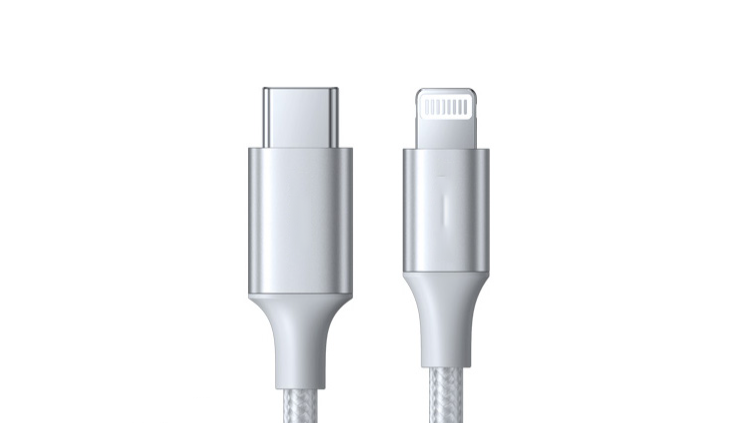
1.3 What data cables are suitable for the connection?
Android: Micro USB to Type-C audio cable
Android: Type-C to Type-C audio cable
IOS: Lightning to Typy-C Professional Audio Cable
2. Android/IOS Guides
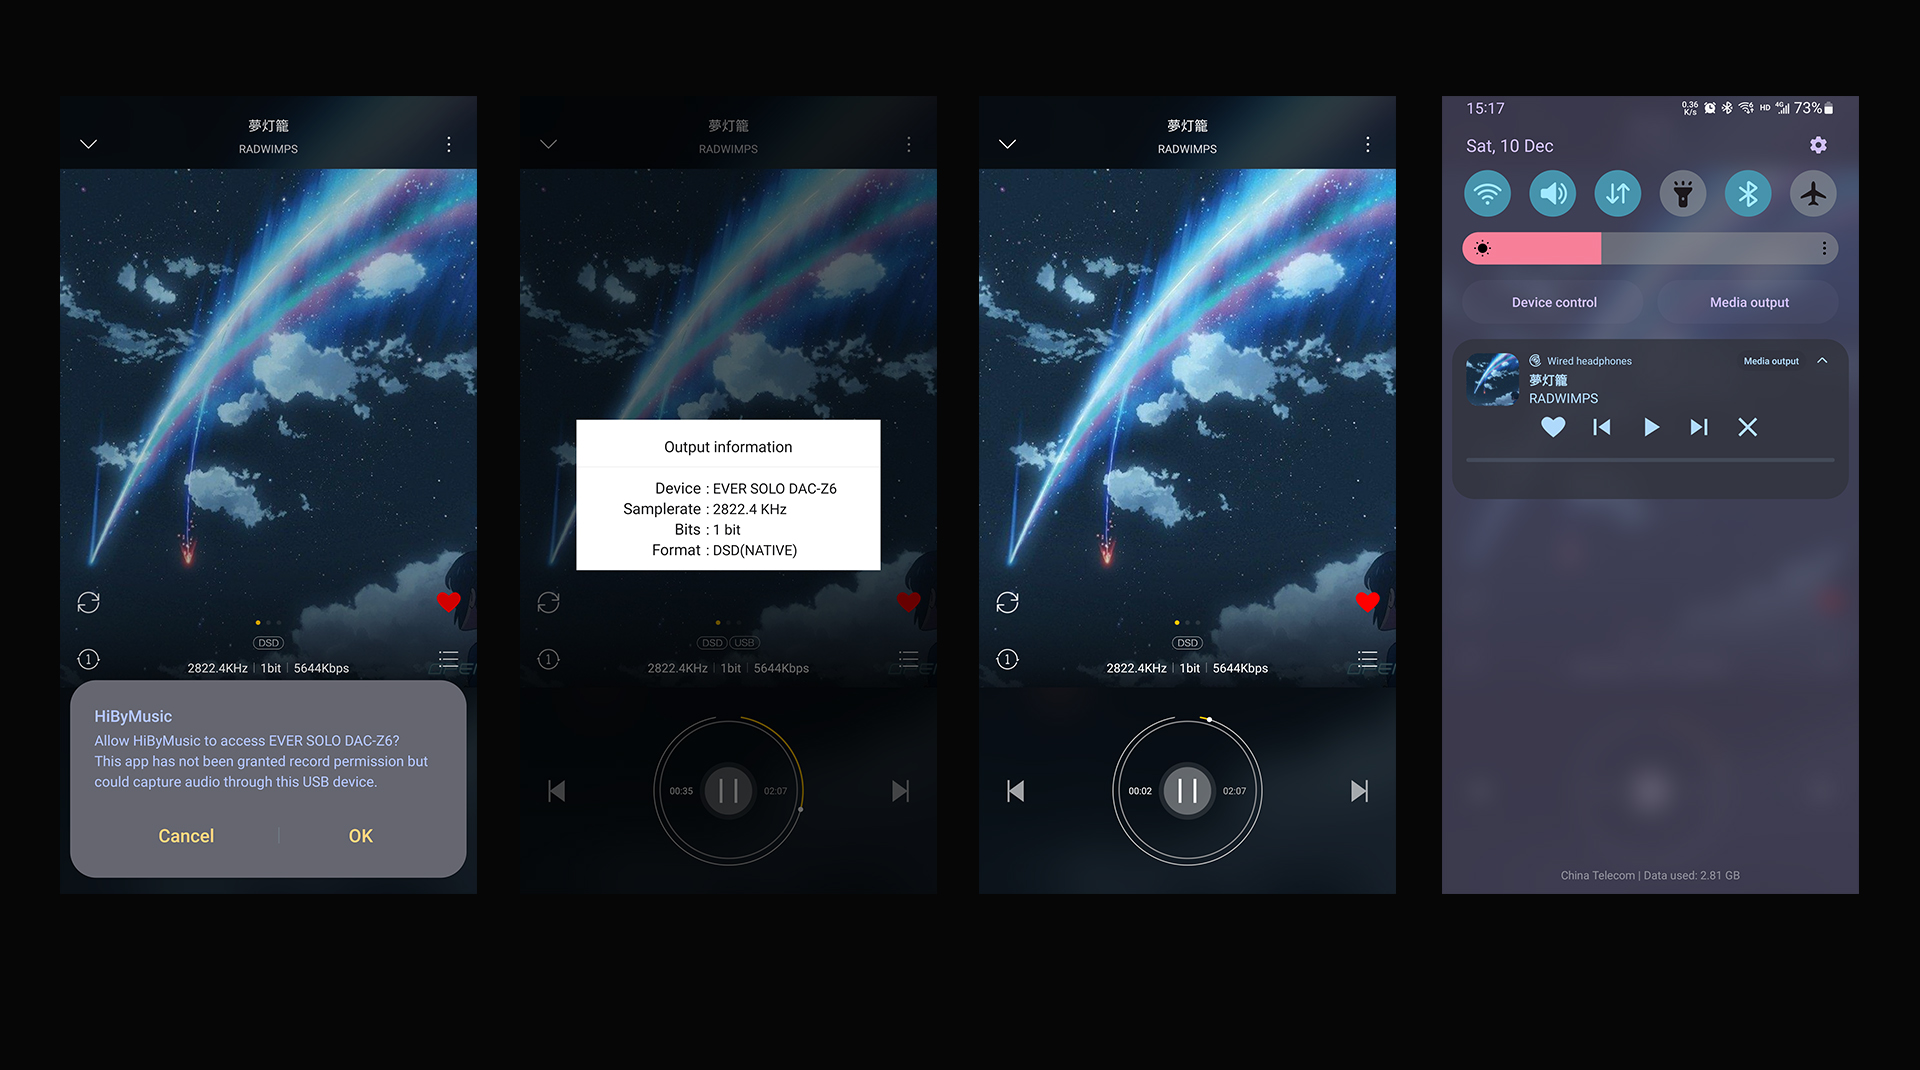
2.1 Android: Take Hiby Music for example.
Enter into Hiby APP> Enable exclusive HQ USB audio access> DSD mode set to Native> Enable “Keep alive in background” for USB output setting.
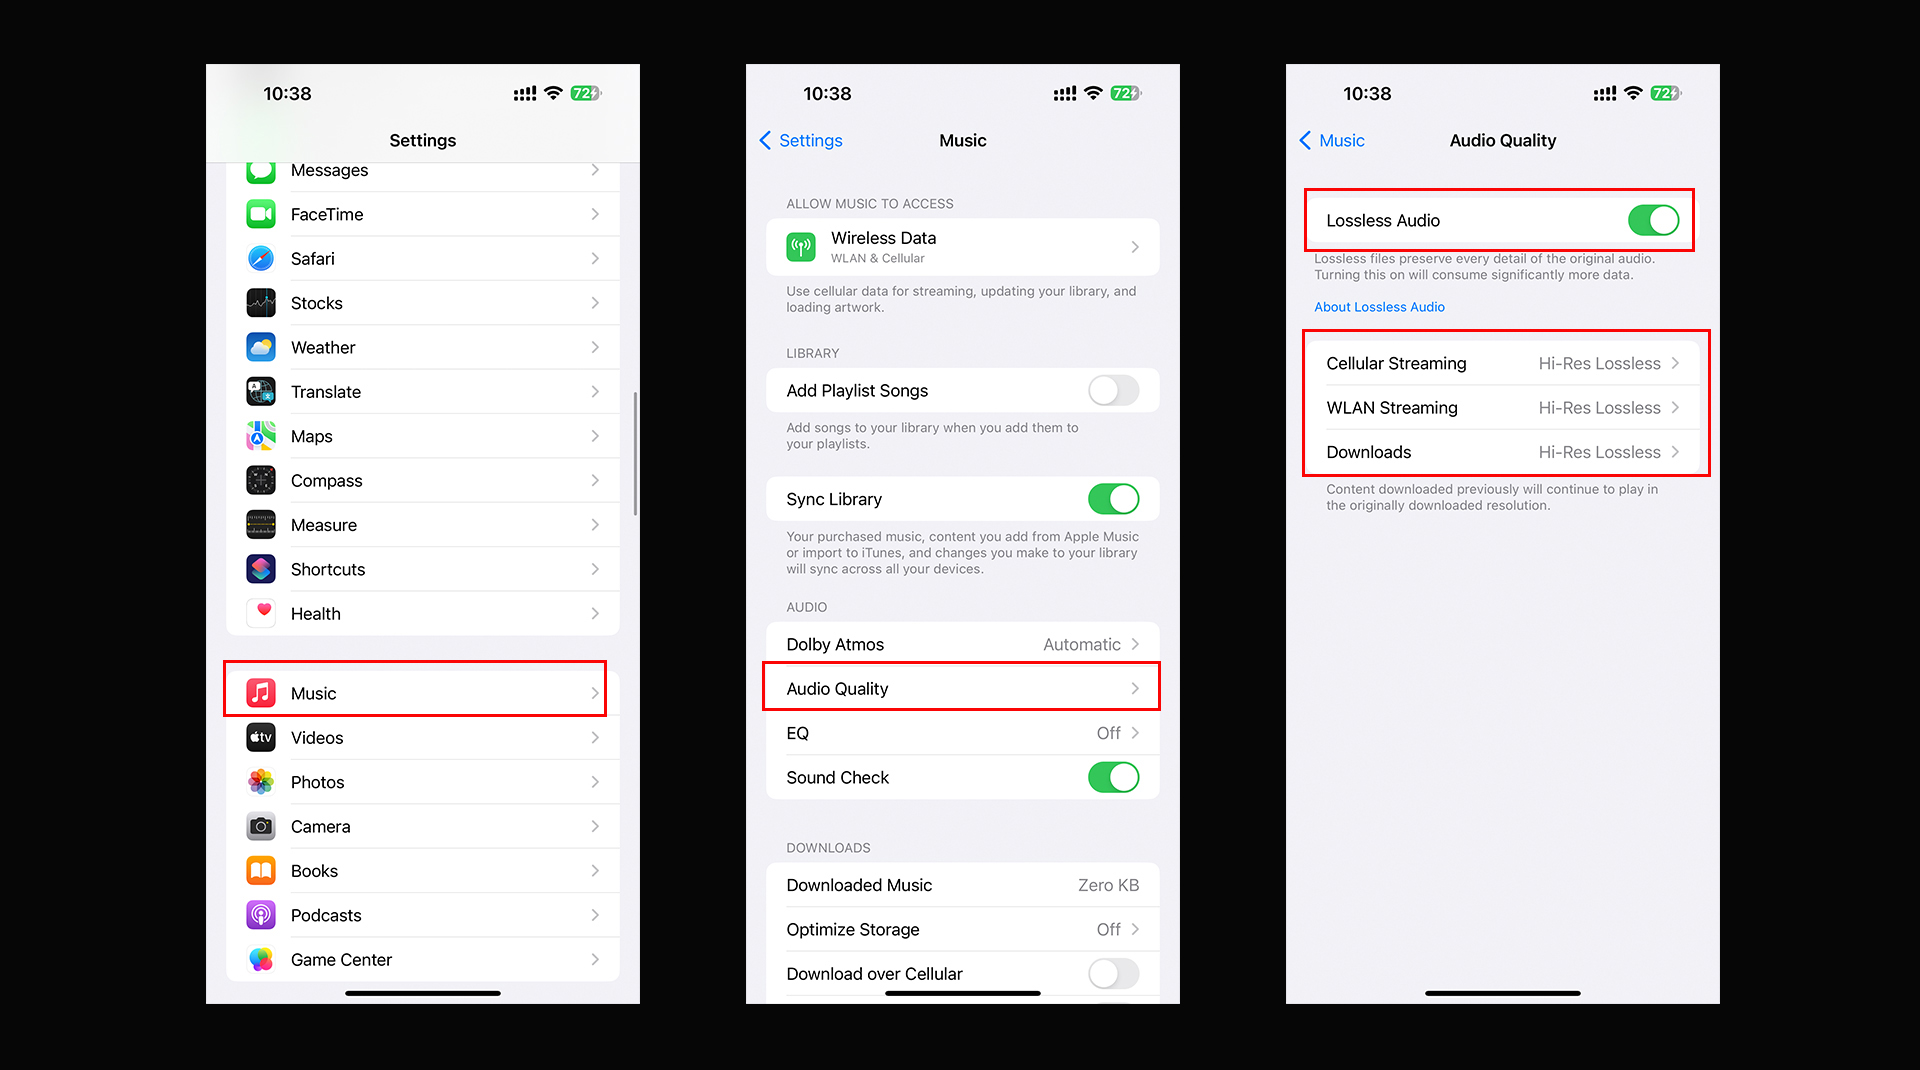
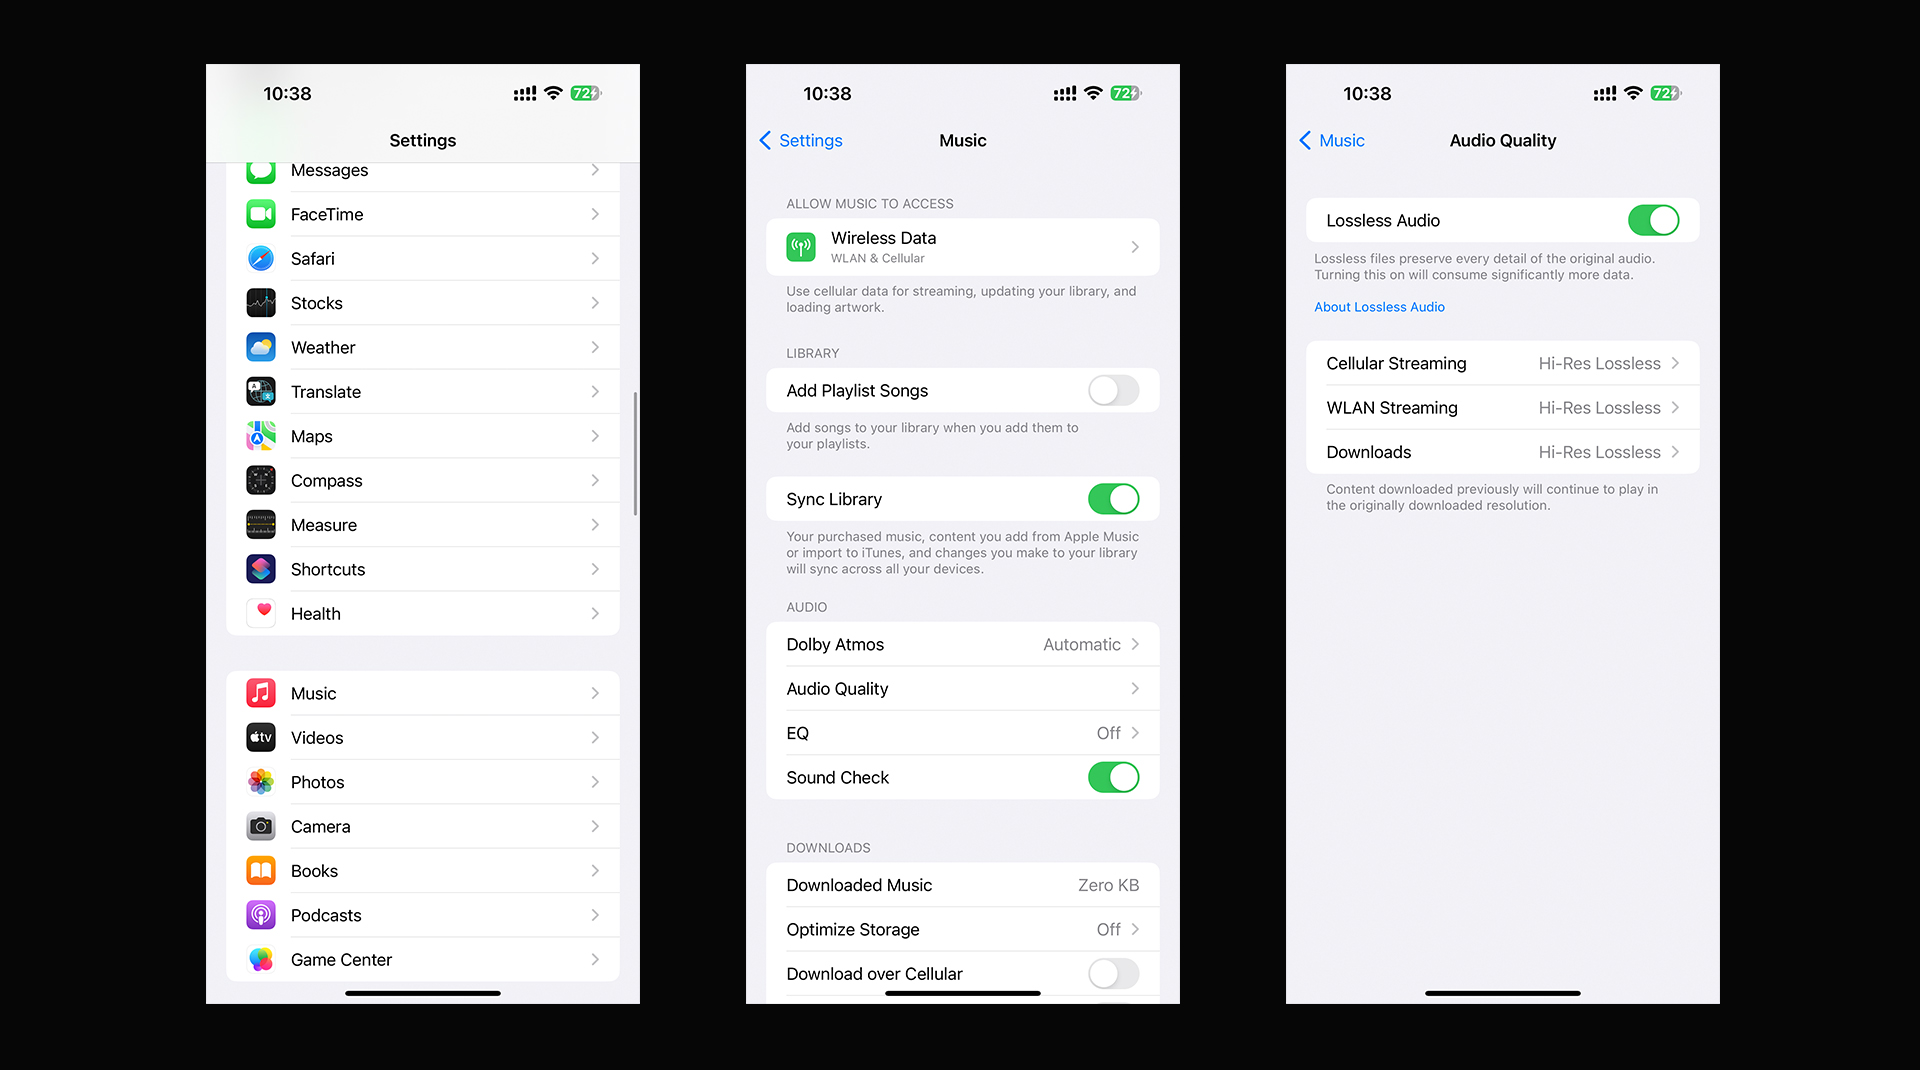
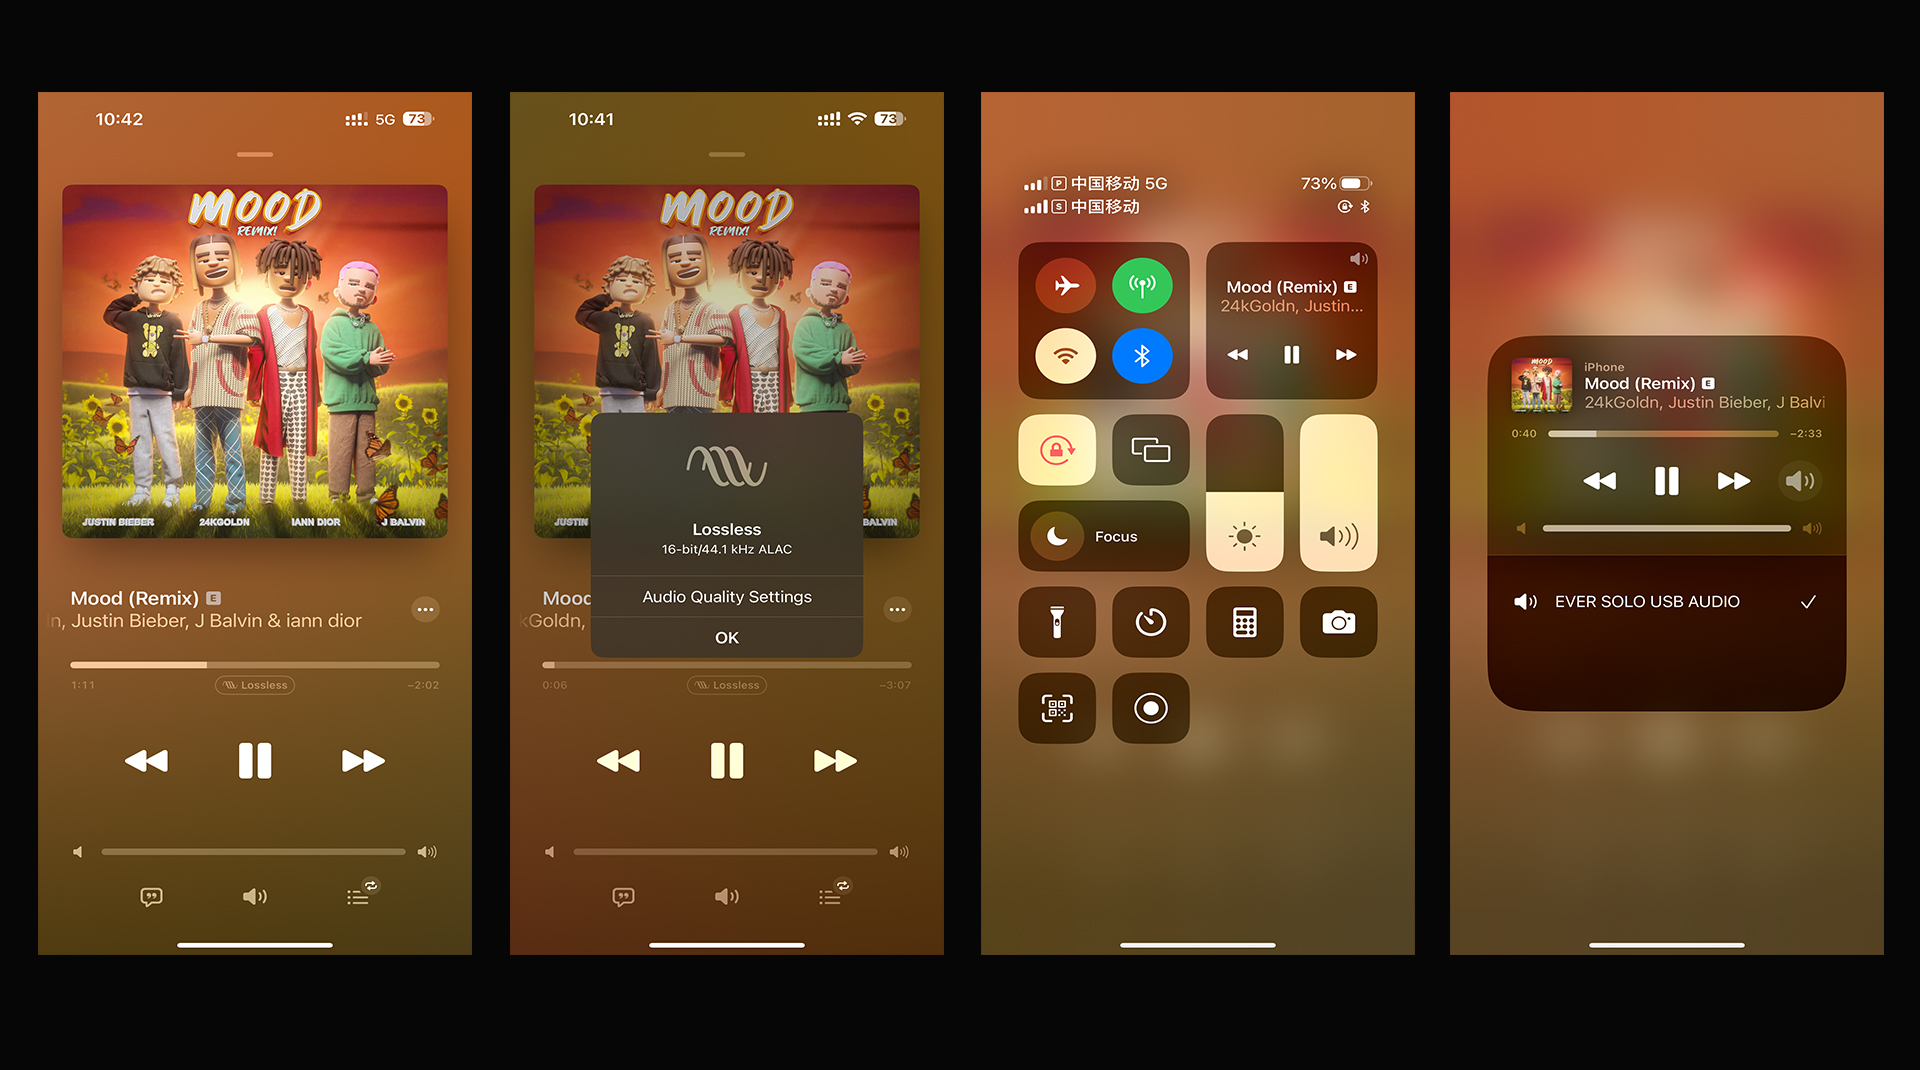
2.2 IOS/iPad
IOS: Take Apple Music (premium account) for example.
Hardware & Software Settings
Eversolo Streamers M.2 SSD Installation Tutorial V1
Eversolo Streamers M.2 SSD Installation Tutorial V1
Eversolo Screen and Knob Brightness Adjustment and Screensaver Settings Tutorial
Eversolo Screen and Knob Brightness Adjustment and Screensaver Settings Tutorial
Eversolo Streamers 24-hour Format Setting Tutorial
Eversolo Streamers 24-hour Format Setting Tutorial
Eversolo Streamers Third-Party Input Method Installation and Setup Tutorial
Eversolo Streamers Third-Party Input Method Installation and Setup Tutorial
How to Use REW to Create a DMP-A8 DSP FIR Impulse Response File
How to Use REW to Create a DMP-A8 DSP FIR Impulse Response File
Eversolo Streamer M.2 SSD Installation Tutorial v2
Eversolo Streamer M.2 SSD Installation Tutorial v2
How to Switch Audio Output Port for DAC-Z6/Z8?
How to Switch Audio Output Port for DAC-Z6/Z8?
Find settings below by pressing the volume knob or using the remote control:
Settings > Output Port > XLR output/ RCA output/ XLR and RCA output
Note: Headphone output is adaptive. It will automatically switch to the headphone output when a headphone is inserted.
How to Switch VU meter Display Mode for DAC-Z6/Z8?
How to Switch VU meter Display Mode for DAC-Z6/Z8?
Find settings below by pressing the volume knob or using the remote control:
Settings>General>VU meter>VU1/VU2/UV3/Only audio info
How to Adjust Screen Brightness for DAC-Z6/Z8?
How to Adjust Screen Brightness for DAC-Z6/Z8?
Find settings below by pressing the volume knob or using the remote control:
Settings> General> Energy saver> Screen brightness> Brighter/Medium/Darker
How to Turn Off the Display for DAC-Z6/Z8?
How to Turn Off the Display for DAC-Z6/Z8?
Find settings below by pressing the volume knob or using the remote control:
Settings> General settings> Energy saver> Turn off Display> 30 seconds/ 1 minutes/ 3 minutes/ 5 minutes
When there are no operations for the intervals, the display will turn off.
System
How to Upgrade DAC-Z6 Firmware?
How to Upgrade DAC-Z6 Firmware?
- Preparations:
1. Firmware download
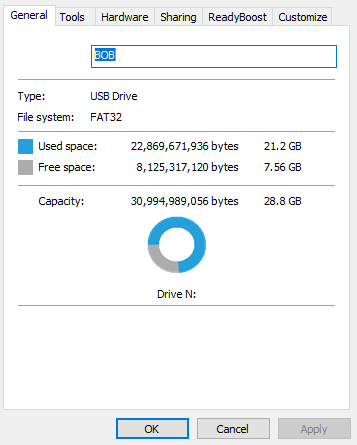
2. FAT32 USB stick

Where to download the firmware:
http://dev.eversolo.com/en/downloads/dac-z6
Copy the firmware to the ROOT directory of FAT32 USB stick.
1. Insert USB stick into the USB port on the rear panel, then access into "Settings".

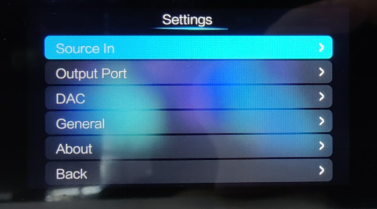
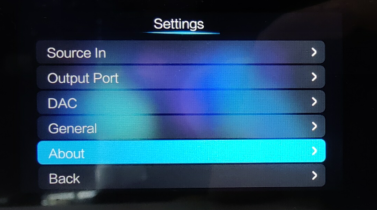
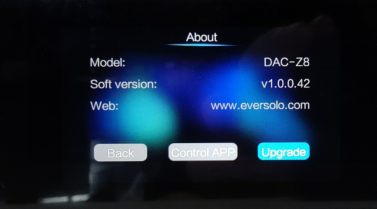
2. Move the cursor to "About".
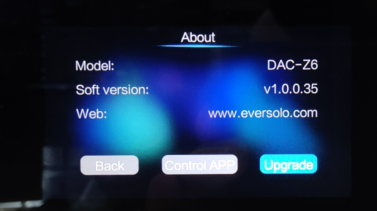
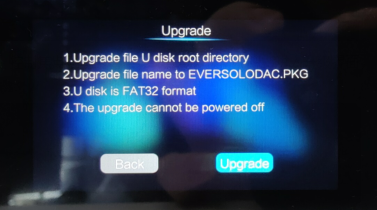
3. Move the cursor to "Upgrade" and start firmware upgrade.


4. After the progress bar reaches 100%, restart the device to finish firmware upgrade.

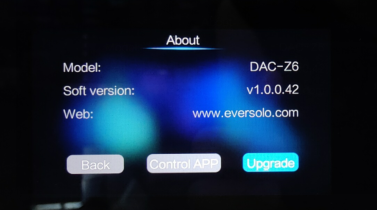
5. You will see the newest firmware version when re-entering into "About" interface.
How to Upgrade DAC-Z8 Firmware?
How to Upgrade DAC-Z8 Firmware?
Preparations:
1. Firmware download
2. FAT32 USB stick
Where to download the firmware:
http://dev.eversolo.com/en/downloads/dac-z8
Copy the firmware to the ROOT directory of FAT32 USB stick.
1. Insert USB stick into the USB port on the rear panel, then access into "Settings".


2. Move the cursor to "About".

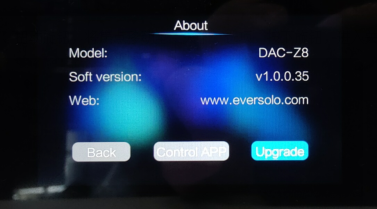
3. Move the cursor to "Upgrade" and start firmware upgrade.
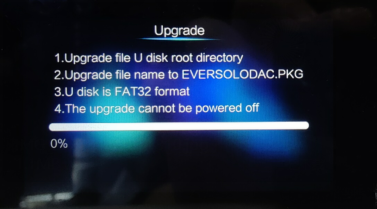
4. After the progress bar reaches 100%, restarting the device to finish firmware upgrade.
5. You will see the newest firmware version when re-entering into "About" interface.
How to Wipe Both Cache and Data under Eversolo Recovery Mode
How to Wipe Both Cache and Data under Eversolo Recovery Mode
This tutorial applies to Streamer Series, here we use A6 as an example.
I. Preparations
1.One DMP-A6 device
2.A fine needle (for pressing the restore button)
Friendly reminder: Wiping Both Cache and Data will erase all application data on DMP-A6. This method is only suitable if the player is unable to start normally.
Ⅱ. Operation Guide
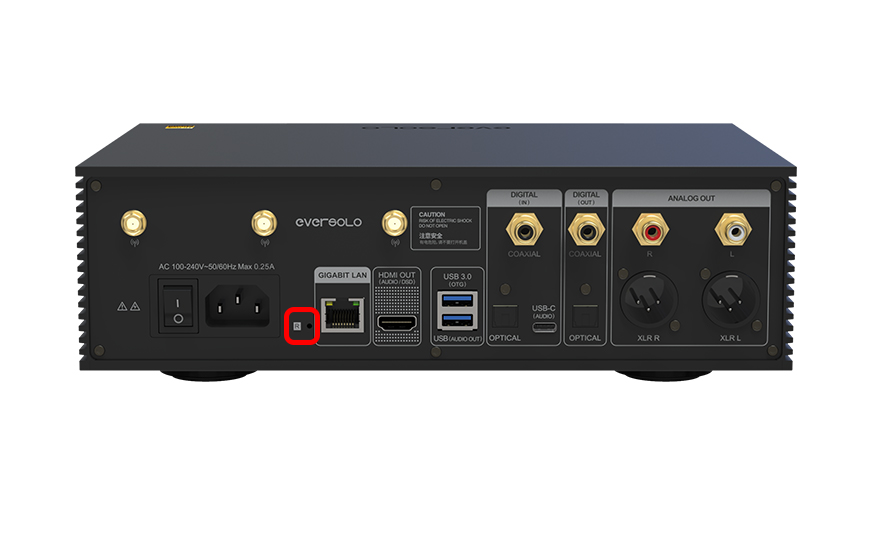
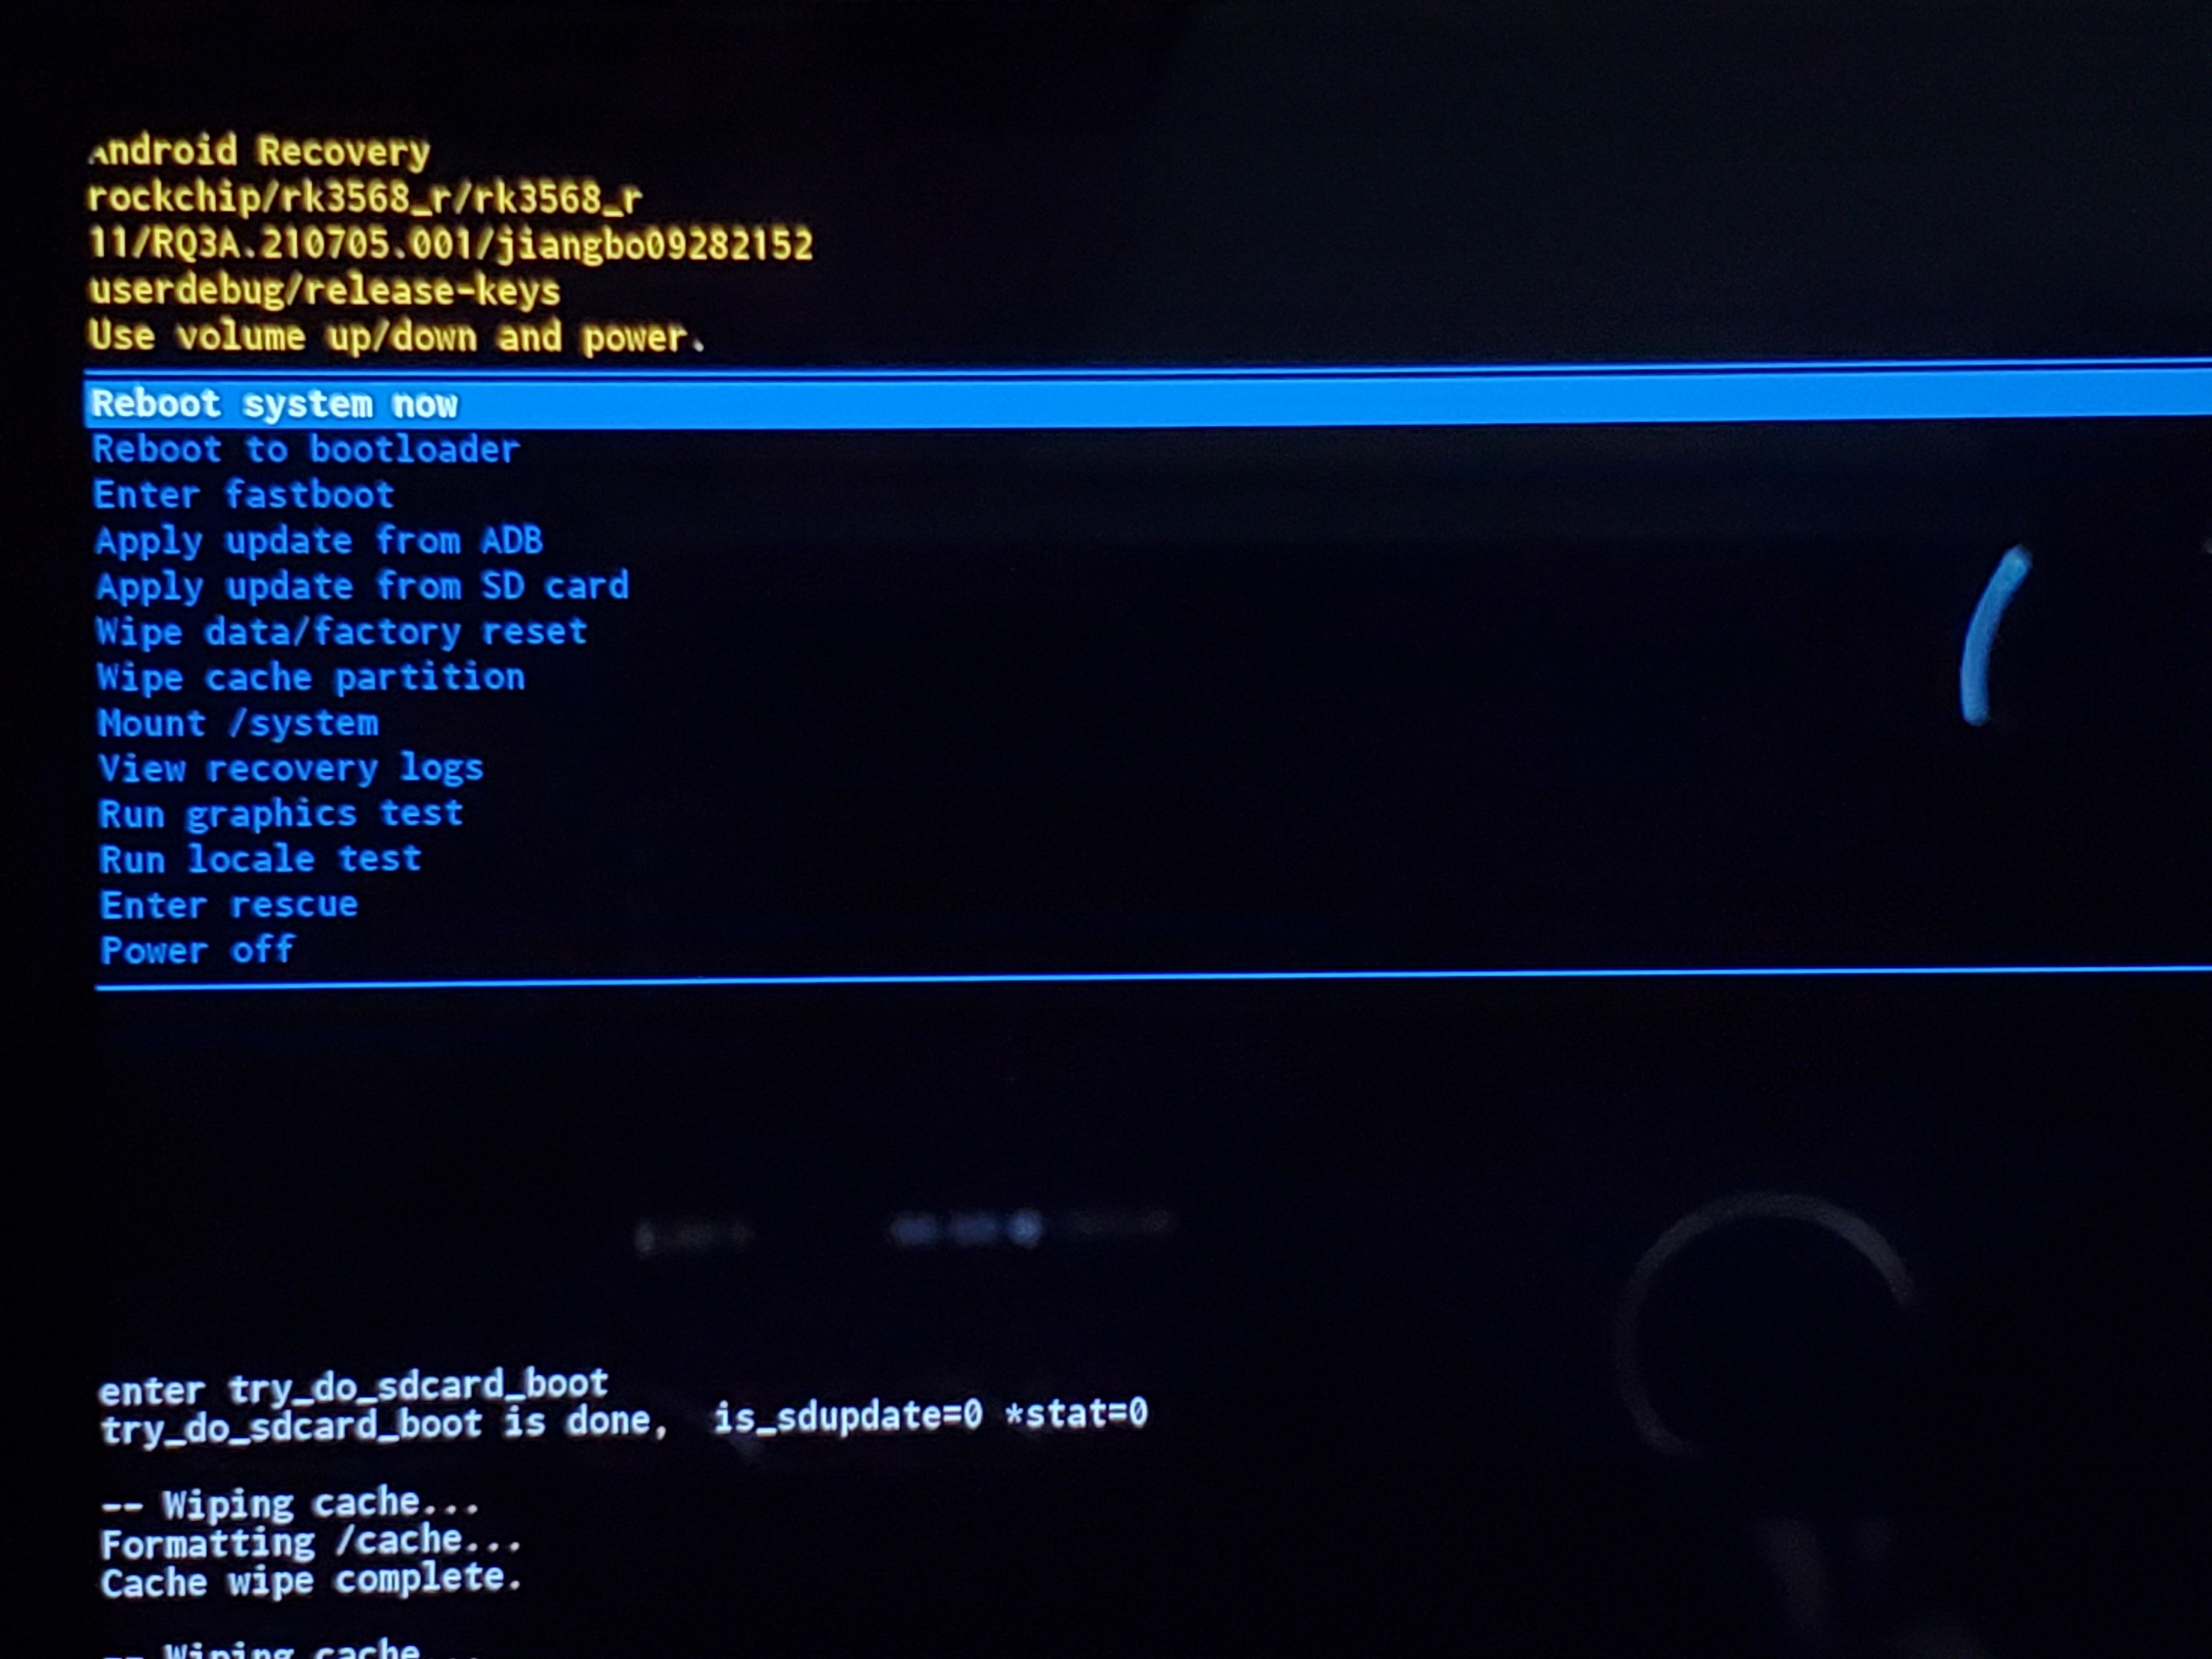
1.While DMP-A6 is in the power-off state, use a fine needle to press and hold the restore button at the back of the device, then press the knob on front panel to power on.
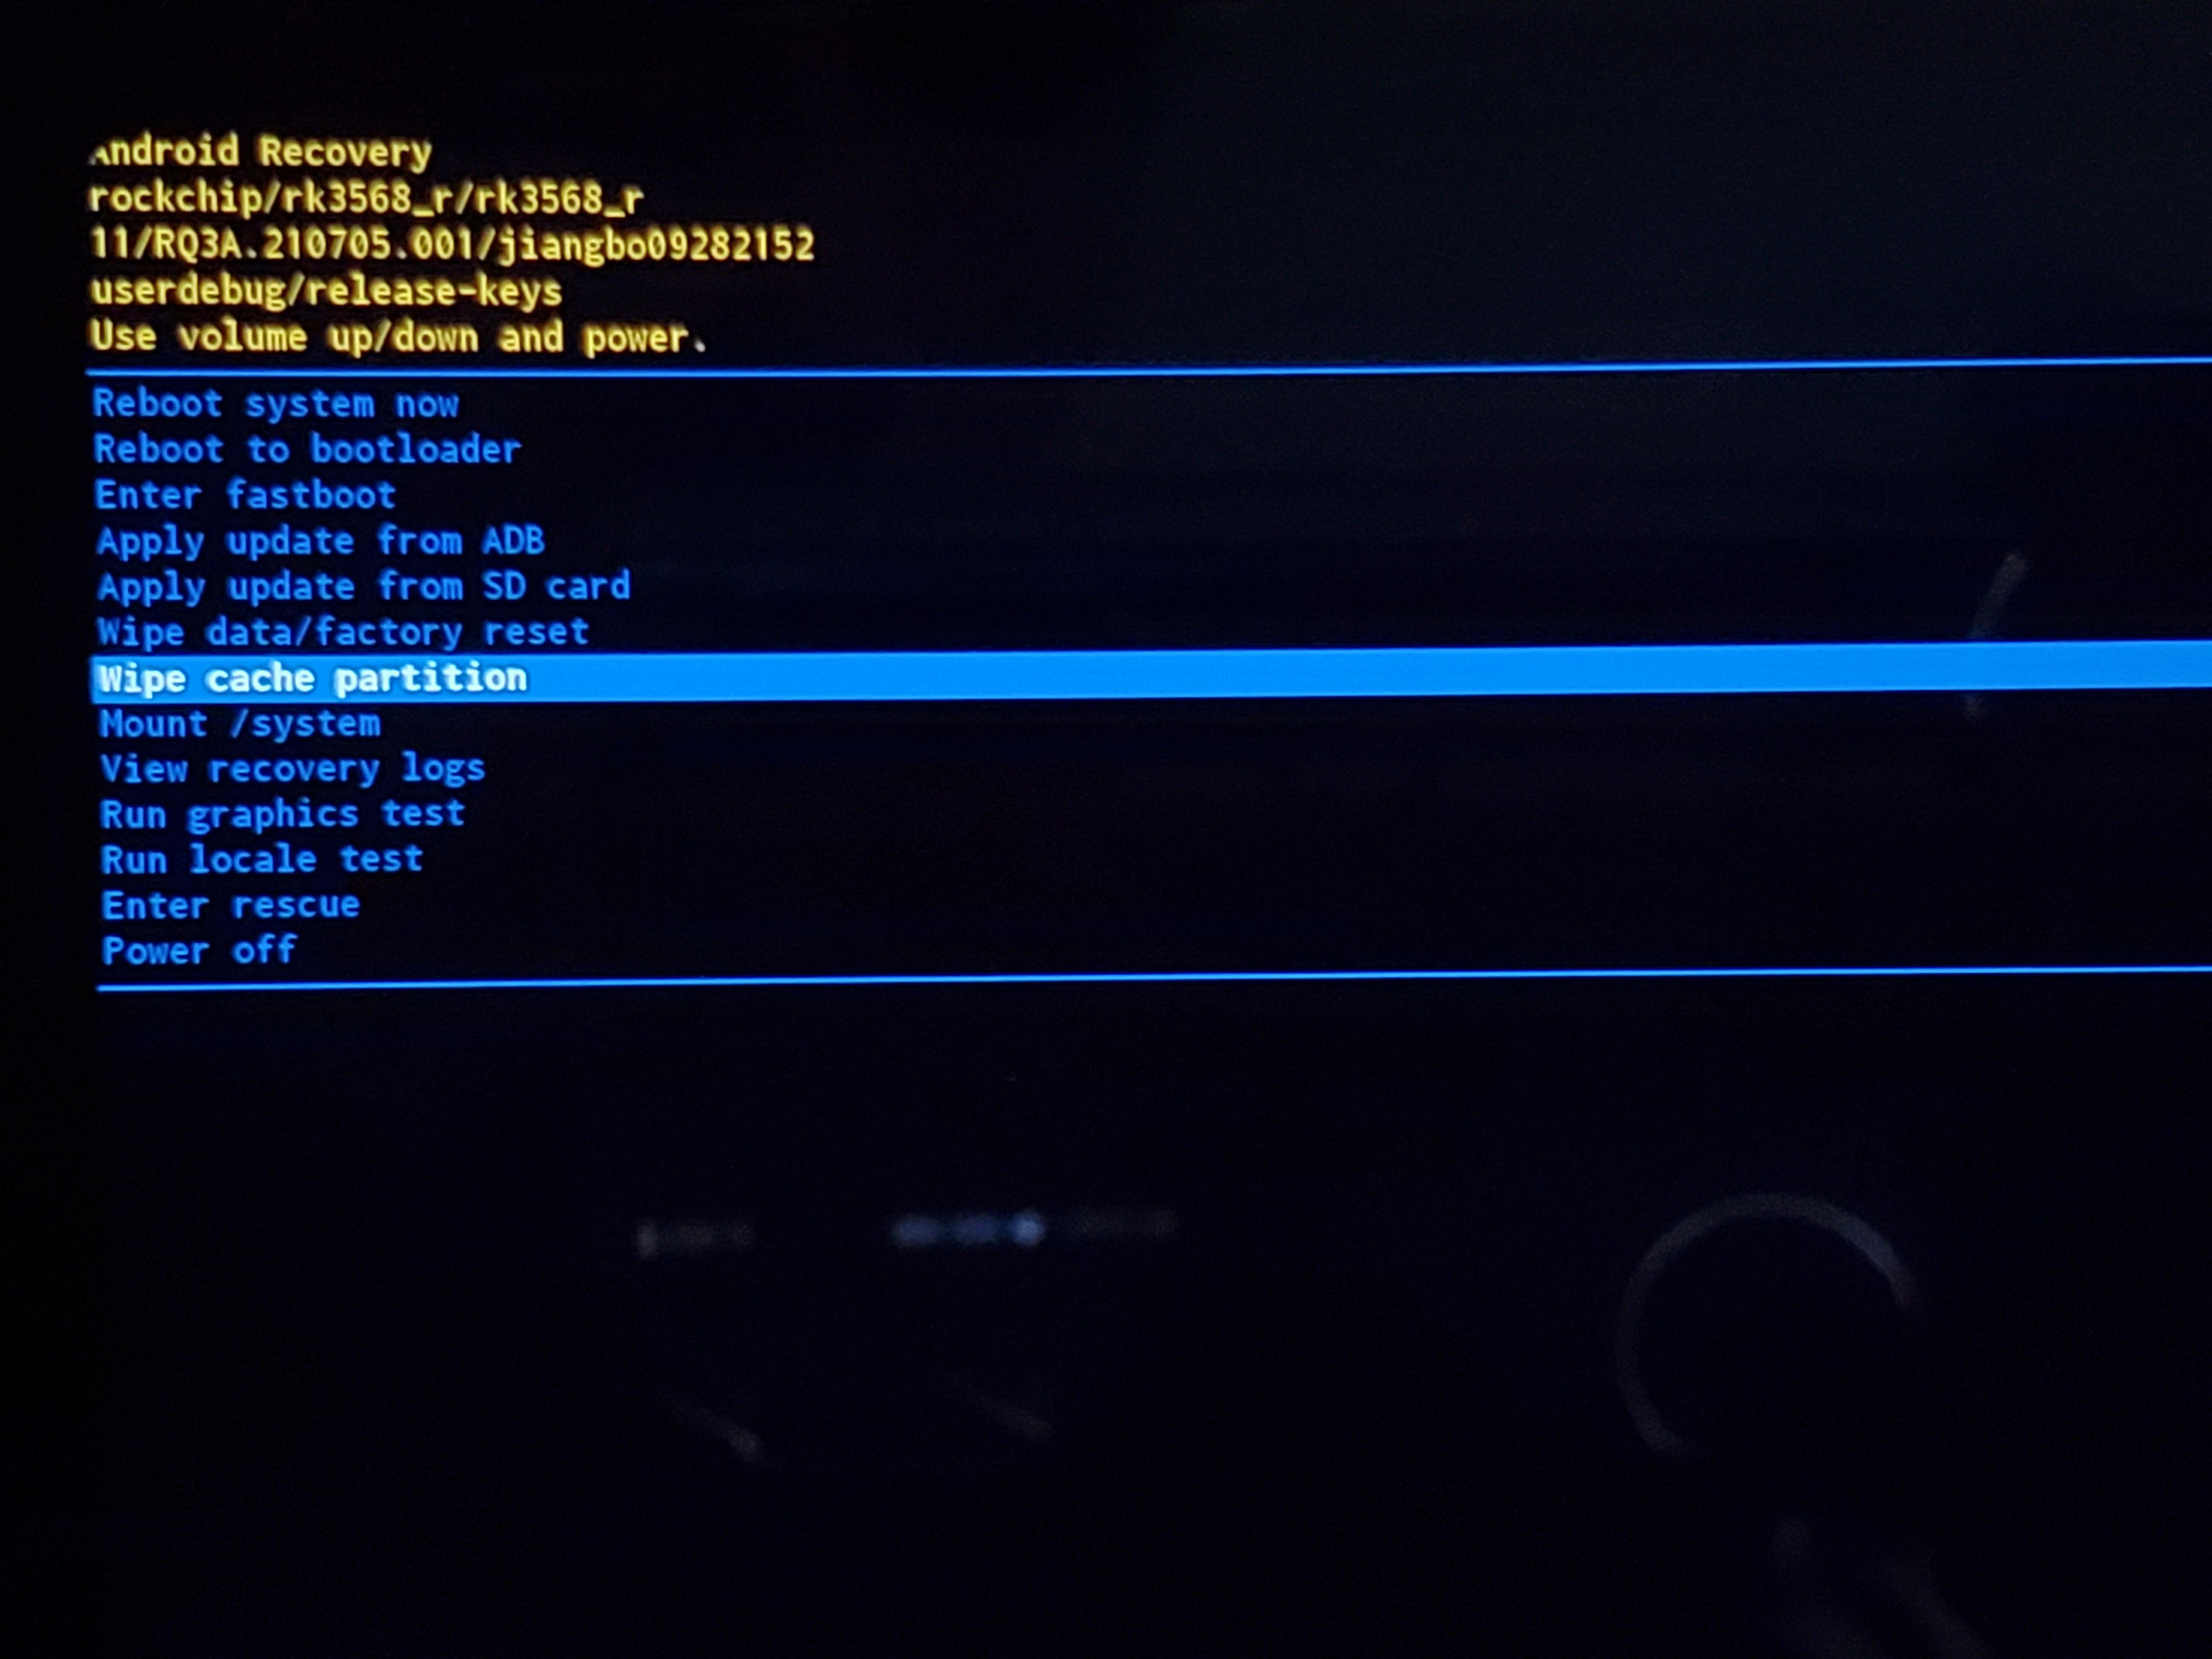
2.[As shown in the image below] Once the device enters Android Recovery mode upon startup, you can release the needle.
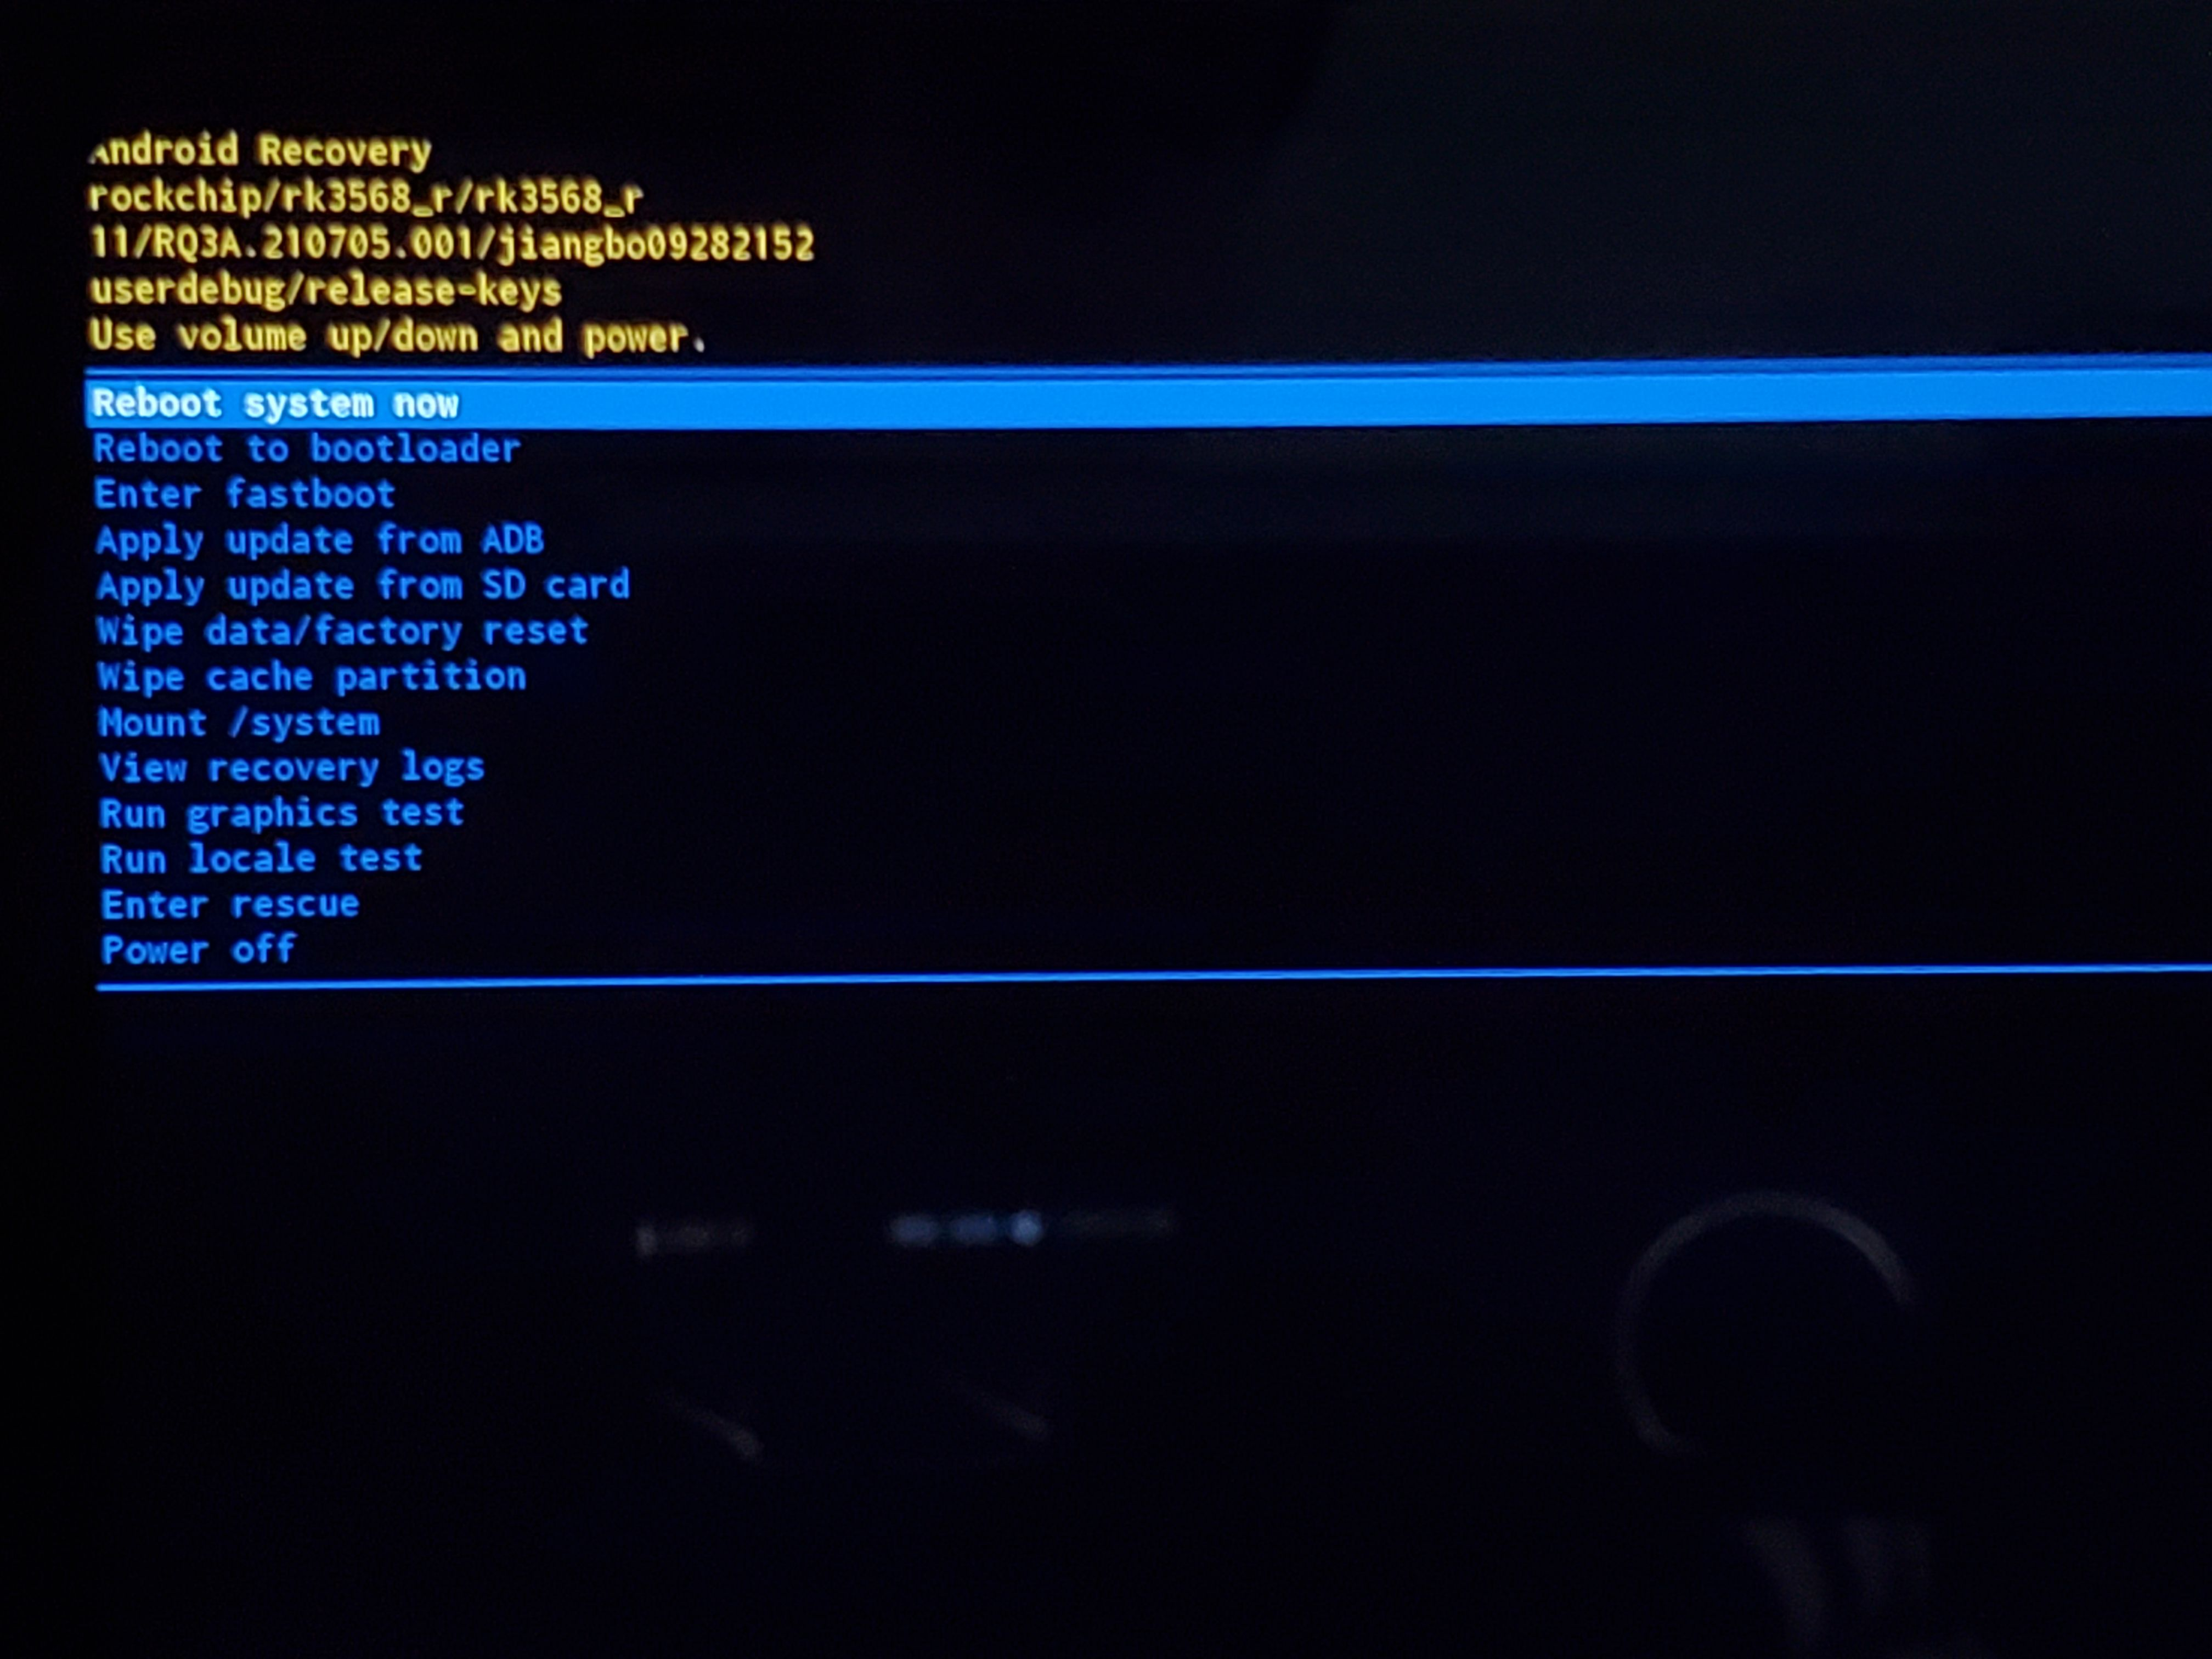
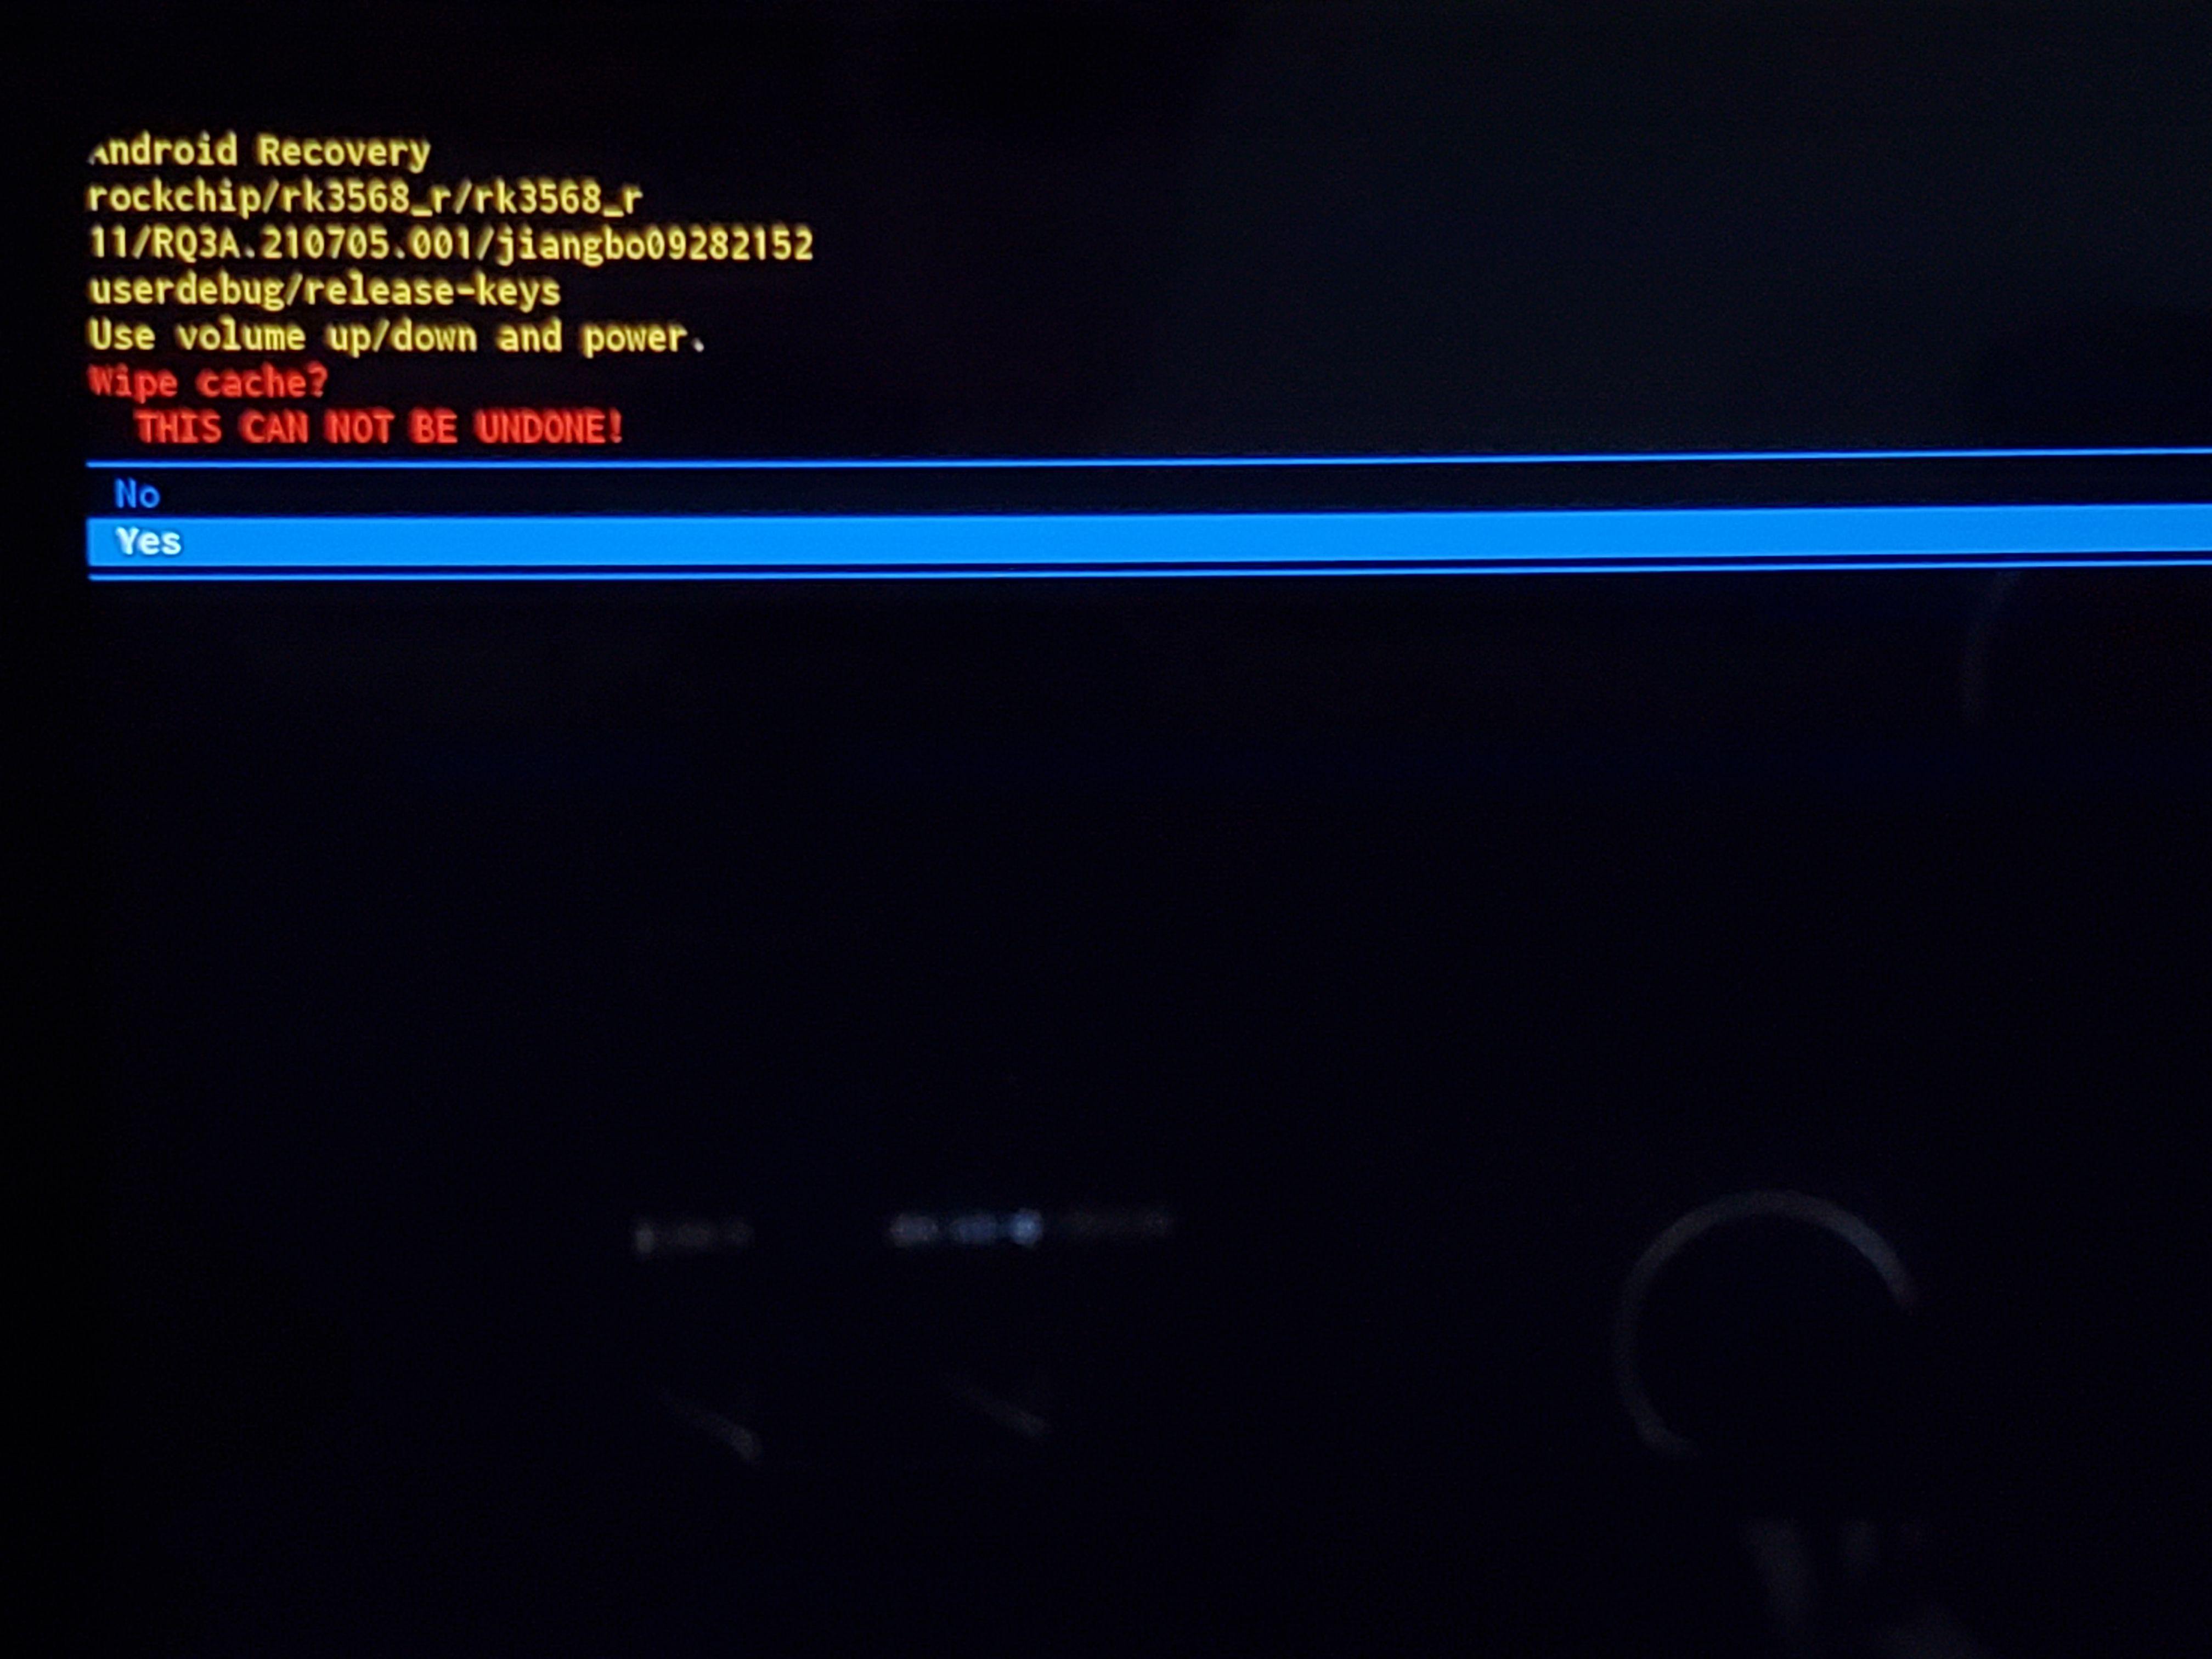
3. Move the cursor to the 'Wipe cache partition' option and select YES.
Friendly reminder: In Recovery mode, left and right rotation is for moving up and down, and pressing the button is for confirmation!
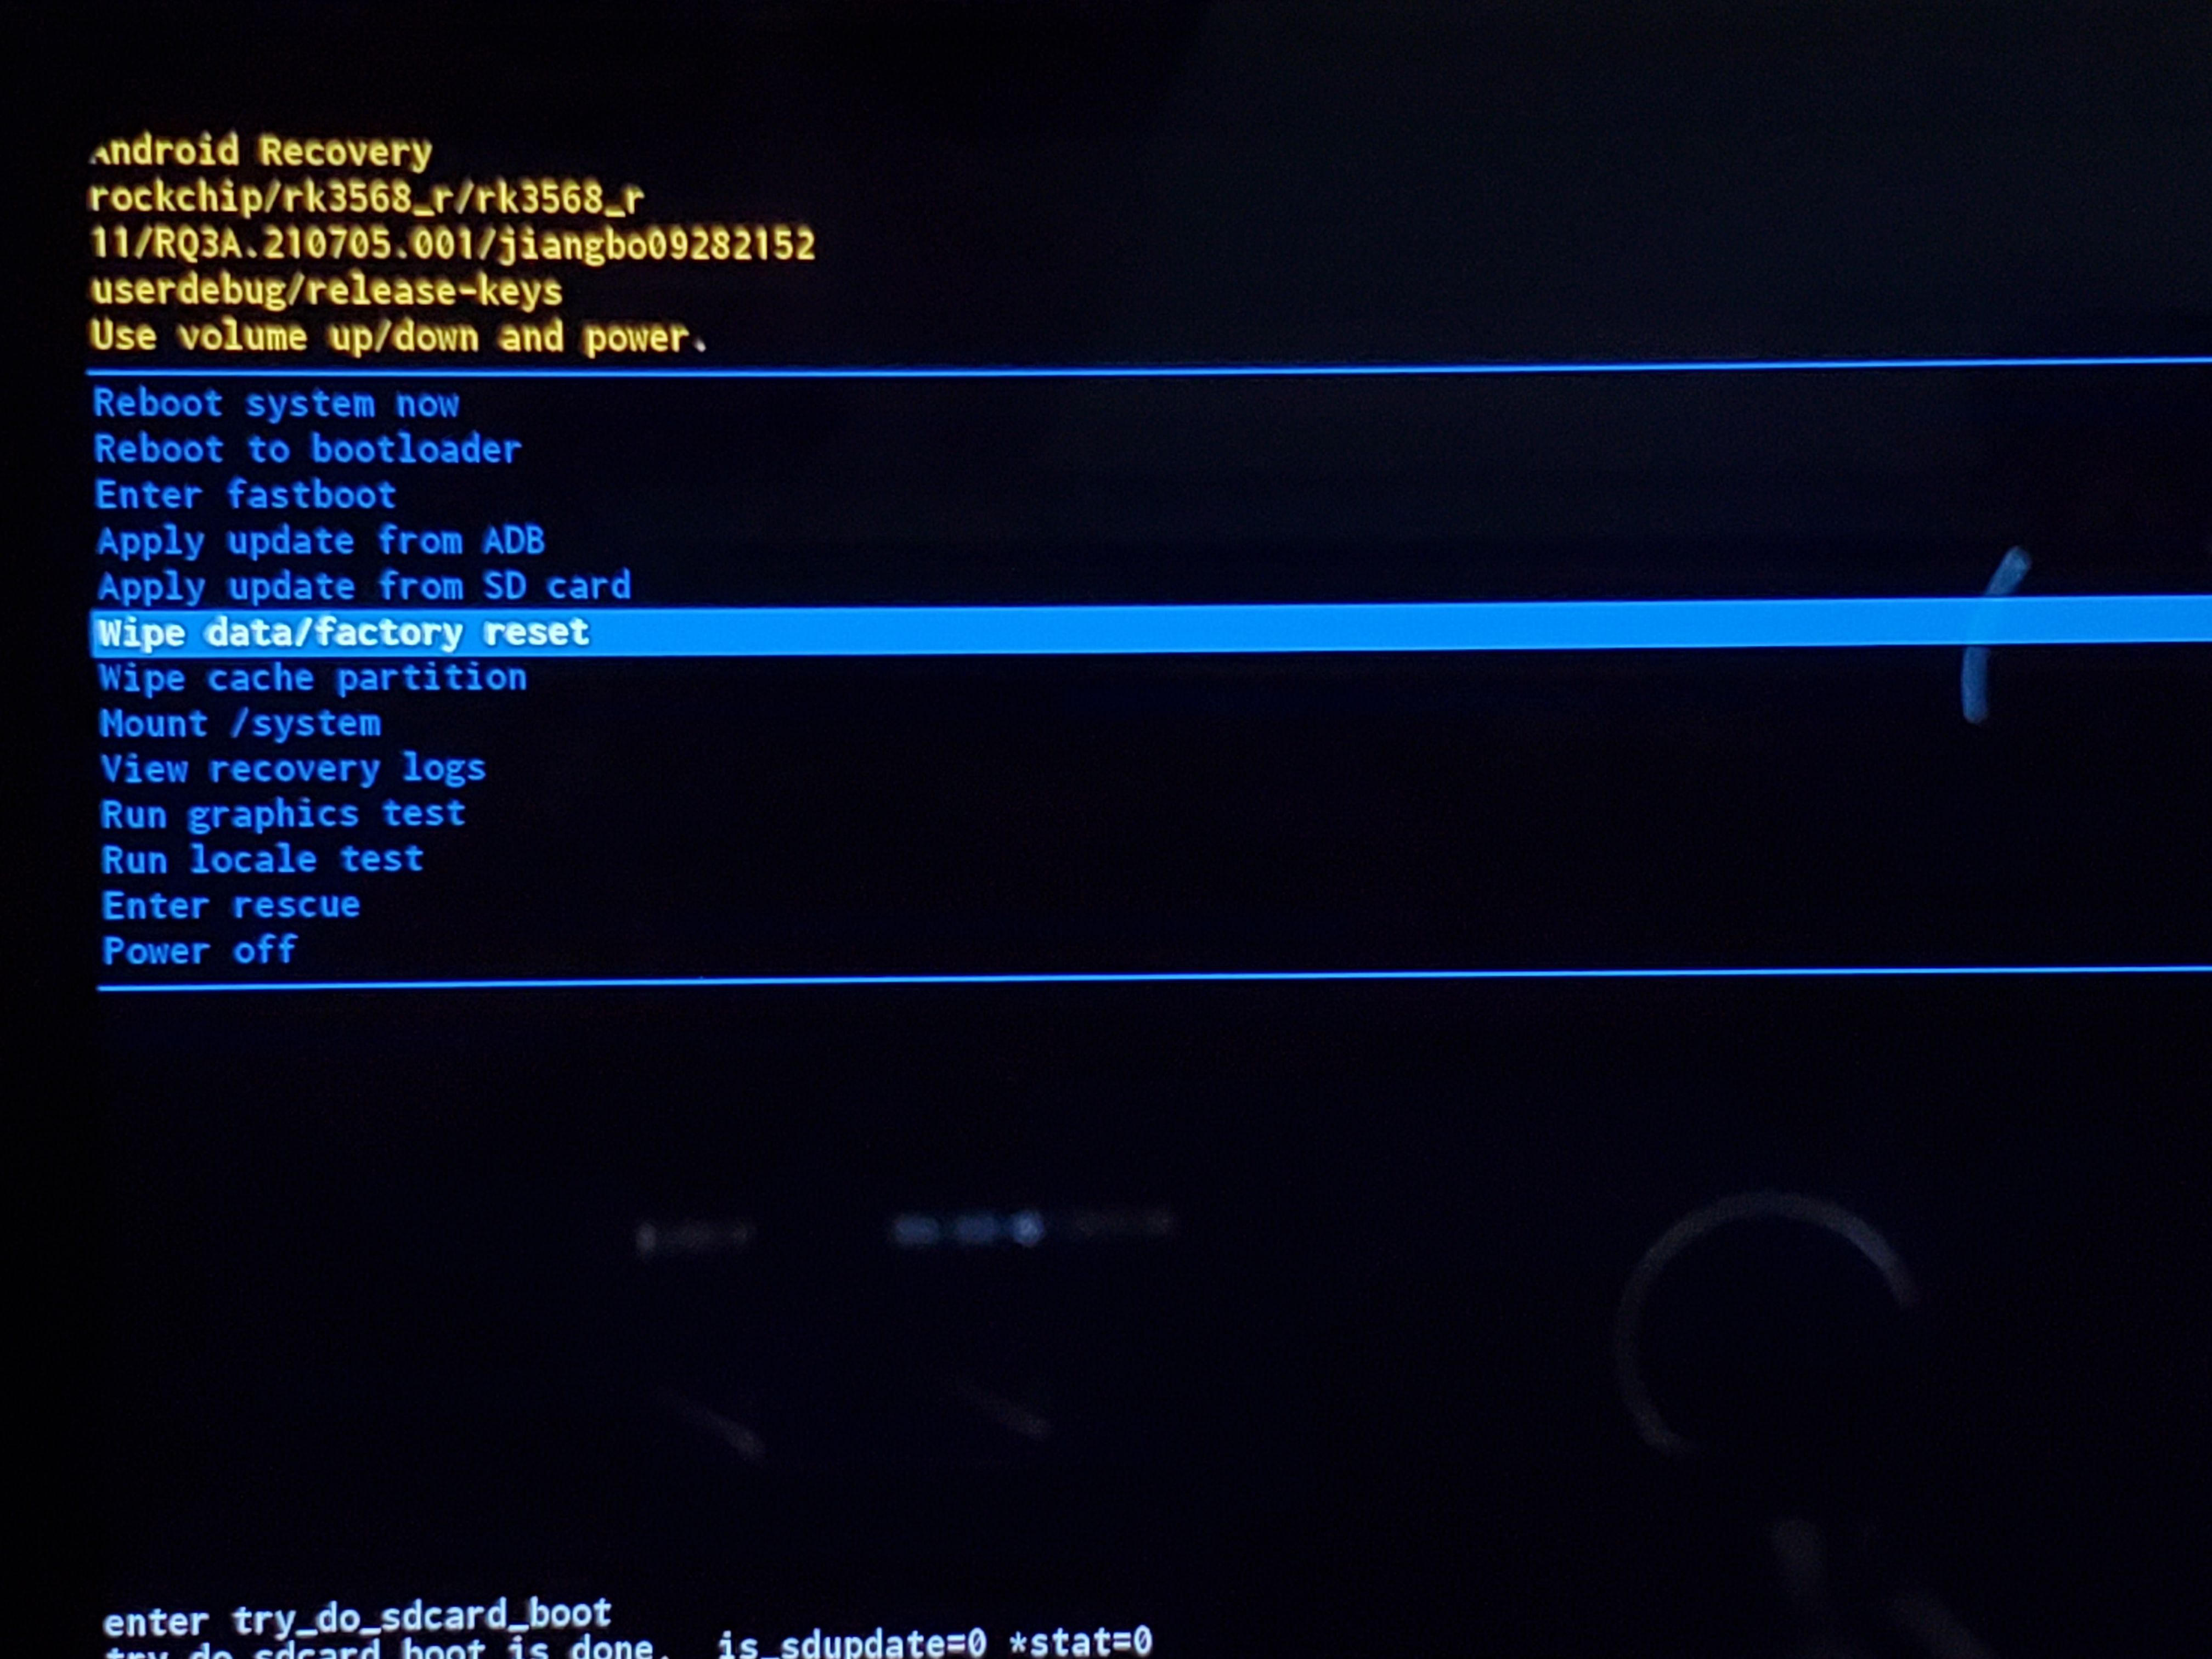
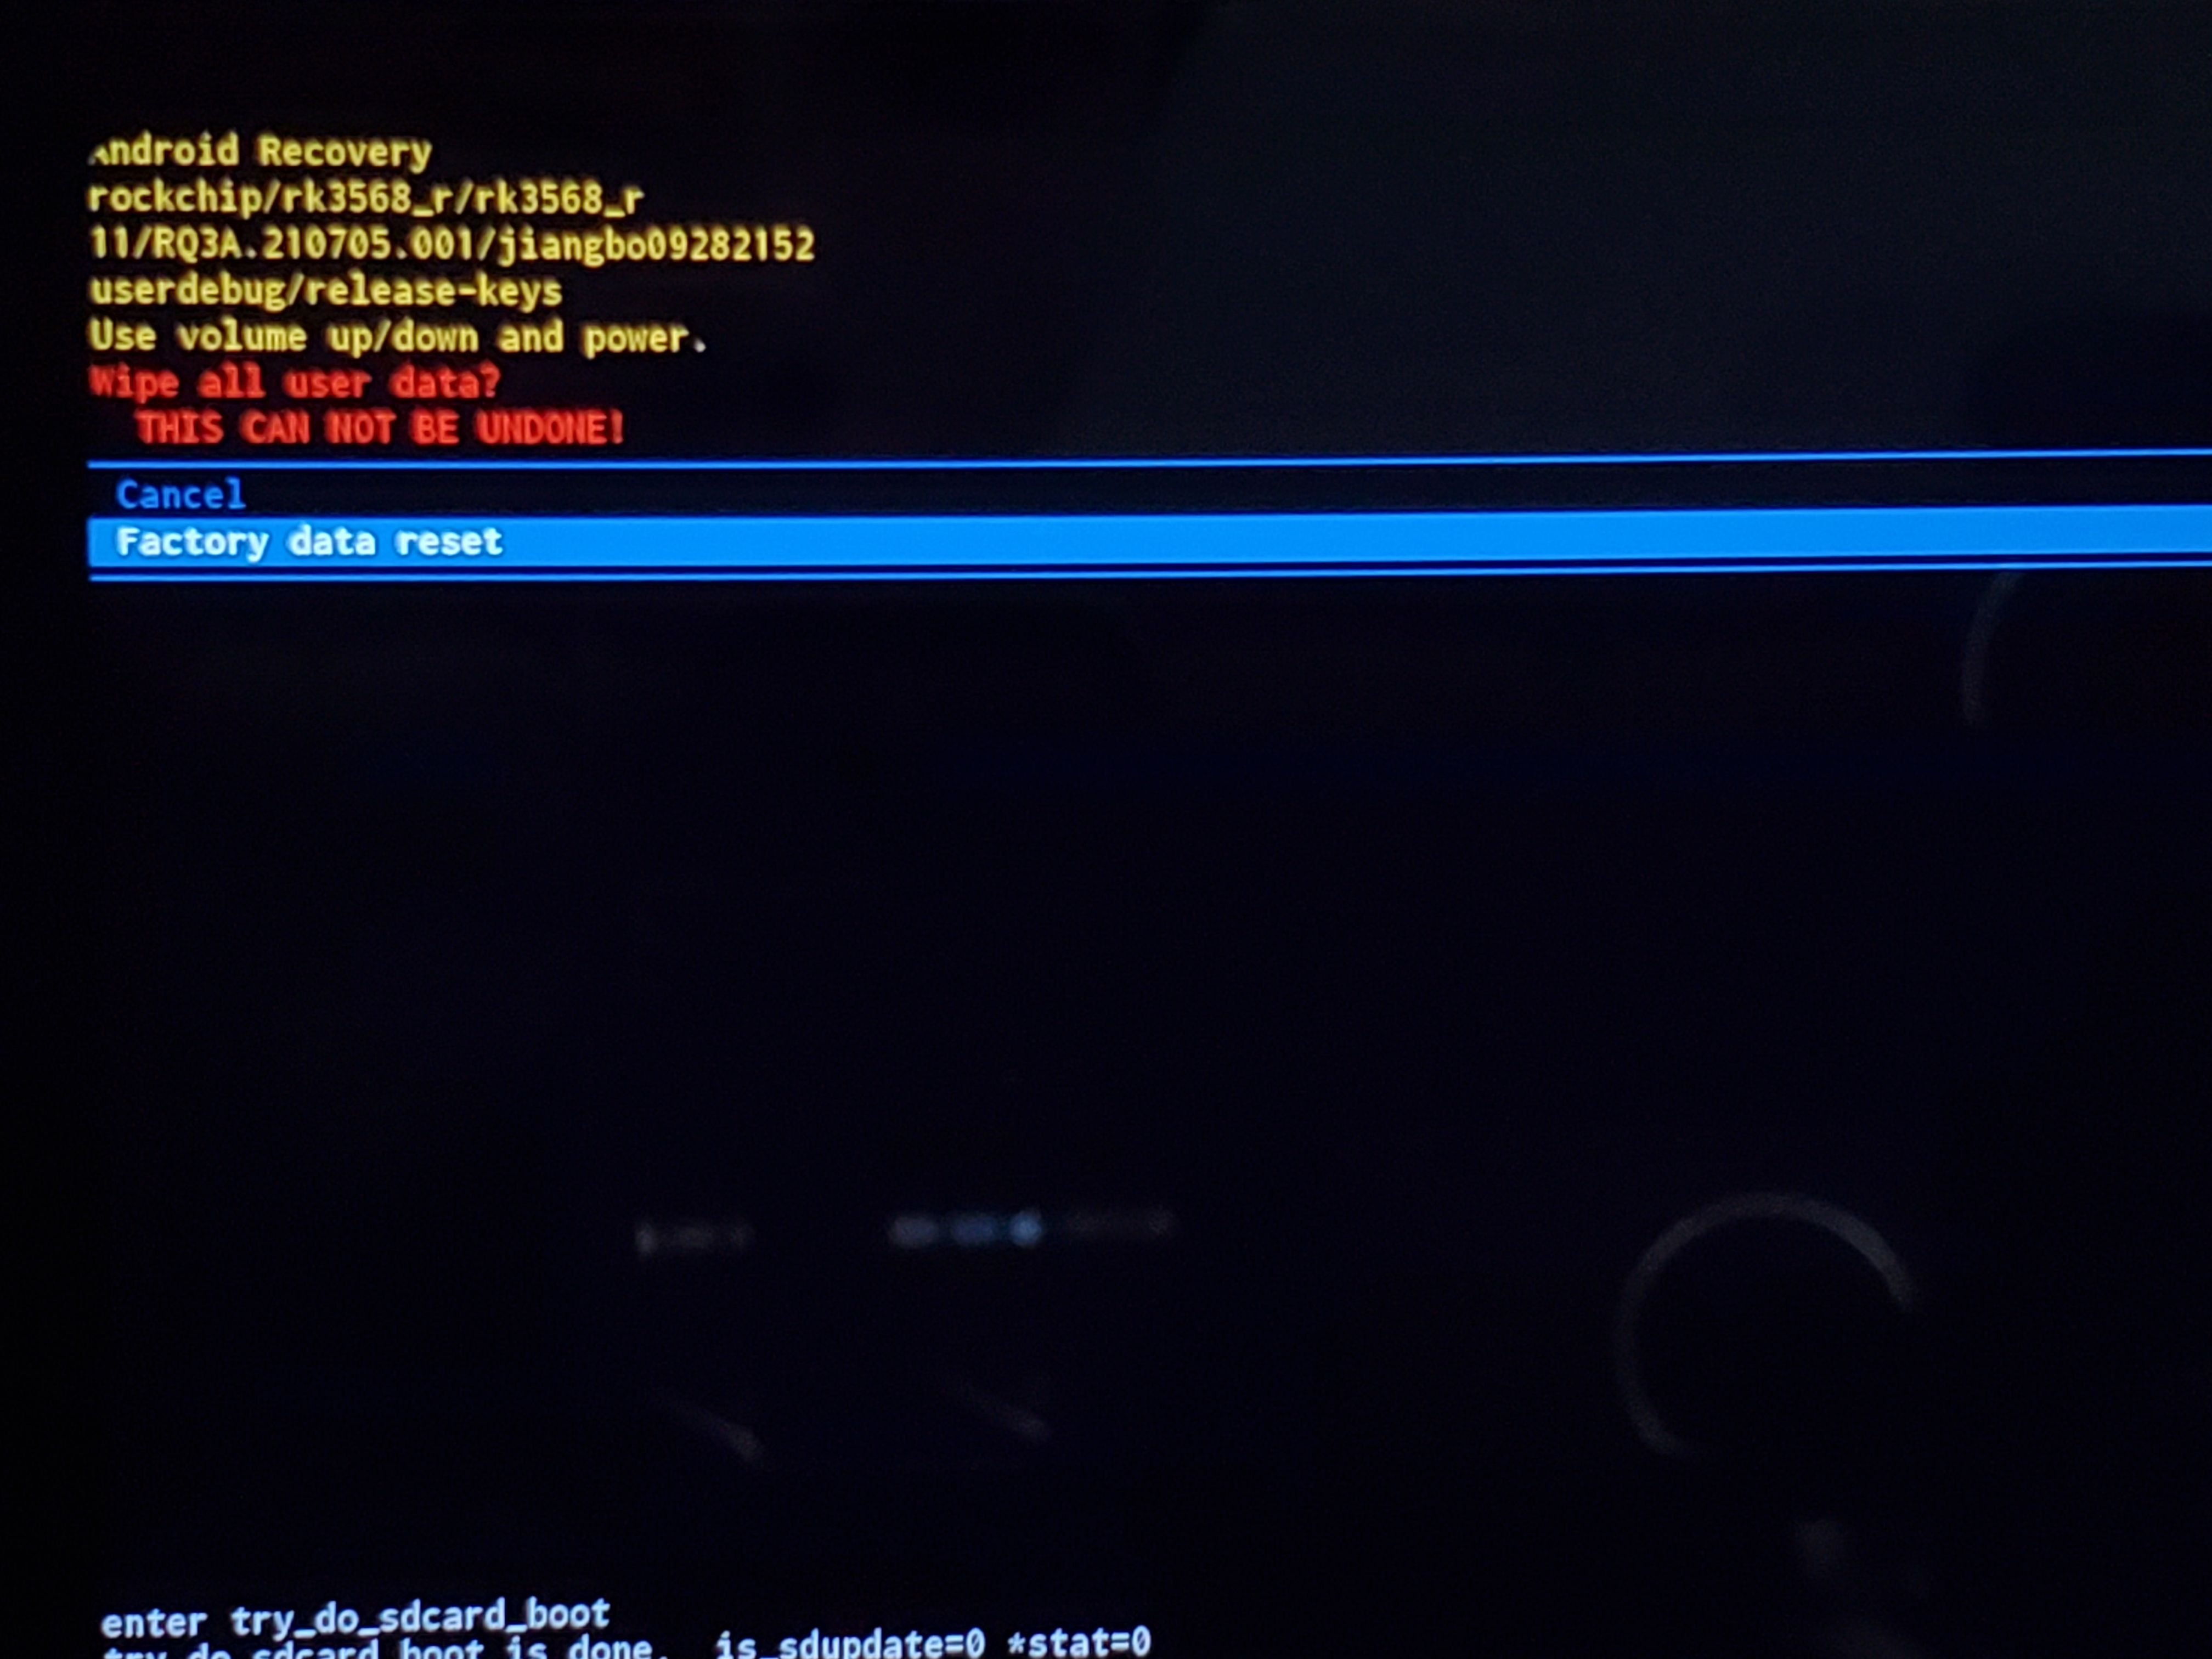
4. Move the cursor to the 'Wipe data/factory reset' option, and select 'Factory data reset.'
Friendly reminder: In Recovery mode, rotate the knob left or right to move up and down, and press the knob to confirm!
5. After completing wiping both cache and data, move the cursor and click on 'Reboot system now' to restart the player.
How to Flash Eversolo DAC-Z6/Z8
How to Flash Eversolo DAC-Z6/Z8
This tutorial is applicable to the Eversolo DAC-Z8/Z6.
I. Preparations
1. One DAC-Z8/Z6.
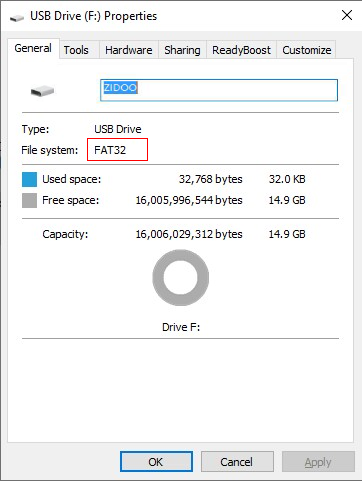
2. A USB flash drive formatted in FAT32.
3. A fine needle (to press and hold the restore button).
Friendly reminder: Regarding flashing, it is recommended to use a USB flash drive from a reputable manufacturer. Please avoid using a card reader + TF card combination!
II. Downloading the firmware for flashing
1. Please download the firmware package for flashing from the official website link.
Friendly reminder: The OTA upgrade package released by the official source can also be used as a flashing file.
-DAC-Z8
Download link:http://dev.eversolo.com/en/downloads/dac-z8
-DAC-Z6
Download link:http://dev.eversolo.com/en/downloads/dac-z6
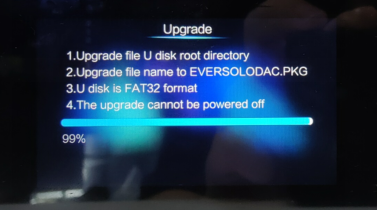
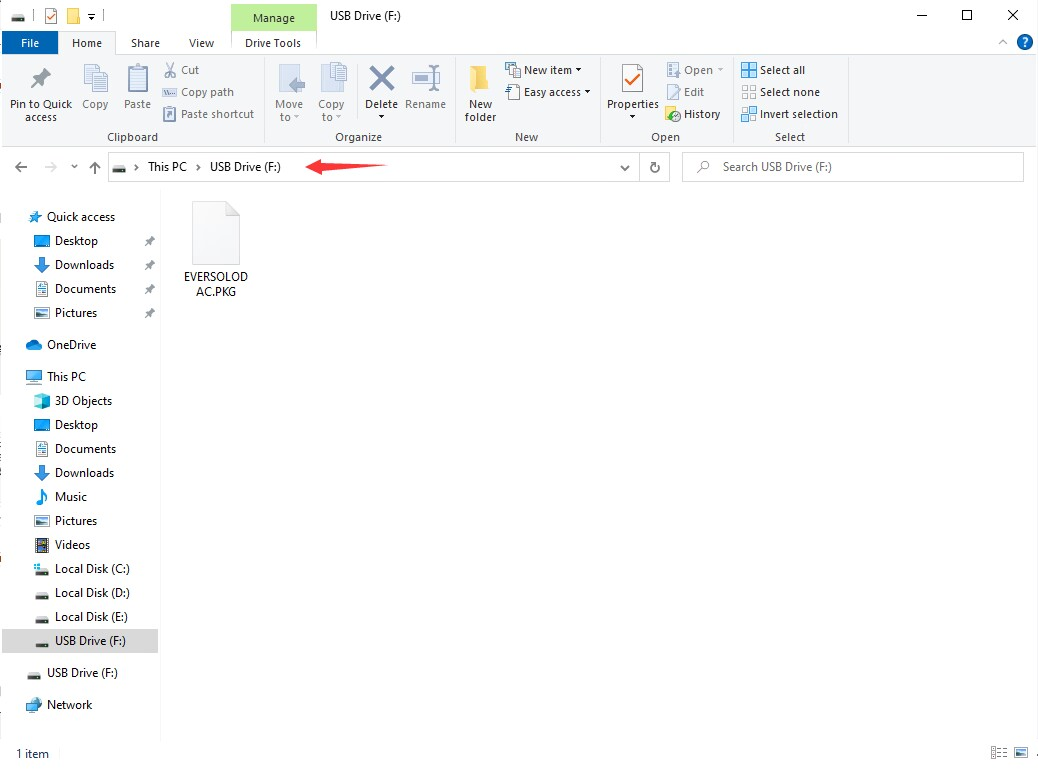
2. Use a computer to rename the downloaded firmware file to "EVERSOLODAC.PKG”.
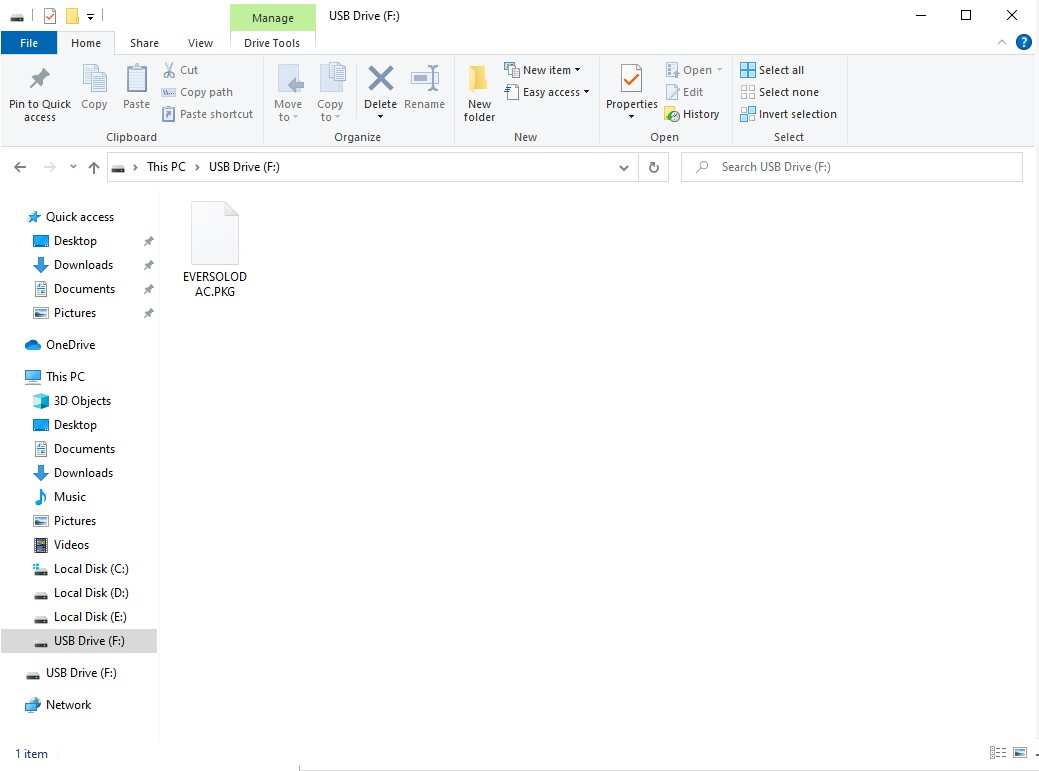
3. Then copy the firmware file to the root directory of the USB drive (i.e., open the USB drive's main directory).
III. Start flashing
1. [See the image below] Connect the USB flash drivecontaining the firmware files to the USB 3.0 port located at the rear of the decoder.

2. Keep the DAC decoder in power-off mode, press and hold the restore button located at the rear end using the prepared fine needle, and then power it on.

3. When the device is powered on, the Eversolo logo will be displayed. Then wait for 5 seconds before releasing the restore button. The decoder will enter the flash mode, and the front screen will display the following information. Please wait patiently.
Friendly reminder: Do not disconnect the power when the DAC decoder is in flash mode!!!

IV. Flashing Completed.
When the front screen displays the main interface, it indicates that the flashing process is complete.
How to Capture Logs on Eversolo Streamers
How to Capture Logs on Eversolo Streamers
Log Report
This function allows you to submit logs when the system encounters exceptions, application non-response (ANR), or when developers need to collect logs.
-Navigate to the "Settings" >"Log report" interface and click "Capture Logs".
-Use the device normally. If the system crashes or encounters exceptions under extreme conditions, return to this interface and click "Upload Logs".
-If the system can reboot normally, you may also restart the device first, then return to this interface to upload logs.
Eversolo Security Center
Eversolo Security Center
Security Breach Response
Eversolo attaches great importance to security issues, and we welcome security researchers to provide us with feedback on potential security issues to improve the security of our products and services.
Vulnerability Response and Disclosure Process
1. Recipient
Monitor and and assign received vulnerabilities in a timely manner.
2. Verification
Conduct technical verification of the effectiveness of vulnerabilities, confirming their exploitability and potential impact.
3. Solution Development
Provide effective fix solutions or risk remediations measures.
4. Affected Scope Confirmation
Investigate and confirm the complete scope of affected products.
5. Disclosure of Vulnerabilities
Review and publish security recommendations for the vulnerability after confirming the completion of all vulnerability response processes.
Vulnerability Submission
Please report any security vulnerability via email to: service@eversolo.com
The email should at least contain the following items:
- Organizational information and contact details;
- Affected products models, serial numbers/MAC, purchase date, where you purchased and firmware versions;
- Descriptions of the vulnerabilities;
- Exploitation methods of the vulnerabilities;
- Vulnerability disclosure plan;
- Other information (if any).
Attention
Although we encourage investigation of potential security breaches, we cannot tolerate any activity that may interfere with legitimate users or may violate applicable computer abuse, cyber security and data protection regulations. Therefore, the following activities are prohibited:
- Modification or destruction of data
- Service disruption or degradation, such as DoS
- Disclosure of personal, proprietary or financial information
Response Time
Upon receipt of the vulnerability you have submitted, we will send you a notification via email within 48 hours to commence the vulnerability response, along with confirmation and feedback on the nature of the vulnerability. The subsequent progress of the vulnerability will also be continuously updated in the email as soon as possible.
*Note: The actual vulnerability response time may vary depending on the risk level and complexity of the vulnerability.
Vulnerability Disclosure Instructions
When an external party discovers or is concerned about a potential vulnerability, but we have not yet fully confirmed it, we will disclose basic information about the vulnerability and our investigation via email.
The vulnerability information shall be kept confidential until Eversolo releases the formal security advisory to the public.
When the vulnerability has been confirmed to be fixed, new firmware will be released, and a firmware update change log will be published, containing a description of the vulnerabilities that have been solved.
Product Support Policy
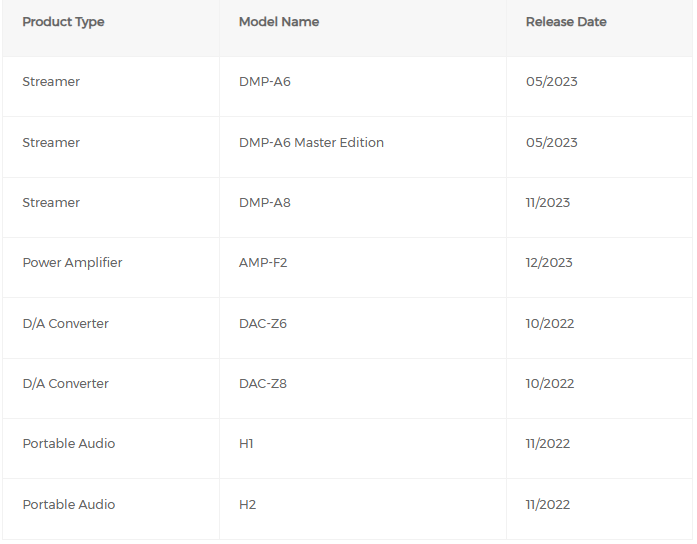
We strive to provide continuous security updates for our products. The security updates generally include the latest patches, vulnerability fixes, and other security improvements. We will generally maintain security updates for at least two years from the launch date of a product. However, the security update situation may vary by product, so please pay attention to our announcements. We will regularly publish and update information about the security of Eversolo products on this page to help you check your device's security updates.
Note: Security update policies and products are subject to change and will be reviewed on a regular basis.